|
|
|
|
|
|
|
|
|
|
|
|
| Resizing digital images | ||
|
|
Resizing images is easy, but it helps to know what you want to do with them afterward. Here are a few pointers to help you with your goals.
There are lots of reasons to resize the images that came out of your digital camera, or even your scanned film. For sharing through e-mail or a favorite photo gallery website, large images are simply wasting space and slowing down servers, which can even make them annoying (we're in an age of instant gratification, so don't keep people waiting for your excellent images!) Yet you want them large enough to show the detail you need, and free from artifacts and blocks or jaggies, so they appear nice and smooth. And for getting prints done, the images will want to be much larger in size to preserve the detail.
Workflow is important. If you think you're going to send the image to friends, put it on a website, and print it too, you'll want to work on the print first, because that's the one that will need the most detail, then you can switch to the smaller versions. Once you've removed data from a digital image by making it smaller, you can't add it back in later on, so work from biggest to smallest.
As with any digital editing, make sure you do not alter your original image, so you can always start over. If this means opening a copy, or opening an original but immediately saving it under a different filename, whatever. Just always be sure not to overwrite your original. My originals always sit in different folders from the print and web versions.
Also, clean your monitor before attempting any kind of exacting digital cleanup. Dust on your viewing surface resists any and all editing tricks ;-)
What to use. You will need a decent photo editing program, but there are so many offerings out there that having specific instructions for them all is impossible. Some of this you're liable to have to piece out on your own. Generally, you should have received something in the software included with your digital camera, and if you haven't installed that software, now is the time to do it. Among free, downloadable programs, GIMP is among the best, but be warned: it is intended for advanced use and can be a bit hard to get used to. Irfanview is a great basic editor, though, and also includes batch resizing, editing and renaming.
Know your end goal. Basically, if it's for any kind of computer usage, exceeding the resolution of someone's monitor means either scrolling to see the whole image, or the image getting resized by the user's e-mail program or web browser. But you won't want it too small, either. Monitor resolutions are expressed in pixels, same as images, but there's a lot of different options now (and these may even have changed by the time you read this.)
 Don't get confused with DPI.
DPI stands for "dots per inch" and is, technically, a home-printer
term. Because three, four, six or seventeen colors still won't reproduce
the wide range of colors available in even a 24-bit color image, home
printers have to layer in multiple ink specks to produce the color that
you want. For this reason, you cannot compare your printer's DPI
capabilities to your digital image's resolution, which is PPI, or
"pixels per inch" - that's how many actual digital "dots" can be found
in the finished product. Some editing programs use the terms
interchangeably, however.
Don't get confused with DPI.
DPI stands for "dots per inch" and is, technically, a home-printer
term. Because three, four, six or seventeen colors still won't reproduce
the wide range of colors available in even a 24-bit color image, home
printers have to layer in multiple ink specks to produce the color that
you want. For this reason, you cannot compare your printer's DPI
capabilities to your digital image's resolution, which is PPI, or
"pixels per inch" - that's how many actual digital "dots" can be found
in the finished product. Some editing programs use the terms
interchangeably, however.
Completely ignore DPI and PPI unless you are making a print. Since you are typically going to aim for a print of a certain size, this is the key parameter in your resizing efforts. My general rule, which has yet to be proven wrong: Your print resolution should be 300 pixels per inch. So if you're aiming for an 8 x 10 inch final print, your digital image file will be 2400 x 3000 pixels in size.
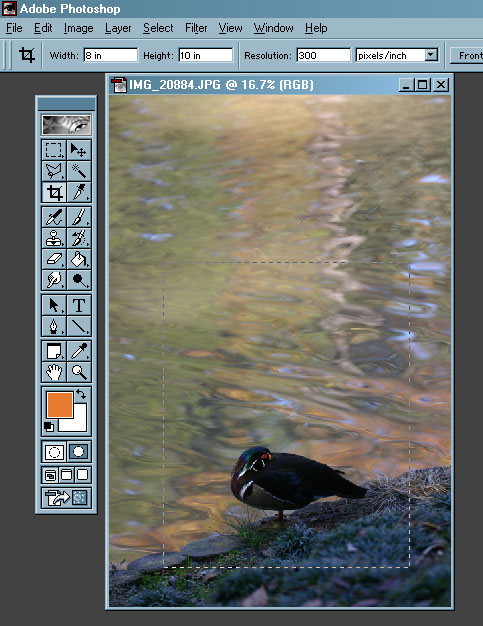
Some editing programs make this easy for you, allowing you to set a 'Crop' command to a specific goal. That way you can set a selection and easily see what the ratio of width to length will look like in the finished product – see the settings in the top bar in the example at right. You will usually want to do this first, but your web usage may not be cropped to the print ratios (8 x 10, 5 x 7, etc) that you're constrained to – you may want to display the image as a wide panoramic online, for instance. In such a case, do the color editing and cleanup first – in most other cases, doing the resize first may save some time and computer stress.
Clean your image. This means color-tweaking, touching out dust or noise, cropping, and so on. You'll want your image to look the same for your prints, your web usage, and what you e-mail to friends, so start here. Redoing this for each different use is a waste of time.
Make the print a wee bit bigger. Many places that print photos for you will overlap the edges of your image a little to ensure that gaps and such don't appear, even when you've been very good about sizing it properly. Also, if you put it into a frame, the frame or matt edges will overlap the print a little too. So don't put crucial details (like someone's face) very close to the edges, or they may not get printed, or covered by the frame. When cropping for a print, go just a little bit wider than what you want to see in the end.
Save each under a different filename. There's nothing more annoying than getting to the lab that does your prints and finding that the version you have on your flash drive is the web-sized version with low resolution. I save my prints with their intended print size at the beginning of the filename, such as "0812Woodduck.jpg" for an 8 x 12 inch print.
 E-mail and most web usage. Very simple – don't
exceed 1000 pixels in either dimension, and ignore all else (like width
in cm and resolution.) Common monitor resolutions are presently wider
than 1000 pixels, but your image will typically be sharing its space
with menus, program borders, page borders, and such. A maximum of 1000
pixels will typically keep the image large enough to show good detail,
but small enough not to hog resources or overload servers. You may have
circumstances to use exceptions, but overall this is what to aim for.
And yes, even though it might appear pretty good on screen, monitors are
usually far less detailed than prints. The image at right is 344 pixels
wide, by the way – the dimensions displayed in the box are for the image at top.
E-mail and most web usage. Very simple – don't
exceed 1000 pixels in either dimension, and ignore all else (like width
in cm and resolution.) Common monitor resolutions are presently wider
than 1000 pixels, but your image will typically be sharing its space
with menus, program borders, page borders, and such. A maximum of 1000
pixels will typically keep the image large enough to show good detail,
but small enough not to hog resources or overload servers. You may have
circumstances to use exceptions, but overall this is what to aim for.
And yes, even though it might appear pretty good on screen, monitors are
usually far less detailed than prints. The image at right is 344 pixels
wide, by the way – the dimensions displayed in the box are for the image at top.
Know site limitations. Some photo-sharing websites have limits on resolution or file size, so these are your guides in resizing. If you send an image too big or too small, the site software will be changing the resolution for you, and it may not do this as well as you do.
Constrain proportions. What this means is that, when you select a new dimension for the width, the length will adjust accordingly to keep the picture looking the same, so when you see this option in your editing program, always check it. You'll know what went wrong when you have an image that's 1000 pixels wide by 3680 high and looks rather squashed.
Don't get confused with monitor resolution and image size. Your editing program does not know what size monitor you bought or what screen resolution you set, so all it actually shows is pixel resolution. Let's say your monitor resolution is set to 1280 x 1024 pixels. When you resize your print image to 2400 x 3600 (an 8 x 10 print), and view it at a zoom setting of 100%, it's way bigger than the screen, even though your monitor is probably far bigger than 8 x 10 inches in size. This is normal – you print in much higher PPI than your monitor shows, so don't worry about it.
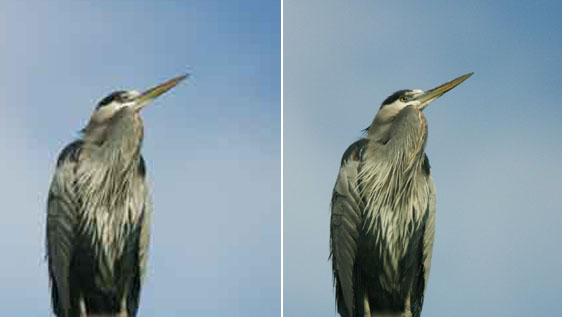 |
On the left, a slight zoom on a jpeg quality setting of 2 out of 12, 12 being the highest (no compression.) On the right, a setting of 8. |
JPEG compression. Believe it or not, I work almost exclusively in jpeg format, despite dire warnings about loss and artifacts and all that jazz. The reason is, I know what jpeg compression does, and don't use any compression whatsoever for prints, and minimal compression for web usage. But I still save a ton of space in the file size, and this makes web pages load faster and e-mail not get jammed or rejected.
For prints: No jpeg compression at all, maximum detail and file size. This will still be significantly smaller than TIFF or RAW formats.
For web or e-mail: I use settings about 2/3 to 3/4 maximum. This is usually enough to save a bit of space without introducing artifacts, or at least none that detract from the image. There is no reason whatsoever to reduce beyond the halfway mark, and plenty to avoid it.
A little tip: Finely detailed images can actually get by with a little more compression. What shows jpeg artifacts more distinctly are gradient areas, like large portions of sky where the color changes just a little from one side to the other. These are the images on which you do the least compression.
File size. For prints, whatever you end up with after following the above guidelines is fine, unless your lab or service demands something less (I have yet to run into such, but be warned that your upload time might be significant, if doing this online). For e-mail and web usage, anything over 1 Mb is too large. Resize it or use more compression.
If you're watching the image load in stages on the website, your file is way too large. Unless the server is very slow, your image should pop up pretty quickly. Webpages are funny – they will often specify the size an image appears in, regardless of the size it really is. But they still have to load the full-sized image, just to display it smaller. Do not use an image sized at 2400 x 3000 pixels and use the html tags to display it at 480 x 600 - that's just a huge waste of space and time. Resize it to display dimensions.
Upsampling. This means making an image bigger than its original file size. With most proper digital cameras anymore, this wouldn't ever be necessary, but perhaps you're making a bigger print from an older camera. You can get away with this to a certain extent (see here), but you cannot add detail that wasn't in the original image, despite what TV crime shows depict. You're trusting the software to guess what the detail should look like, and sometimes this produces decent results, and sometimes not. Don't expect great results, but occasionally you luck out.
Printing a picture taken with your phone. Don't. In fact, don't take pictures with your phone at all. You're better off fingerpainting.
Anyway, this should help give you some guidelines to use. Good luck!
 What's this? What's this? |
 |
