|
|
|
|
|
|
|
|
|
|
|
|
| Cold Weather Tips | ||
|
|
If you intend to head out and do some outdoor photography while the weather is cold, here are a handful of pointers to help make it go a bit smoother. This (and the hot weather counterpart) started as blog posts, but I figured they'd both be useful as regular pages. I added a few items as well
The first tip is obvious enough: dress appropriately. But “appropriate” for photography has some additional factors. You’ll want warm gloves, but the ability to operate camera controls too, so either a pair that gives good fingertip dexterity, or a second thinner pair to wear under the first, so you can whip the heavier gloves off to operate the camera yet still not be bare-handed. Your jacket should also provide two things: adequate coverage for walking, stooping, climbing, and dodging, for getting to those good vantage points and angles; and enough space inside to warm up the camera, lenses, film, and/or batteries when needed. If you’re the type to use a photography vest, you’ll want to have this on underneath your jacket, because it gives lots of pockets inside the warm and dry shell your jacket provides. For the jacket, I would recommend something with a nice nylon outer layer that won't absorb moisture, which will allow for repeated contact with snow and wet ground, but this needs to be tempered against the amount of rubbing and squeaking noise this can make — if you're trying to remain inconspicuous for stalking animals, such jackets are worse than cloth or leather.
If your style involves lots of different angles or closeup work, consider kneepads and/or a ground cover. I have used a small auto floor mat rolled up and tucked into a pocket or strapped to a tripod leg, easy enough to toss down on wet ground or snow when I need to be crawling around. Which reminds me: if you use a photo backpack, remember what you have to do when fetching more equipment, and if you'll need to set it down, know that the nylon shells of most aren't completely water-repellent. Either treat it with further protection, or use your ground pad to set the pack on. And for every kind of bag, once you return home, take all of your equipment out and allow the bags to dry thoroughly before repacking. The moisture can be retained in such bags for a long time, and this can get into equipment with very bad results.
Batteries operate efficiently only in a narrow range of temperatures, and getting cold means they drop off in power delivery drastically — don’t be alarmed, since this comes back when they’re warm again. You should have extra charged batteries anyway, no matter what the shooting conditions, but for cold weather, they should be held close to your body heat. Camera bodies are also not terribly temperature stable, and only a short period out in open air will drop their overall temperature down to rob batteries of power, and make the camera uncomfortable to hold, so the ability to get it inside your jacket can help. Decently padded camera bags will retain some warmth through insulation, but don’t be fooled; this is only as long as the camera remains warm. Once it gets cold, putting it inside the bag does nothing but keep it cold, and in fact, may make the situation worse as you hide the camera away from whatever warming affect the sunlight has. The camera will not produce its own heat to bundle around it, like our bodies do.
Having padded tripod legs provides a serious benefit now, as it gives you something to grab that is not metal that’s been sitting out in cold weather (which reminds me: tempting as it may be, leaving the tripod out in the car means you’ve pre-chilled it to painful levels when you need it.) Many tripods come with padding, and you can buy them from the manufacturers as well, but I just use pipe insulation. It’s cheap and easily replaced when it gets chewed up, and better padding and insulation anyway.
A hat with a good-sized brim helps with blowing snow, dripping melt water, and provides some protection against the low sun angles of wintertime. But it can also get in the way of operating the camera, so there’s a tradeoff. I still prefer my stiff brims as better protection, but it does mean I shove the hat up higher as I put my eye to the viewfinder. Also, cover your ears. A full-face ski-mask helps with exposed skin during wind-chill conditions, but the opening for mouth and nose can sometimes serve to hold warm, moist air against the camera as you compose your shot, fogging the viewfinder.
 Get in the habit of closing your camera bag at all times, since blowing snow and dripping water will get inside easily. Also have plastic bags or camera covers handy to keep it off the camera when you’re set up on the tripod and waiting for the right conditions, and a small towel is always a good thing to carry to dry things off (plus it’s rumored that Bugblatter Beasts are more active in colder weather.)
If your car is nearby, park it facing the sun if you can — this will provide the best greenhouse heating within the vehicle and may give you a warm haven for breaks. Setting the camera or batteries on the dash can help restore heat, and you can even start the car and set your wet gloves atop the engine to dry — just remember that they’re there and don’t set them on a dirty surface. And if you have a car charger for your batteries, all the better.
If you’ve been out for any length of time, your camera and lenses will have chilled down, which means taking special care when you enter a warm building. The cold surfaces will attract condensation and fog up seriously, so keep the camera in your bag and the lens caps on until everything warms up. If you need to shoot indoors quickly, pop everything into ziplock bags so they can absorb the heat quickly while not being exposed to humidity.
A curious little tip: think carefully about your shots before you venture ahead, especially when looking at that pristine snowfield — once you’ve dragged your tracks through it, you have a long wait before they’re invisible again. Staying to the edges of fields and treelines keeps the evidence of your presence less likely to be in the middle of your composition, as well as helping you stay hidden when the deer or fox appears in your view.
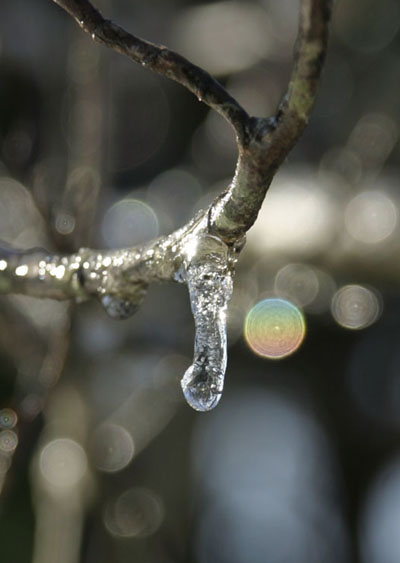
Sunny days, of course, provide the best conditions for winter shots, giving great color and bright snow, and the lower humidity of wintertime means the skies tend to be more deeply blue. You also have the opportunity to get nice color refraction effects from ice and snow, but be warned: even seeing these in the viewfinder is no guarantee that you’ll capture them in the image, since the closing of the aperture as the shutter opens might cut off the effect. Setting for maximum aperture, as seen in this shot, can help ensure that you catch it, as well as providing nice round ghosts instead of ones shaped like your aperture, hexagonal or octagonal. If you want to know more about this, I’ve explained the effects in detail on this page.
Getting a proper exposure in snowy conditions is tricky. Camera exposure meters are set for midtones, and will often take the bright white conditions of a snow-covered scene and underexpose it — see this page for a greater explanation. This means you will very likely have to add some exposure compensation to produce what you want to see, purposefully over-exposing the image from what the camera is programmed to produce. Sunny days may need as much as 2 to 3 stops overexposure, but never count on any one setting, and bracket your exposures to be confident that you got something that will work. Also note that ice and melt water will produce bright, specular reflections from sunlight and camera flashes, throwing the contrast very high and perhaps even inducing flare, so try to plan your images accordingly. In such conditions, sometimes it's better to have hazy light, or wait for the sun to go behind a cloud.
 Holiday lights are
a fun challenge — there are a lot of ways to take advantage of their
presence. Most especially, in the darkness you can produce nice circles
of diffuse color by keeping them out of focus with your aperture wide
open. The biggest challenge is having them arranged pleasantly in the
frame, which doesn't often occur in their typical usage — you may be
rearranging their positions as you go. Twilight is also a great time to
tackle them, when you have enough light from the sky for some color and
to illuminate the setting, but still have it appear to be darker. It
takes practice to get the exposure right, so experiment freely. A tripod is a must for these.
Holiday lights are
a fun challenge — there are a lot of ways to take advantage of their
presence. Most especially, in the darkness you can produce nice circles
of diffuse color by keeping them out of focus with your aperture wide
open. The biggest challenge is having them arranged pleasantly in the
frame, which doesn't often occur in their typical usage — you may be
rearranging their positions as you go. Twilight is also a great time to
tackle them, when you have enough light from the sky for some color and
to illuminate the setting, but still have it appear to be darker. It
takes practice to get the exposure right, so experiment freely. A tripod is a must for these.
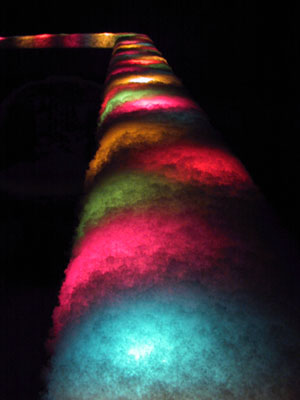
If you want to do something like the image at right, it's important to leave the lights off as the snow is falling, since the heat of the bulbs will melt little wells into the snow — this means you won't have very long to get such images after you turn them back on, as well. Again, exposure is tricky, so try lots of different approaches.
That should be a decent start. Good luck!
 What's this?