| Handling light for macro subjects | ||
|
This is an example of using a white box, an off-camera cord, and a soldering rig that holds a natural-looking plant (as a setting) and another leaf as a background. With the narrow field-of-view in macro work, you don't need much. |
This is a subject that's more involved than it first seems, and there are numerous properties to consider. I'm going to do my best to make it as clear as possible, but there's no way to make it simple.
Part one: The more that the lens magnifies, the shorter the depth-of-field becomes. Depth-of-field (DOF) is how far decent focus extends ahead of, and behind, the point where the lens is focused. With macro photography, DOF can drop down so low that the eyes of an insect subject may be sharp while the wings are not. With very high magnification, DOF may be measured in millimeters, or less. (The same trait applies to telephoto photography as well, just not to such an extreme.)
So to increase the useful DOF, you close down the aperture as far as is useful — this often means f16 or f22. Notice that I said, "useful" rather than, "as far as it can go," because diffraction can start to soften the image at very small apertures (see here for more detail.)
Of course, this small aperture means very little light is being admitted. The solution is to either get more light onto the subject, which often means a strobe, or leave the shutter open longer to compensate. That brings us to...
Part two: With high magnification, camera shake and subject motion can easily blur the image. A tripod is certainly recommended for macro work, but there are some difficulties with using one all the time. They greatly limit the ability to change shooting position easily, and for many macro subjects, placing a tripod can be exceptionally difficult; the conditions may not allow it, or placing the legs may disturb the foliage that your subject rests upon. And sometimes, the angle required for the best view is difficult to get a tripod to accommodate. Plus, a tripod does absolutely nothing to prevent your subject from moving around, which it may do on its own (insects are notoriously stubborn about taking directions) or which may be caused by even slight breezes.
Doing without a tripod, however, means that camera shake is a significant possibility. When sharp focus is in that millimeters range (even with a very small aperture, in many cases,) this means that even tiny movements will affect the image. Going for a longer shutter speed to compensate for a small aperture virtually guarantees that the results will not be useful, and in fact, anything below 1/60 second can probably be thrown out without even viewing it (I usually don't shoot below 1/200 second.) In rare circumstances you can get away with pushing these parameters, but not often, and not dependably. So, we go with the other option, which is getting more light on the subject.
Part three: Working with strobes. Problem solved, right? Of course not — there's still a lot more page down below ;-). Strobes can accomplish a lot, but they have their own issues. Their standard position atop the hot shoe of the camera means they cannot often throw light onto a subject too close to the lens, and for very close subjects, the lens barrel will block the light from the subject. There are various solutions to this, some simple, some not so.
Simple is an off-camera shoe-cord, or flash synchronization cord. This lets the strobe be moved to a position a short ways from the camera while still communicating with the automatic exposure functions. These are often more expensive than they really should be, but aftermarket brands can be found too, which can drop the price considerably over the manufacturer's models. With such a cord, the strobe can be placed on a bracket or stand, or even held with a free hand.
 Even
older, manual strobes can be used, especially those with variable power
— it's not hard to convert a hot shoe to the old standard of PC sync
pins. This may require calculating manual exposure and doing some
experiments, but this isn't too involved (I do this constantly.)
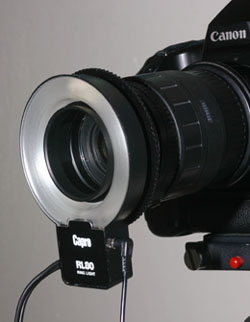
More involved are the various ring and macro flash units available. These put the light source right down alongside the front of the lens, making them as direct as possible. These can work well for very close subjects or very narrow fields of view (dentists use these to photograph inside patients' mouths,) but they have their own properties. The first is, they're typically expensive — manufacturers figure that those who do this kind of work are willing to spend a lot, which makes me outside of their demographic I suppose. Another issue is how boring direct light can be, producing flat results and often eliminating any shadows or gradients that give depth and shape to your subjects. And if your subject, or portion thereof, is reflective (such as eyes,) the ring shape of the flash tube can occasionally produce quite obvious reflections. Some units use two flash heads that can be placed and fired independently, which helps to some extent.
 |
| Lumiquest BigBounce diffuser. It's normally meant to be used fully upright, not at 45° as seen here, but this position throws light onto close subjects. I've added a strap to stabilize it at this angle. |
But here's the biggest issue with most strobes: They're often spotlights. They produce a lot of light from one direction, which makes dark shadows and very bright, specular highlights, traits that frequently don't make for good images. With subjects that are shiny and dark, you may have no detail whatsoever, just bright reflections among dark outlines. Direct light, even from an oblique angle, can be difficult to work with.
Enter the diffuser. The idea behind a diffuser, or 'softbox,' is to allow the illumination to come from a broader area, as well as reducing the concentration of light from the source. It can give the most convincing appearance of natural light, mimicking scatter throughout the atmosphere, and can sometimes throw some light into the shadowed areas of a subject, though usually not much. There are two shortfalls of diffusers, however. The first is that it reduces the light output, which is often not significant, but can make a difference in strobes with lower output (and it will run batteries down faster.) The second is, the best diffusers are bulky; spreading the light wide enough for good coverage takes a wide diffusing panel, and this can be challenging to use on any kind of handheld rig. I know enough of my subjects aren't cooperative enough to sit on the topmost leaves right out in the open to accommodate the softbox overhead.
 |
Taken in broad daylight, 1/200 second, f22, ISO100, direct flash |
Why does it look like my images are taken at night? Okay, here's the nature of lighting, which applies to macro lighting in spades. Light drops off from the source by inverse-square ratios. Given a certain light level at any specific distance, the light will drop to 1/4 as strong when the distance has doubled; at four times the distance, it is 1/16th as strong. At typical macro distances, you may be working within 20 cm, so even leaves in the near background can be receiving much less light than your subject. Coupled with the small aperture and the fast shutter speed, the natural light is not enough to produce a good exposure from the background, even with bright daylight.
Four solutions. You might use any of these depending on the circumstances:
1. Slow the shutter speed, or open the aperture. When you can get away with it, this provides the most natural-looking results in many circumstances, but as we've already seen above, your ability to use this technique is usually limited. See here for an example image using mixed light and 1/100 second shutter speed.
2. Get a closer background. This can be as simple as placing an appropriate leaf close behind your macro subject, provided you can do this without disturbing it. A leaf 10 cm away is much better than one a meter away. An added bonus is that you can be selective over background color, and use something that nicely sets off your subject. Believe it or not, I've anchored some in place with spiderweb (stuff I gathered, not that I produced on my own.)
3. Work with a secondary light source. I have very rarely used this in the field, since it's awkward to arrange, but some photographers do this routinely and it can produce excellent results if your setting is photogenic. Essentially, you need a light source to illuminate the background separately from the camera strobe, whether it's triggered as a slave (detects the light from the camera strobe and fires automatically,) by sync cord, or by radio transmitter. Setting proper light levels can take some time, especially without a light meter. The unit will usually require its own stand, power source, and perhaps even diffuser, and will need to be readjusted if your shooting angle changes too much. This is where an assistant comes in handy, though how many of us can even convince someone to tag along, much less play stagehand? But if you know someone who also pursues macro photography, perhaps you can take turns.
4. Create your own setting. Ah, this one can solve many different issues! Let's look at studio macro.
Yes, this means captive subjects. A lot of people don't like the idea, and aim to use strictly natural settings and undisturbed subjects. This is personal choice and may be dependent on end usage, but don't rule out the studio shoot just because of some arbitrary standard.
 Given
a flightless, semi-docile subject (which of course applies to inanimate
ones,) an indoor studio shoot presents lots of advantages. You can
easily use AC powered lights, and set up multiple lights at any angle that suits you. You're out of horrendous weather, and most especially away from the breezes that always spring up just when you go in close to your subject. You can even use a tripod, and move your subject to produce better angles.
You don't need much. Since you're working close, your field of view is tiny, and often all you need as a main setting is a branch, leaf, or small tray of ground litter. There are various rigs available for hobbyists and people who assemble electronics, consisting of movable arms and a few alligator clamps; these are great for holding a branch or leaf. With slightly more active subjects that may run down the branch, arm, base, and tabletop, putting your setting into a small cup filled with water can prevent escapes and limit the distance they can get away from your camera. I've even floated leaves on water to restrict escapes.
A leaf works fine for the backdrop, as does another sneaky trick: a photo print of some useful background. Just something with foliage, bright or darker green as it suits you, or perhaps dry leaves or even sun-drenched rocks. The print will usually be well out of focus so it doesn't matter too much, but be aware of having a subject within the print that attracs attention. If you like, purposefully shoot some nice neutral backgrounds out-of-focus just to use for this kind of work.
 |
| The multiple reflections in the eyes, and the shadows indicated by the arrows, tell of the two primary light sources used for this shot; one overhead softbox, and a fill-flash aimed straight from the lens. Notice how there are no deep shadows underneath the spider, and no harsh contrast. The eye-reflection to the upper left is actually from the sun ;-) |
Fill lighting. There will be times when you want to be able to see all detail of a subject, especially that which falls into the shadows from your light source — this is where fill or bounce lighting comes in. The idea is to have a light source, less powerful than the main, which throws light into the shadow areas and doesn't quite eliminate them, but permits detail to be seen. Sometimes this is done with another light unit, but more often it can be achieved easily with simply a white card or semi-obscure reflective surface (not a mirror, in other words, but a shiny piece of just about anything can work.) This is placed almost opposite your main light source to bounce some residual light into those shadow areas. Again, the studio setting makes this much easier, especially when you can just spin or angle your twig-holder to change your subject position, and leave the lights and reflectors alone.
White boxes and light tents. This is a great method to achieve surrounding, soft lighting, and can actually be done in the field, but not easily. There are two versions which accomplish much the same thing. The easiest is to simply have a small box, open on one side and just large enough to give your subject room for positioning. The insides are lined with white paper, even the bottom, and your strobe unit is positioned inside with the subject, out of view and aimed at the top of the box (see illustration at top.) The light splashes around from all sides and produces very indirect and even lighting. The tent is a slight variation consisting of white material that lets light pass through, just like a diffuser panel, but forming a tent on most sides of the subject; your strobe is instead aimed through this. It often requires more than one strobe, though, and won't produce much light from underneath. With either, you can choose your own background and setting, or simply do without — identification and illustration images for arthropods, for instance, not only require no such additions, they can often be considered distractions and obscure pertinent details.
Wrangling. This is the hardest part of studio macro. Your subject will likely still not be experienced enough to pose properly, and might even be so rude as to try to leave your set. Some are shy and think that the underside of the leaves is much more comfortable. Limit such opportunities as much as possible, and have several things handy to assist in those good poses. I always have a pointy probe and some kind of fine tweezers, even though grasping most subjects with tweezers stands a significant potential of harming them; they're useful in removing lint and debris from your shot, and can be used as forks to scoop up a subject. A small bit of stiff card, like an index card, can work well for sliding under a subject without harming or agitating it, and of course you'll want some container to hold it within while you're preparing (or repairing) your setting — this is what film cans are actually for. Bet you didn't know that.
Prevent escapes. It should go without saying, but during studio work, try to secure a location where your subject will not escape into your house or office. Don't assume you'll be quick enough. Also, from experience, if your subject gets out of your prepared area it may pick up lint, dust, and cat hairs which will be annoyingly obvious in all subsequent images, so clearing the area ahead of time can save some headaches ;-)
So try them all. And exercise your own creativity. Any of these techniques can have their uses, depending on your circumstances, and I've used nearly all of them. They can be combined, and you can even make your own rigs or additions that help with a particular situation. My biggest point is always that you don't have to throw a lot of money at something to get good results, and the used market can be a valueless resource.
Let's see what they look like |
|
 |
 |
Above is
direct flash in dark surroundings (no bounced or ambient light.) Notice
how distinguishing the edges of the stones is difficult, and the marble
throws a dark shadow underneath. |
Above is a
ringflash, revealed by the distinctive reflection in the marble.
However, the marble is more evenly lit and has less shadow beneath.
There remains no 'modeling' to help distinguish shapes, but for very
close subjects this provides the most even light. |
 |
 |
Above is a
Lumiquest softbox diffiuser (see image further up.) Contrast is softened
and the shapes of the stones becomes more apparent, but there's still
evidence of a directional light source, similar to hazy sunlight. |
Above is
the softbox with the addition of a fill-light aimed from directly under
the lens - note the two reflections visible in the marble and stronger
highlights on the spring. Also note the lighting on the bottom half of
the marble. This technique helps with complicated subjects that might
throw shadows where you'd rather see detail. |
 |
 |
Above is a
white box. Now the shape of the stones is readily apparent, but bright
reflections are practically eliminated and contrast drops way down - the
sparkle all but disappears, and the same may be said for iridescent
chitin or eyes. The flash still produces an overhead 'source' from
aiming at the top of the box, but bounced light fills in from all sides.
Be aware that using a white undersurface (unlike the 18% grey seen
here) may bounce light into the lens directly and produce glare. |
Above is a
white box with the same fill lighting as the one above, from underneath
the lens (again, see the reflections in the marble.) This produces a
little underlighting and more of the direct lighting sparkle while
retaining the modeling of the stones. Note the highlights from the back
side of the spring where it was shaded under the marble. |
 |
And one just for giggles. If you use a print for a background, make sure you position yourself not to shoot past the edge... ;-) Good luck!  What's this? What's this? |
