


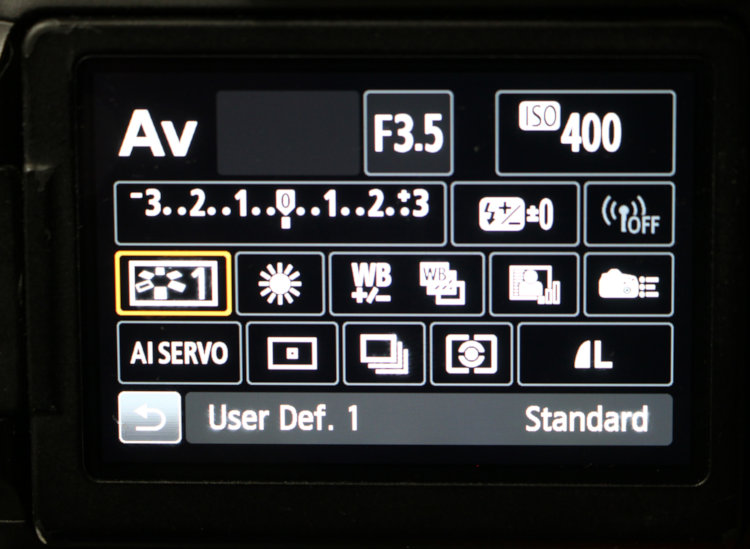
One of the things that I tell my students when they’re first learning how to use a camera is, don’t let yourself get confused by all of the options. Camera manufacturers now try to accommodate as many different photography types and styles as possible, meaning that many of the options on modern camera bodies may never see use by any individual photographer; there are several different things on any of the bodies that I’ve owned that I never had the occasion to use. However, you should be familiar with everything showing in the image above, because they relate to most of the basic functions and a few things that can give you a handy edge. One aspect of these, highlighted in orange here (this is a typical display for Canon cameras, though others are similar) are custom settings, or user-defined settings.
At first, you may not have a particular use for these, or understand why you might want to have something like this handy and able to be activated within a couple of seconds, but as you define a routine subject matter, or style, or set of conditions, such things come in very handy and can save a lot of fiddling around when you should be just getting the shots. I’ll use mine as examples, but bear in mind that there are a lot of options and your own tastes will dictate how to optimize your own custom settings.
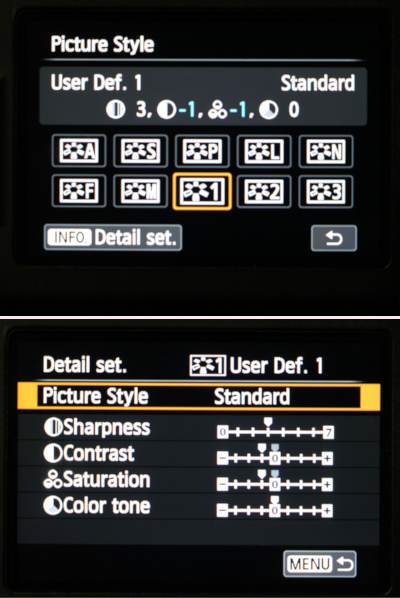 There are three User Defined Modes here, allowing the user to save the parameters of Picture Style, Sharpness, Contrast, Saturation, and Color Tone to a given preset that can be made active in moments. Here, my Definition 1 shows Standard style, neutral Sharpness, but lowered Contrast and Saturation, and then neutral Color tone. And the reason for this is, I shoot primarily in natural light; sometimes brilliant sunlight with high contrast and the ability to overpower colors and bleach out highlights, and sometimes full overcast with its very low contrast and weaker color response. So I have a couple of presets to counteract these traits, which could otherwise exceed the limits of typical digital photographs. This setting is what is used in those bright sunlight conditions, reducing the contrast and saturation to help keep the color response and dynamic range (the range of brightness from full black to full white) within control. You’ll notice, however, that I’ve only adjusted by one ‘step’ on these, while three are available. In my experience, having the camera make more drastic adjustments can often result in images that begin to look unrealistic, yet you may find that your own uses benefit from higher settings. Something to remember: if the camera saved the image file with certain adjustments, you likely won’t be able to reverse these if they’re too strong. And at the same time, if the sunlit snow bleaches out to pure white, you’re not bringing detail back into the image. I have a decent grasp of digital editing and can make adjustments if needed, so I tend to prefer keeping the in-camera effects to a minimum, but again, season to your own taste.
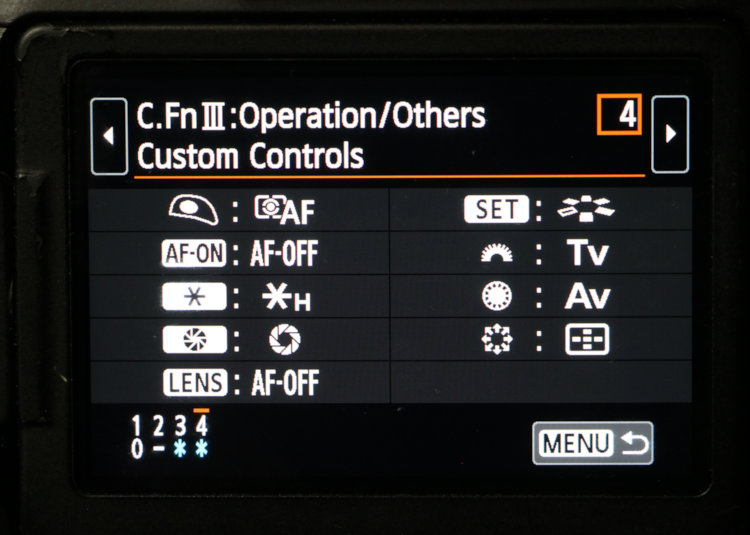
There are myriad other settings that you can program into the camera for quick activation, often linked from something like the Mode Dial, as well as several presets (like Exposure Auto-Bracketing) that can be accessed easily. Most decent camera bodies also allow you to assign certain functions to some of the easy-to-access controls on the back or at your fingertips, as shown above. Two distinct settings from my own cameras here: The ‘AF-ON’ button, near my right thumb when holding the camera, actually turns the autofocus off, useful when tracking something like a distant bird to prevent the autofocus from grabbing the horizon when the bird crosses it; and the Multi-Controller (kind of like a joystick on the back of the camera, the star-thingy at lower right in the menu) selects which autofocus point is active, allowing it to be switched quickly for framing situations where I don’t want the bit right in the middle to be what the camera focuses upon. Again, these are for my shooting style; I don’t recommend them to anyone else unless they feel they can actually benefit from them. There is no ‘one size fits all’ in photography.
It can be worth it to sit down one quiet evening and pick through the Custom Functions menu (or whatever it might be called on your own camera body) and review the settings to see what’s available and what you think you can use – and this probably isn’t a bad idea to do once a year or so as your tastes and subject matters develop. The same can be said for the manual. Reading one cover-to-cover can be tedious and even confusing, but picking out certain functions to see what they actually do might suddenly make your work flow smoother, and/or give you ideas for something new to try. If you run into something that you don’t understand, a quick web search will usually enlighten you. However, it is important to remember what you actually changed on your camera – maybe even take notes. That way, when you suddenly find that your images aren’t appearing as they always used to, you know where to start looking first.
[Also, get in the habit of checking out all of the basic settings, like the illustration at top, routinely, as soon as you switch the camera on and even from time to time during a session. It is remarkably easy to change something and forget about it, only to have it affect a whole slew of images that you never intended it to. Ask me how I know…]
And one more thing, that’s been beneficial to me on countless occasions: learn how to operate your camera by feel alone. Know how many clicks you need to move that control dial to adjust your aperture where you need it, or the mode dial to go from aperture-priority to full manual. Know which one of those switches on the lens barrel turns off autofocus (this is always fun since lens manufacturers don’t feel obligated to uniformity.) The same goes for your tripod, flash unit, camera bag, and anything else that you use routinely. First off, you may not always have adequate light to actually see these, and in my case often enough, I may not want to shine a light around. But it certainly helps when you don’t have to take your eye away from the viewfinder to adjust the camera as needed within a second or so, and it even makes you look more professional in front of anyone.
So go personalize your camera to make it the tool that works best for you, and have fun with it!