


There’s always a tradeoff in photography, the bad that must be taken with the good. The primary one, the thing that negatively affects the greatest majority of photos, is camera movement caught by slower shutter speeds. In order to get adequate light for a good exposure, the shutter has to be open for a certain amount of time, and as this time gets longer in cases of lower light or smaller aperture, the chance of capturing some small twitch of the camera itself gets ever greater. This is especially true of high magnification images, such as telephoto and macro work – while the camera might only move a tiny bit while the shutter is open, this little bit of blur is magnified as much as the subject of the photo is, and therefore becomes much more noticeable. Thus, nature photography is rife with situations where camera shake can ruin an image.
The best cure for this is a tripod, and to a lesser extent, a monopod. These reduce the amount of camera shake possible for any given situation – but, it must be noted, do not eliminate it. No tripod is perfectly stable, and some situations contribute more to camera shake than others – shooting in a high wind, for example, and even the slap of the reflex mirror in SLR bodies can set the camera a-trembling. Overall, however, it is simply a good idea to use a tripod.
Maybe. Actually, here are my two basic rules:
1. A tripod should be used in every situation where it will improve the quality of the image;
2. This may not be very often.
It all depends on the situation. While stalking cheetahs or white-tailed deer, a tripod will likely help a lot. The subjects are almost certainly going to stick within the same horizontal plane, and lateral movement often isn’t too significant – even cheetahs, as fast as they can be, are probably going to be photographed from a significant safe distance, so the panning movement of the camera is reduced commensurately. Birds are another matter; they move in all directions, and are very likely to appear at quite a high angle above the photographer. This may mean that a tripod has to stand very high, sometimes over eye-level of the photographer, and extending this high means camera shake is more likely – the higher a structure, the more vibration it will undergo.
This is why most nature photographers aim for a ball-style tripod head, rather than the more common pan/tilt head. A ballhead releases the camera to move in many directions with a single control, allowing panning, tilting, flopping, or the combination of all three at once, making it much easier to follow the bird that passes diagonally overhead. In contrast, a pan/tilt head has separate controls to release side-to-side motion, and up-and-down motion, and often flopping the camera sideways into a vertical orientation. Following a moving subject while loosening these controls is obviously a bit problematical, at least until we evolve a few more arms.
Now we (finally!) get to macro work. Here a ballhead often isn’t necessary, because even if such subjects decide to take off and fly overhead, the chances of following them for a series of macro images are, shall we say, rather low. But the magnification is very high, so preventing camera shake is a good thing, and a tripod should be used often, right?
Not really, and here’s why. At such magnifications, the position of the camera becomes very crucial; slight changes in location can result in significant changes in framing and subject portrayal. It’s a matter of pivot point. For something like cheetahs on the hunt, the pivot point is where the photographer stands, turning to follow the motion of the cats. For macro work, the pivot point is often the subject, and the camera shifts around trying for the best angle. Shifting a tripod a centimeter to the left can actually be kind of fussy, and when it comes to shifting in all three dimensions, it becomes quite involved.
Now consider that a tripod requires those three legs to be firmly placed, and for many macro subjects, this may mean extending underneath the subject, since working distance is so minimal, usually well less than a meter. It becomes very easy to disturb the plant or surface that the subject rests on, and therefore ruin the shot. It is also challenging to make such movements of a tripod in subtle ways that don’t frighten off the living subjects.
Even in those situations where the photographer sets up an indoor studio and works with captive subjects, on a branch held in a moveable clamp for example, a tripod can be severely limiting. The subject may wander around on the branch, or present the best angle from below, and too much movement of the clamp can disturb them.
Then there’s “settling.” Just about any tripod head will shift slightly after tightening the locks, meaning the camera repositions itself, and this is magnified by all intermediates between body and tripod head, such as battery-grips and flash brackets. I don’t think I’ve ever seen a tripod head that doesn’t possess some settling, though I admit I haven’t worked with the ones that cost more than my yearly phone bill.
Finally, we consider the focus range. With a standard macro lens or equipment such as extension tubes or diopters, focus range isn’t too limited, but in the more esoteric applications such as lens stacking or lens reversing, the range of sharp focus is ridiculously small, measured in millimeters. Positioning a tripod to tolerances that fine can be remarkably tricky, at times even impossible.
So with all that, it means a lot of macro work is done handheld. It’s easier to shift position to change framing, there are no considerations of where the legs go or adjusting the tripod for low-angle shots, and there’s nothing to fuss with that increases the chances of spooking a subject off. Which means, what do we do about camera shake?
The first thing is, use a higher shutter speed, so the probability of shake is greatly reduced. Combined with the smaller apertures often necessary for such work, this usually means natural light exposures are out of the question. Which leads to producing adequate light with a flash or strobe (whichever word you prefer.) This often progresses to trying out some form of flash or macro bracket, to allow positioning the light where it will have the best effect. The shutter speed cannot go above the camera’s flash sync speed (on most modern bodies, this is 1/200 second or so, but older bodies may get down to 1/60 second) – unless, a dedicated high-speed strobe is used, occasionally called focal plane (FP) flashes. These can sync at quite high speeds, but be warned – the higher the shutter speed, the less distance the flash can cover, which still may not be much of an issue in macro work.
Is 1/200 second enough, at that magnification? Usually, yes, since the brief shutter speed and small apertures often mean very little ambient light is coming in, so the exposure duration isn’t really governed by the shutter speed, but by the flash duration instead. Exceptions are situations like a shiny subject in bright sunlight, where bright reflections are enough to get exposed and may betray the camera’s movement. So even with this, remaining as steady as possible is important.
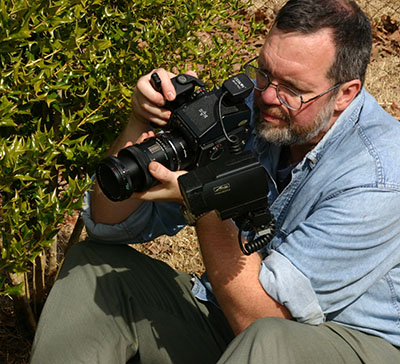
You may think you can stand quite still, but so still that your head or hands move less than a millimeter? How about while standing in a half-crouch leaning over a bush with a heavy camera and flash rig in your hands? It can get interesting, believe me, and after a day of extensive shooting, you might find weird muscles in your calves, forearms, or lower back protesting the next morning. This is the main challenge of shooting macro work handheld, but the flexibility in focus and framing options offsets it significantly.
At times, a monopod can help a little here, restricting movement in one direction at least – it may not seem like much, but a 33% increase in the probability of nailing the shot is not to be ignored. A monopod does not have to be used straight down to the ground; it can be braced sideways against a rock or tree trunk, or even forward against the surface that the subject itself rests on (this should be done with care, since it makes it very likely you’ll shift that surface.) Sometimes, even just the weight of it hanging from under the camera, not in contact with anything, adds a little inertial stability, like the various camcorder stabilizers that are available. This has to be used judiciously, since the point of those stabilizers is to keep the camera level as well, and this is often working against macro uses. One perspective may require a certain camera angle, looking down slightly on the subject, but shifting lower means a different angle, shooting more level, and thus adjusting the hanging monopod so you’re not now trying to hold its weight at an angle.
In some cases, I have actually timed my infinitesimal swaying or shifting to trip the shutter right as the camera reached prime focus distance – I can’t recommend this as a regular practice, but it’s worked for me (I also tend to shoot several frames in such conditions because of the chance of missing – hoping, sometimes in vain, that at least one will be ideal.) The same technique sometimes works for subjects moving in a breeze, the arch-enemy of macro shooters. I have also used a tripod as a brace for my body to lean against, but this is hazardous – most tripods are not made for this kind of weight, and aren’t very comfortable anyway. The purpose it serves is to give just a little resistance, and to make the movement in your position very easy to feel, and thus counteract.
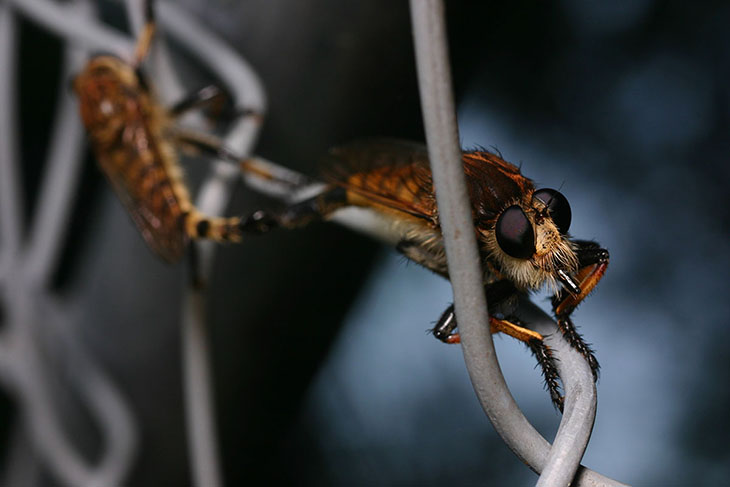
So am I advocating that you go without a tripod? Not at all – there are plenty of places where they do provide enormous benefit. See those rules up there again – use them wherever they work. But also get used to the idea that, in some situations, they may be inordinately cumbersome or detrimental, and you’ll have to find some other method of keeping the images sharp. The image at the top of this post would never have been obtained if I’d been convinced a tripod was the only way to go; aside from the subjects flying off before I could have set one up, there was no way I could erect one up against the chainlink fence to get that perspective, and the framing that I liked required a very specific position.
And of course, all of these are my own tricks – every photographer develops their own, often geared towards their own particular style and approaches. Try anything, and look around to see what others are doing. While there’s some useful (and often expensive) equipment out there to make your pursuits easier, I’ve found that the new designs tend to lag behind the necessity, and have quite often rigged my own solutions because the ‘professional’ avenues didn’t yet address those problems. Sometimes you’re on your own.
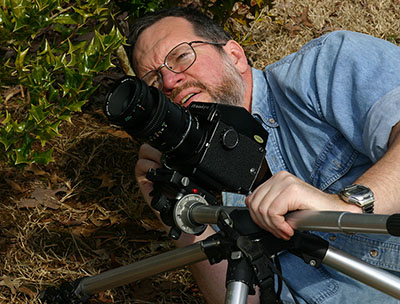
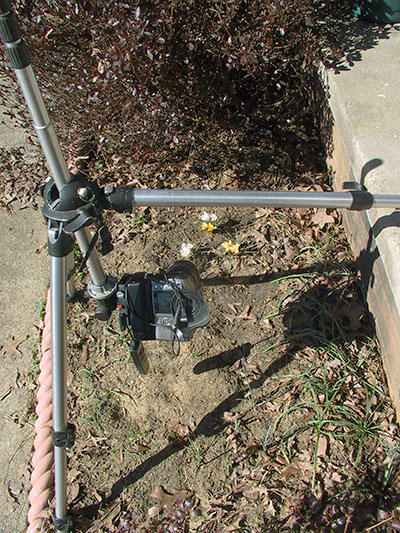 NOTE: This post was in largely finalized form when I got the photos for the animated gif two posts back, and so I shot a few frames of the tripod position that I used. The center column (which is removable and doubles as a monopod) was reversed to put the camera down low, and the variable leg spread allowed me to use the edge of the porch as part of the support. The TC-80N3 timer remote was draped over the camera and can mostly be seen by its dangling shadow. The camera was covered with a shirt for heat and bomb protection except during the frames taken for this illustration. Despite this position, the tripod still managed to twitch a bit, as can be told by looking closely at the gif. It’s also apparent how little is really growing right now – the dark mass at the top is is one of the azalea bushes that featured in, like, 99% of my images from last year.