


We’re once more into the nonsense blog trivia that would interest, oh, perhaps 1.29% of the population, but you did catch the ‘blog’ part, right? Good.
Today marks the 57th anniversary of the first flight of the Northrop HL-10 lifting body, and I’d intended to have a project done by now, but failed in that regard. So consider this a prelude for when it is done.
The HL-10 was one of three lifting body aircraft developed by NASA as a precursor to the space shuttle program, and my favorite based solely on its appearance. A lifting body is an aircraft without wings, deriving lift instead from the shape of the fuselage, surprise surprise. The thought was to have a craft at the head of a rocket, but wings at the front of a rocket introduce difficult stability issues, so, no wings. The program was successful to a degree, but other issues meant that the thoughts turned to more conventional designs and moving the craft alongside the rockets rather than atop them.
I’ve had the goal – obsession, really – of obtaining or producing a model of the HL-10, but the only production model was long out of production and expensive when found, not to mention a smaller scale than I wanted. I was slowly learning how to model it in software, which was going to be an absolute bitch due to the very fuselage shape that it relied on to function, when I came across this model from robert-ho and snatched it up. It was slightly off in scale and lacked some crucial details on those fins, which I clumsily remedied, and I produced a basic 3D print of the model:
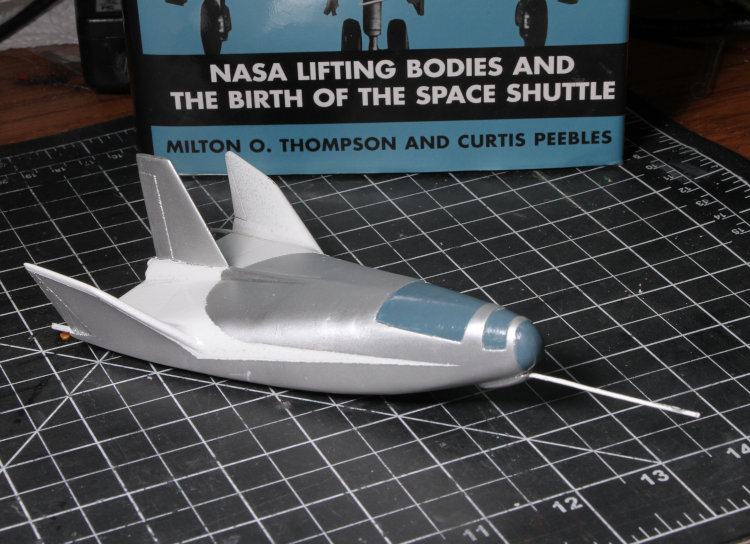
Which is great and all, but only the outer shell without much in the way of further details. Still, it got me past the difficult part, which was accurately modeling that esoteric body shape. Then I thought, I wonder if I could add in the details and make a decent static display model? A few weeks worth of work in Blender (a 3D modeling and animation program) followed.
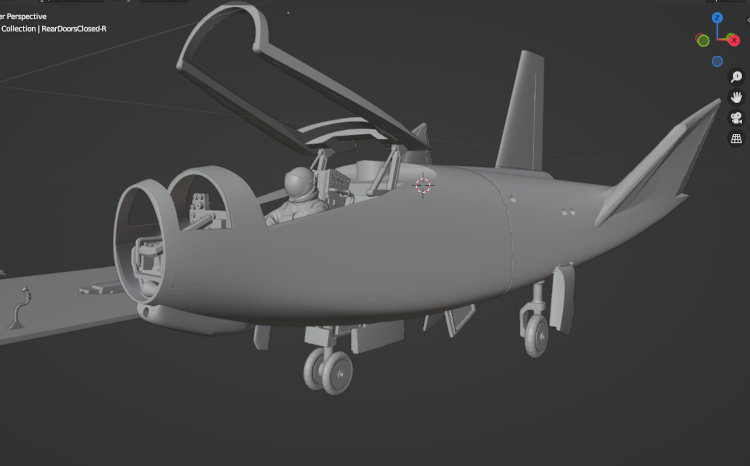
I readily admit to cheating a lot in here: the pilot figure, seat, controls, and landing gear were cribbed from other 3D models and modified to work. The pilot’s arms were especially tricky, since you don’t simply ‘reposition’ parts of a model without lots of issues.
More difficult, however, was designing the interior, since few photos exist and the details in the nose ahead of the pilot are especially vague. But this does mean that the only people who can point out how wrong my stuff is are those that have seen the real thing in person. [The actual aircraft, of which there was only one, sits on a pole at Edwards Air Force Base in California, but raised and positioned in such a way that these details are not visible.]
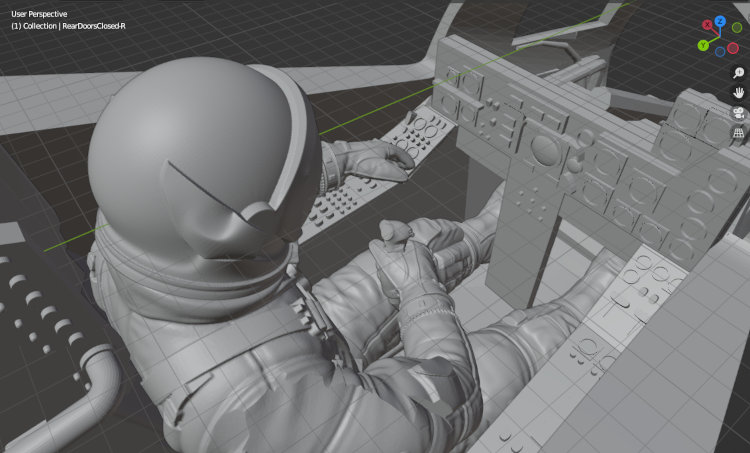
All of the details in those panels, however, are all mine, as well as the greeblies ahead of them (that you can’t see much of here.) The intention was to produce a reasonably-accurate display model, able to be assembled in flight display or open-cockpit on the apron, as it were, and I finished this well before the move. I knew that 3D-printing this without major headaches would require an SLA/resin printer, which I did not have, and therefore shelved the idea for later.
About two weeks ago, with the printer now in my possession, I started the test prints to determine where the problems might lie, and was pleasantly surprised to find that the raw cockpit area with all of the attached greeblies ahead went through the slicing program without any issues whatsoever – it would just be a print of several hours.
[A side note: taking a 3D computer model and prepping it for a printer is called ‘slicing,’ and it’s naturally different for FDM/filament printers and SLA/resin printers, both with their own quirks in what’s going to present problems.]
I did do test prints of pilot, seat, canopy, and control panels, discovering as I did so that the pilot and seat and even the thin canopy worked just fine, but the panels were too thin to print well – not a hard thing to fix. But then I got into other projects and never got back to tweaking the design to reflect this, nor in testing out the other details like the landing gear and doors. So here we are. There’s also the issue of the cockpit glass, where two of the pieces could easily be flexible clear plastic from just about any packaging, but the frontmost dome is going to take some problem-solving – it will not print with clarity through any 3D printer, and might have to be vacuum-formed. With this in mind, I did create a printable mold for it, but do not possess or have access to a vacuum-forming jig. Even if I’d been on the ball in printing what I have, this dome would still have required more time.
But, it’ll be done one day, and I’ll show it to you. I will also likely be contacting the original designer to see if he’s interested in the modifications, since I cannot upload anything that I’ve done without his permissions, it being a derivative work. While many designs in the 3D community are open to ‘remixes,’ provided the original designer is credited, others are available only for purchase, like the original that this is based upon, and I’m totally cool with people getting paid for their work. This means I can show you what I was working on here, but not the files to actually print it. At least not yet.