Not to get too deep into either fundamentals or philosophy, but, “photograph,” essentially translates to, “light drawing,” and light is what it’s all about… but that’s what sight’s all about too, so that’s kind of a “Duh!‘ thing. But light angle can be very important to your results, and it’s good to know how to utilize this. In the image above, the shadows define both the deep shapes and the overhang of this odd fungus, and this would have looked very different, probably not as dramatic, if a flash was used, especially not a direct, on-camera flash.
Any art student knows, when drawing, you turn a circle into a sphere with the simple addition of a shadow, and in photography, shadows can define and enhance the shapes and textures of your subject. Very often, simply moving to a different position with something will change its appearance well beyond just a different perspective. When using natural or ambient light, this is usually all that you can do, but that can be quite a lot if you consider up and down, direct or oblique in your consideration – even more if you have a camera that has a flip-out, rotating LCD for a live viewfinder so the camera doesn’t have to be held up to your eye. Also, when doing any outdoor photos, whether they be landscapes or portraiture or even architectural photos, remember that the sun moves across the sky, as well as changing altitudes with the seasons, and this can radically alter the way something appears. If there’s a scene or setting that you like but can’t quite make it work, try returning to it at different times of the day at least to see how much it differs. And with smaller subjects, sometimes you can simply move them as needed to work with the light better.
Same subject, same session, aiming indifferent directions in relation to the sun (and achieving different exposures from the amount of light reflected into the camera.)Light angle is paramount to portraiture, whether it be weddings or ID photos or nudes, and the more demanding your requirements, the more you have to be aware of the results and how to alter them. Direct flash is anathema to most ‘people’ photos, since it flattens most curves and makes everything seem ‘fatter’ – this is where the old adage, “the camera adds ten pounds” comes from, even though it’s not the camera or photography in general, but the handling of light. The “camera’ (actually the light angle) can also lose ten pounds or five kilos or whatever, by being carefully controlled. This is why most wedding photographers have a strobe on a bracket that sits high and off to one side, to shape faces better and throw shadows down behind the subjects. Meanwhile, studio shoots of any kind almost always rely on meticulous balancing of light for optimum results.
Shiny subjects require special consideration and often techniques to prevent glare that detracts from the imageArtificial lighting, whether it be an off-camera flash/strobe or studio lighting or even a handy table lamp, provides a lot more control over how your subject is rendered. As shown above, reflective surfaces can be the worst to cope with, especially curved ones, but overall, the more flexibility that you can achieve, the better your results will become. I’ve personally spent a lot of time refining the macro flash rig, and it will undergo even more, but right at the moment, the flash is on a flexible arm that can achieve a large variety of light angles, and can be reversed to come from either side of the lens.
The difference between a more overhead angle and one from behind the camera and to the rightWhile I usually deride ‘chimping’ (the act of checking the LCD preview of the image that you just took,) one of the few places where it serves a purpose is to check lighting, most especially what happened with a flash or strobe. While I still recommend not counting on it, since LCDs are notoriously unreliable and too small to judge effectively on, you can see that the flash throws too many shadows, or fails to illuminate the key aspects properly, and adjust accordingly right away. Many studio lighting units have a ‘modeling light,’ a normal bulb that can stay on and allow you to see how the shadows will be thrown when the strobe goes off, and doing the same thing with a smaller flash unit is handy too, when you can achieve it (I’ve gone back and forth on having this option – right now it’s tricky with a diffuser panel n the way.)
A particularly bad example, the light here is too far to the side and throwing far too many shadows from an already-complicated sceneA ‘studio’ subject with fill light coming from the left to maintain detail on the shadowed side of the camera – note the highlight on the chrome on the left side, and the detail in the bills and ticket even in the shadowThere are other modifications as well. The aforementioned diffuser, or softbox or umbrella, works to spread out the light and prevent the ‘spotlight’ affect from a single flash bulb, softening the shadows and lowering contrast slightly. A ‘fill-flash’ can be used in natural or ambient light to soften shadows as well; it can seem odd and pointless to be firing off a flash while in bright sunlight, but the flash will add almost nothing to the sunlit portions of the subject while it brightens up the shadowed areas from being almost pure black. A secondary light does the same thing, offsetting the main/key light, reducing shadows or illuminating the off-side enough not to be lost in darkness, or a simple reflector can be used to accomplish this, given enough available light that can be bounced in usefully.
You can also see photographers aiming a strobe at the ceiling, a technique called ‘bounce lighting,’ and given a close enough pale ceiling, it spreads the light out over a broader area and looks the most like ambient light. It does require a lot of light output, which translates to a higher guide number in equipment terms, and won’t work well with high ceilings, dark ceilings, or too large of a room to be captured. In the right conditions, however, it can usually look like no flash was used at all while still reaping the benefits of a fast shutter and properly-colored light (unlike nearly all indoor lighting.)
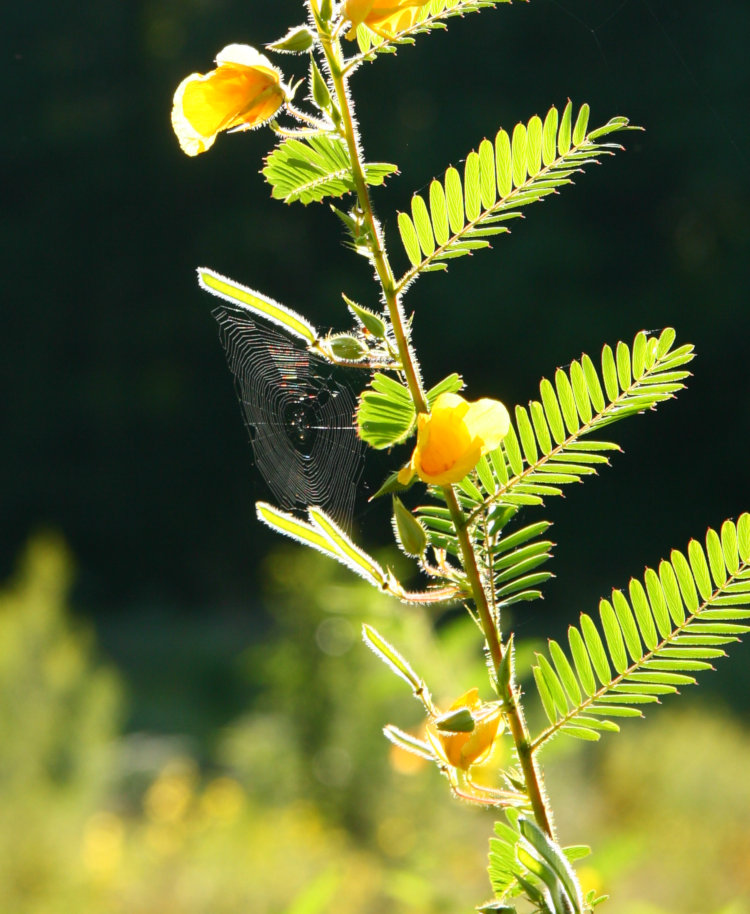
The glow of the leaves and especially the delineation and iridescence of the web could only have been achieved with backlightingWhile the general rule is that the light source should be somewhere behind the shoulders of the photographer (if natural, or mimicking that if not,) there are plenty of occasions when you might break this rule – backlighting, as shown above, though care must be taken to prevent that same light from hitting the lens, and I’ve cropped out my hat brim that was faintly visible at the top if the image, blocking the sun from the lens. Long shadows also serve a purpose and are a compositional element themselves at times. And while we talked about softening shadows above, there are also the benefits of not doing so, having inky black portions of the image or a face that is half-shrouded in darkness, which provides an entirely different mood than a standard portrait. You can enhance or diminish a texture, depending on how you light it, and add or subtract contrast and even color. It’s worth studying any of the more dramatic images that you like (or even dislike) to see how the light affected this, perhaps being even totally responsible for the mood or tone. The more you grasp this, the greater your repertoire.
Good luck!
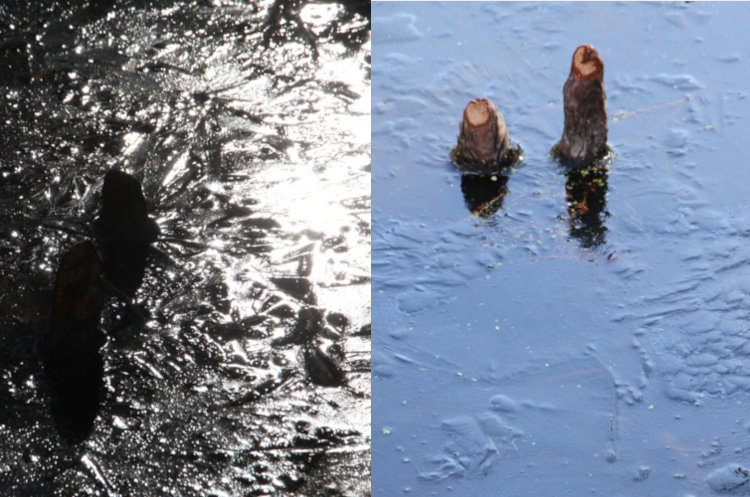
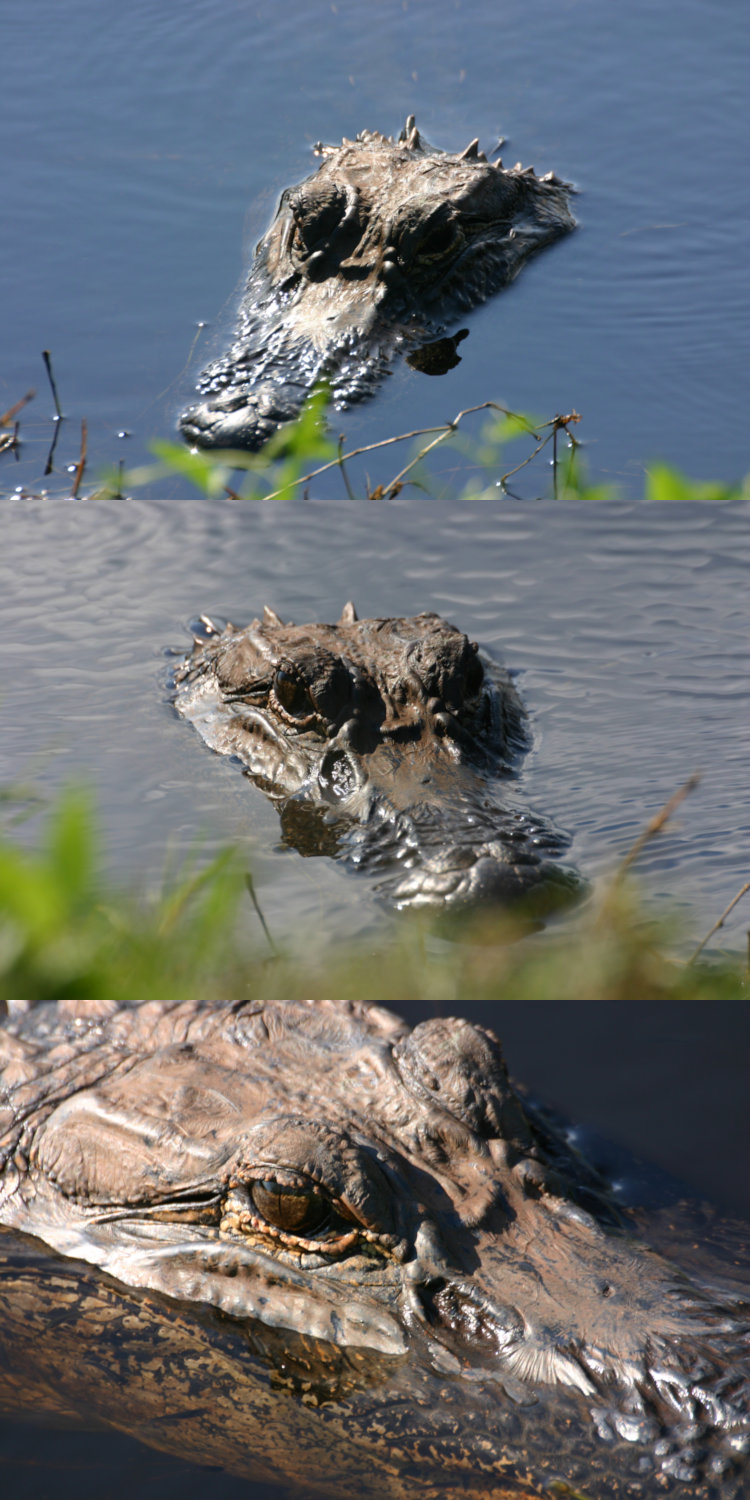
Same alligator, same time, same location, just different angles. Note not only the mood, but the colors rendered from both the gator and the water. There’s no ‘right’ way to approach this, just the idea that you want to convey