


Fairly basic one this week, since I have several that I’d like to tackle that will take more preparation than I have time available for right now. So we’ll talk about one of the staples, and that’s ISO, formerly (unofficially) known as film speed.
Short explanation: ISO refers to how sensitive the digital sensor (or indeed, the film) is to light; the higher the number, the more sensitive it is and the less light is needed to achieve a “proper” exposure, and that’s in scare-quotes because there is no such thing. There is an average, though, and that’s what camera exposure meters and light meters are calibrated to produce, but since not every scene or subject is average, they can’t always produce the ideal exposure, and it’s up to the photographer to accommodate these shortcomings.
Long and technical explanation: ISO actually stands for International Organization for Standardization – yes, that’s correct, I initially thought it was that way for the French version, but that’s not abbreviated ‘ISO’ either. It’s a system of rules to have all the different countries and cultures using the same measurements for everything, and you might already have experience with ISO 9001 with corporate culture, or other numbers if you’re into engineering. For photography, technically it’s ISO 6, or even 6:1993, and is a direct translation from ASA; ASA 100 films and ISO 100 settings on digital cameras have the same light sensitivity. You will likely never have a need for this info in your life, but at least this answered that idle question.
ISO progresses much the same way as shutter speed, so ISO 200 is twice as sensitive (requiring half as much light) as ISO 100. From there, 400, 800, 1600, 3200, and so on; these are typically called, “stops” or “EVs: for “Exposure Values.” Most cameras can be set for values in between these, such as 320, and these are subtle differences, partial stops or partial EVS, but even so, the math holds up: ISO 640 is twice as sensitive to light as ISO 320. We just deal with the whole hundreds because it’s easier overall, and ISO 100 is considered the base setting.
Generally, the way it works is, if your meter indicates that the correct exposure is f5.6, 1/50 second shutter speed at ISO 100, but you want a faster shutter speed to prevent blur, you could change the ISO to 200 instead and now use a shutter speed that was twice as fast at 1/100 second. Or keep going – ISO 400 and 1/200 second, ISO 800 and 1/400 second, and so on. Simple!
Only, like everything in photography, there’s a tradeoff, and the tradeoff in increased ISO is decreased quality and resolution. The simple guideline is, use the lowest ISO you can to get the shot – but get the shot.
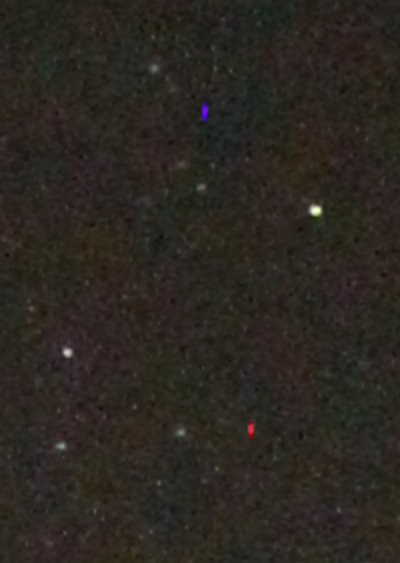
Brief, and probably none too accurate, explanation: digital sensors work by converting light energy into electrical. When you boost the ISO higher, you’re attempting to read tiny voltages from the sensor and amplify them. But the sensor doesn’t just pick up voltage from light, but also from other sources of electricity (including the other parts of the camera itself, and static charges from the air,) as well as minor manufacturing defects that cause the sensor to be less than uniform. In scattered cases, individual pixels in the sensor produce a “full brightness” response to no input at all, producing red, blue, or green dots in an otherwise dark field. While in film, the chemicals that crystallized under light also had variability, causing small splotches of brighter regions usually referred to as “grain.” Just not the bright specks of “noise” that digital sensors produce.
This is mostly visible in shadowed or dark areas of the exposure, but could also show up visibly across the gentle gradient areas if the ISO is really high. And this blotchiness can also reduce the sharpness of the image, faintly blurring the edges that should be sharp.
Also, longer exposures give the sensor more time to register stray electrical charges, and so the noise will often be worse.
In short, avoid using higher ISOs as much as you’re able. But there are certainly times when you need that edge.
Note: complicated, detailed subjects will often hide the effects of high ISO, and you can get away with it more while shooting such subject matter. Conversely, large areas of the same tone or very subtle gradient changes will show the effects much worse. This is especially true when doing night sky exposures.
So, how high is too high? There’s no easy answer to that. Part of it depends on the camera itself, since manufacturers are constantly trying to improve the ISO response in their camera bodies (mostly in the image processing portion, since the sensors themselves undergo few changes.) And part of it depends on your subject matter, as indicated above. Part of it depends on how large you will be displaying the resulting image, or how far you will enlarge portions of it – if you’re reducing the entire frame down to web resolution, you may notice nothing at all. And part of it depends, quite simply, on how picky you might be.
There are some things you can do to cope. First off, you can occasionally avoid using a higher ISO altogether by using a tripod instead, or even just going with a wider aperture to let in more light that way. But if it’s a choice between blurring the image from camera shake during a handheld shot, or dealing with ISO grain, go for the gran every time – you can even use it to artistic advantage in a few cases. Some cameras have a Long Exposure Noise Reduction option that may be worth a try; I’ve only used this a couple of times with night shots, but the processing time took as long as the exposure did and thus prevented me from getting shots in the interim, not ideal when you’re hoping to catch meteors, but perhaps still worth a few experiments.
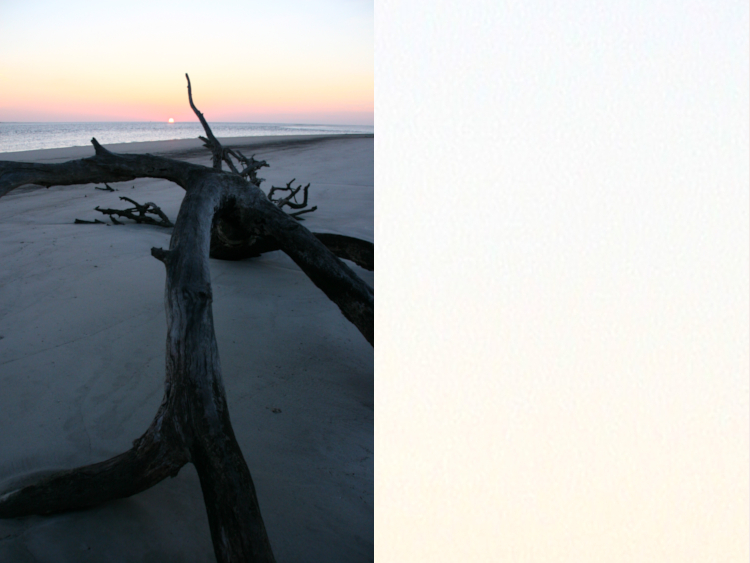
In the shot above where the grain shows most noticeably in the sky, you can often smooth out this blotchiness in an editing program: select by color range and pick the worst areas of the sky, and feather the edges of this selection by several pixels (perhaps as high as 20 pixels if doing this at full resolution,) then Blur your selection by 1.5 to 10 pixels or so – season to taste. You might have to do this for a couple of sections, just be careful about overlapping into the detail areas such as (in this case) the driftwood or the horizon line.
Sensor noise, especially during night exposures, can be eradicated almost entirely with editing – I have a page on this already. Just be sure to obtain a recent baseline noise register, because sensors will degrade slightly over time and more noise will creep in, so re-using an old noise baseline might miss the new noise pixels.
I recommend doing a few experiments with your camera with different scenes, but most especially something with distinct dark or shadowed areas, and keep boosting the ISO up to the maximum the camera will allow, then check out the results carefully on a larger screen (not the camera LCD, for dog’s sake!) In my experience, the highest usable setting for decent results is two stops below what the camera can achieve, so if your camera’s maximum is ISO 6400, you may want to avoid anything higher than 1600, but use your own judgment. Again, the amount of gradient or dark areas and the end usage may dictate your limits better than an overall rule.
And on occasion, you can take a horribly grainy image and do something creative with it. Simply converting to monochrome may make it acceptable, solely because we expect B&W images to be grainy sometimes, from experience with very old photos. A little later on, I’ll have a tutorial on selectively smoothing portions of an image in an editing program, a slick little trick.
Hopefully this was helpful in at least some way, but more advanced stuff will be along. Good luck!