


I mentioned in an earlier post about experimenting with a new method of lighting macro subjects, so now we’ll take a close look at it. One of the chief pursuits of photographers is getting the light just right, which is more involved than one might suspect. Stopping action and camera shake requires a fast shutter speed, especially at high magnifications, so a lot of light is needed, but if it’s too bright it produces a spotlight effect, with overblown reflections and deep shadows (made worse by the simple fact that photography always produces more contrast than we see with our eyes.) Enter the flash diffuser, which scatters light from a broader area, reducing the reflected highlights and throwing more light into the shadows, reducing contrast. In a portrait studio, this is usually accomplished with white umbrellas or a large unit with a thin fabric panel called a softbox. And the same can be used for macro work, but in the field you generally want something that stays with the camera and repositions as you do, so all sorts of tricks are used to produce the ideal lighting system. Alex Wild talks a little about it in his Compound Eye blog at Scientific American, with a couple of linked examples from others; now here’s one of my variations.
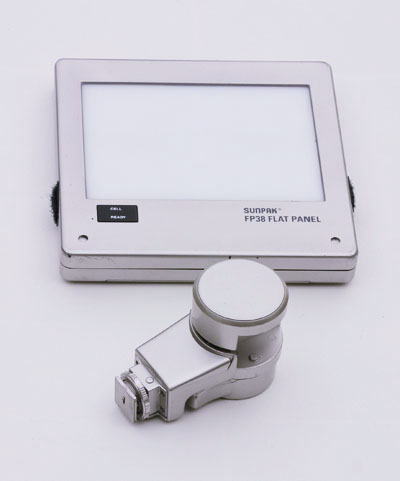 Sunpak makes a flat-panel flash unit, the FP38, which uses four small flash tubes and a large diffusing panel to produce a softbox effect. It’s not terribly large, lighter than my workhorse Metz 44 MZ-3i, and has some nice options like variable positioning and a built-in slave trigger (meaning it will fire simultaneously with another flash by detecting the light produced by the other unit, so it doesn’t even have to be mounted on a camera.) The mount has the standard two-contact hot shoe, but since the panel unit itself is only pinched by the mount, the triggering signal is passed from the hot shoe to the panel by a PC sync cord (meaning you can also connect directly to the camera the same way.) PC syncs are notorious for developing poor contact, so I opened the panel unit and soldered in a 2.5mm mono plug socket instead, which most of my flash units will take now. Now, in an ideal world a macro flash unit should be able to tilt over top of the subject, since we find light from overhead is much more natural-looking – this was something neither Sunpak’s mount nor my current flash bracket could do; at the same time, I found the light was still a bit harsh for my purposes. So I added a new reflecting/diffusing panel.
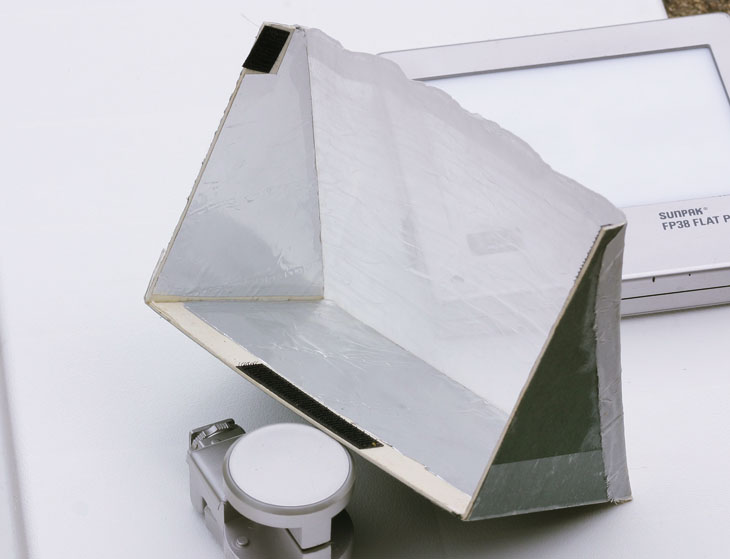
It’s pretty simple: just three pieces of matboard, with aluminum foil glued inside to increase the reflectivity, and a piece of thin white fabric as a diffuser for the light passing through (what you want is something about like tissue paper, transparent but not completely so.) It was measured to extend over the entire light-emitting portion of the FP38, and attached with three pieces of hook-n-loop (Velcro.) In my image, you’re looking through the area where it attaches to the flash unit – it’s upside down here. With some creative angles from the flash bracket, the diffusing sheet ends up being perpendicular to the subject, more or less.

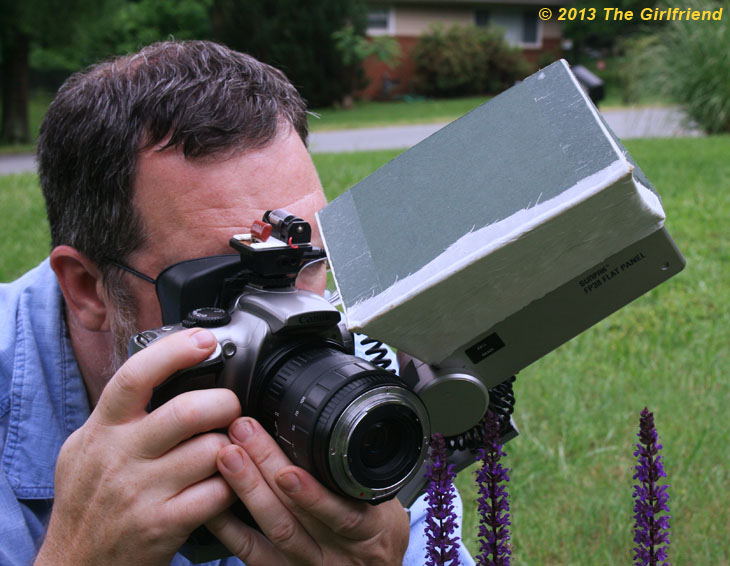
While the FP38 remains vertical (it’s aligned with the back edge of the diffuser in this image,) the cloth panel angles forward, producing light that is partly from above and partly in front of the subject, which gives a good view to the camera and still looks natural. It does mean that the whole unit sometimes looms above the subject, which can send shy insects under cover, and in tight situations it can interfere with the very plant that supports the target species. Yet this would be true of any diffuser save for a studio light on a high stand, something few people can make work in the field, so it’s just something that one copes with. The added benefits overcome the occasional detriment.
I’m going to sidetrack slightly here while the image is not too far away. The lens I’m using (yes, that’s me) is my old Sigma 28-105 f2.8-4; the automatic aperture had died many years ago. I opened it up, removed the aperture motor, and manually set the aperture to about f16. Reversed, it can produce quite high magnifications and some pretty damn good results, at much less than the cost of the only lens I know that can do the same, the Canon MP-E 65mm. It does mean that the viewfinder image is quite dark, and focus is fixed for any given focal length, but the zoom still works and this affects focus and working distance simultaneously (same with the MP-E,) so there are options to work with. Also visible is the large eyecup I added to the camera, which aids greatly when using this lens (especially with eyeglasses that allow glare to come in from the sides) and just in bright sunlight. On top of the camera is a homemade device that drops the voltage of flash units down to a safe level (I used the design here.) Some older flash units throw a lot of voltage through the hot shoe, and the 300D/Digital Rebel, among others, is sensitive to this, so the gizmo there allows me to use the Sunpak FP38 or a Capro RL80 ring flash without frying the camera.
So, how well does it work? Let’s start with the effect on the toughest of subjects, something highly reflective:

Instead of a bright spotlight reflection, what is produced is a “hazy sky” broad effect throwing good light around. In this tight crop, you can see the distinctive shape of the unit’s light itself, with the main panel producing the “window panes” to the left, from its four flash tubes, and the diffuser producing the pattern to the top and right of the reflection. Perhaps drawing attention to it in this manner makes it seem weird, and the effect may not be for everyone, but bear in mind this is a set of conditions rarely encountered, chosen just to show the effect – also note how well controlled the contrast and shadows are. A more typical tough subject is a closeup of a jumping spider, with their highly reflective eyes, and the effect is quite acceptable (to me, anyway – mileage varies) in such a case:

Notice how detail on the side of the ‘head’ (cephalothorax) to the right, and under the legs, is still clearly visible, even though in shadow, and that nothing is harsh. My subject here measures about 3mm wide, and is perched on a blade of grass.
 Perhaps this displays better with a side-by-side comparison of the same species of cricket – direct flash on top, and the flat panel with diffuser on the bottom. Shiny black subjects are the hardest to achieve good lighting of and virtually need a diffuser of some kind, for reasons shown here – pay attention to the shadows too. The color is better, the textures more apparent, and even the implied conditions much more mellow – the top image communicates searing sunlight, high noon in the desert. Diffuse light is just a more pleasant result. Further samples can be found attached to some of the past several posts with arthropod images, for example here and here (previously linked above.) The daisy is not taken with this rig (instead a softened offset flash,) while all of the spiders and mantises have been, and the water droplet image is natural near-overcast light. The diffuser even helps a little with the problem of the background dropping into darkness, because it scatters more light around, but it’s still short-range and won’t correct the problem with flash macro and a background lit by natural light (basically, not appearing lit at all because of the small aperture and fast shutter speed.) To correct that, you either need a closer background or a second lighting unit to illuminate it separately at its distance.
 I’ll also take a moment to throw out a comparison with the ring flash. This is a flash tube that surrounds the lens, which produces almost no shadows – this is sometimes a bad thing, because it’s the shadows that give shape and depth; you just don’t want them too dark. And with reflective subjects, the effect is much more disturbing than the “window pane” shown above.
There are some caveats to the FP38 and diffuser rig, too. Recharge time is a little slow, meaning no chance of snapping off two shots in quick succession, and it has a pretty hard power draw – too many frames and the batteries can start to heat up, dropping their response. There is no ‘charged’ beep and no way to vary power output (I got spoiled with the Metz.) It can take an AC power source, but my one set of tests with that produced some indication of either shorting or overamping, something I have not pinned down yet. The size of the panel limits the kind of bags it can be stuffed within, but at least it’s not too thick. I stupidly did not make my (easily detached) diffuser capable of folding flat, where it could have tucked alongside the flash unit smartly – that modification will be done soon. Sunpak claims that the unit can be used on a mini-tripod, but the unit being offset so far to the side of the mount means it would tip over most mini-tripods, and it cannot be used centered over the shoe mount in any other application (without modification anyway.) Yet, for macro work it’s a very inexpensive little unit, and the slave function works great. It’s far from being my only lighting option, but it’s a nice addition once I got it producing the light I liked.