Earlier I mentioned having pretty egregious autofocus issues with the Canon 7D and the Tamron 150-600 lens, and sat down to see if I could improve things. My efforts were quite successful, so I’m going to go over what I did in the hopes that someone else may benefit from this. Virtually all of these will apply to any DSLR camera, with perhaps minor variations.
Clean the contacts. The electronic contacts between the lens and the camera body are how the camera can tell the lens to start and stop focusing, so ensure that these are clean and shiny. A pencil eraser is a good way to clean off anything stubborn – just be sure not to get eraser bits in either the camera or lens. To this end, holding them up higher and facing down helps the debris fall away – this is also recommended just for cleaning dust.
Blow out the mirror/shutter box, carefully. Generally, a blower brush or bulb is recommended for this, and again, while the camera lens opening faces down. Canned air is not the best; while it’s much more powerful, it can damage the shutter and introduce fluid and solvents into the camera. If used, always fire a test blast into the empty air first, to clear the tube of residual fluid, and then apply it indirectly into the mirror/shutter box, preferably from a moderate distance. The shutter blades are very thin and delicate and a solid blast of air may kink them, and you don’t want that repair bill. You can find air bulb blowers at most camera supply places, or a battery filler bulb (which I use, much more volume for stiffer blowing) from auto supply stores for about 1/4 the price.
Use a soft brush to clear stubborn dust and debris. A decent artist’s brush, preferably a flat brush in the realm of a centimeter wide, can help get out stubborn stuff without using enough pressure to scratch anything. Be aware that there is often a bit of spongy padding at the top of the mirror box, front of the focusing screen, for the mirror to hit without clattering, and this often snags stray hairs that don’t come free with a brush, in which case careful attention with tweezers can get them out of the way.
Clean both mirrors. Hopefully, you don’t have smears or stains on these mirrors, but occasionally it happens – if it happens a lot, you have some bad habits to clear up. For the most part, you can just use the artist’s brush to clean off the reflex mirror, but do this gently – these are front-surfaced mirrors meaning they’re easy to scratch.
If you have to clean oils or gunk off of them, use lens cleaner or high-grade alcohol (90% or better) on a microfiber cloth and swab gently – it shouldn’t need much.
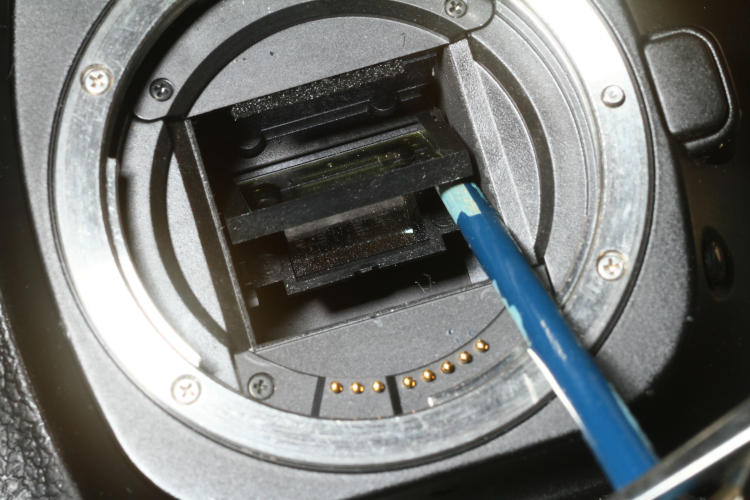
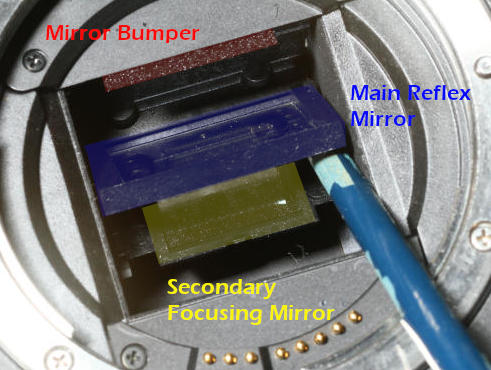 But there’s a second mirror in there too. Using a non-metallic object just to avoid the possibility of scratching (I use the handle of another brush, because you’ll need the first one in a second,) gently push up on the forward end of the mirror – it’s only held down by spring pressure. Underneath, you should see another mirror on its own hinge coming up with the main mirror, angled differently. While holding this up slightly – not all the way – blow some air in there too, and brush gently with the brush as needed. You’ll see that the main mirror is actually semi-transparent, half-silvered, and some of the light entering the camera goes through this mirror to reflect from the second one underneath – this is how the autofocus sensor works. Schmutz on this mirror can affect the AF sensitivity.
[Note that the Canon 30D is shown for these photos, though most DSLRs should be largely the same.]
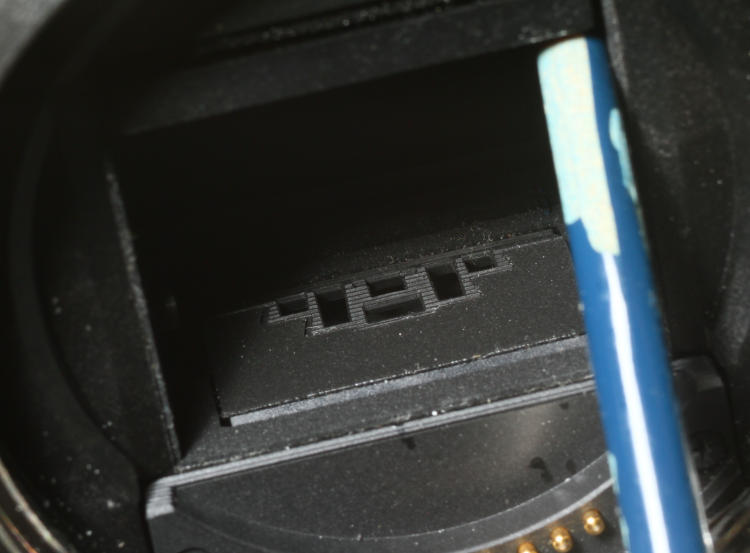
Clean the sensor too. Now lift the main mirror all the way, which will raise the second mirror too. Gently blow some more air in there, aimed towards the bottom of the mirror/shutter box – you should see some openings in the floor there, where the AF sensors lie. Again, do this while holding the camera front facing down. Brush gently with the brush while you’re at it, to clear any dust from the face of the sensors themselves.
Twice now, I’ve had enough dust and pollen and whatnot get in there to affect autofocus – the perils of doing lens changes out in the field, so this should be a routine thing if you’re changing lenses in dustier environments.
Camera Settings
Some of this will be ‘season to taste’ – my shooting habits are not necessarily going to be your own, plus camera and lens variations have an effect. The best I can say is to try them and see what works.
AI Servo focus mode. This is Canon’s nomenclature, but what it means is that the camera will attempt to maintain focus as the camera and subject moves, even while you’re tripping the shutter. This is best for moving subjects, but occasionally it will result in images being defocused because the lens is adjusting as you trip the shutter. Overall, it seems to work more dependably than other modes for action.
Custom Functions. The 7D has an elaborate set of parameters that can be adjusted and these will likely be in different orders or menus with different camera bodies. In my case, these all fell under Custom Functions III: Autofocus/Drive.
1, AI Servo Tracking Sensitivity, set to fastest. May result in more twitching of AF or even hunting if the subject gets out of the focus area for too long, but overall, with subjects that can shift distances quickly, this probably gives the best edge.
2, AI Servo 1st/2nd Image Priority, set to 0: AF Priority/Tracking Priority. I’ve tried others, and they all seem to wander or lag too much for wildlife subjects, especially flying ones that can leave the AF area in any direction.
3, AI Servo Tracking Method, set to 1: Continuous AF Track Priority. Seems to work best, again, for moving subjects, as well as for compositions that do not necessarily center the subject in the frame.
4, Lens Drive When AF Impossible, set to 0: Focus Search On. This one is the one I have the greatest misgivings about, because it can make or break the shot. When on, it will track in and out trying to locate a subject with enough contrast to lock onto, which is fine – it’s what autofocus is all about. But it’s not very ‘smart’ on the 7D at least, and when failing to focus on a subject that was focused only milliseconds ago (a moving bird that slipped out of the focus area, for example,) it can start tracking from near-infinity inwards, shorter, which will throw the bird so far out of focus that it vanishes from the viewfinder, right at the time that you need to see it at least a little to keep it centered so the autofocus can lock onto it again. This is where the focus limiter switch on the lens comes into play, where you can select the ability to only focus between infinity and, say, 10 meters, which will prevent the AF from tracking way too far. As long as it’s already switched on.
There’s no option, for instance, to make the lens focus out first, or search focus only in small increments for a moment or so when focus was locked almost immediately before. Moreover, a major shortcoming of the Tamron 150-600 (the Generation 2 model) is that even if you manually bump the focus wheel in the right direction, it can stubbornly keep trying to focus inward.
[To be sure, focusing outward can have issues too, because that would make the lens lock onto the distant background more often, something I’ve already had issues with. Some of this is assisted with the AF Point Expansion bit further down.]
5, AF Microadjustment, set to 2: Adjust by Lens. This allows the camera to tweak focus by individual lenses, and with the Tamron 150-600, I’ve set it to focus just slightly short, a little closer than what the camera defaults to, which seems to be producing pretty good results. This may be because the lens is ever-so-slightly off when focusing, or it may be because AF grabs the areas of highest contrast, which would be the wings and body against the sky, which are slightly further off than the eyes or fish clutched underneath. Also, depth-of-field extends farther beyond a subject than closer to the photographer, so this bias takes advantage of this trait.
And one more, from the Shooting Functions menu on the camera back, selected by the INFO button.
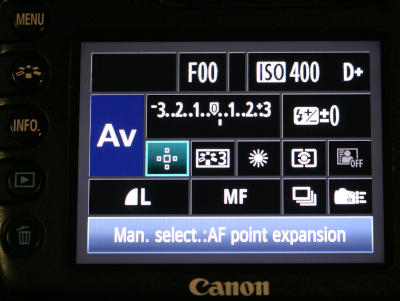 Highlighted here in cyan is the AF Point Expansion mode, and selecting this will provide different options for how specific the autofocus is. The one shown, with its orbit of smaller dots, tries to maintain focus in all of the five focus points shown, which gives a little slop in tracking a moving subject while still being reasonably specific. The main focus point can still be shifted throughout the viewfinder area (offset to one side, for example) and the surrounding AF points will follow. Note that you may have to enable this particular option in the Custom Functions menu.
This mode can still be confused by the camera, by small subjects with lots of surrounding or intervening clutter (like birds in branches,) which is where I simply switch to manual focus – this happens often enough. The biggest problem with manual focus – I mean, after the much slower speed that it takes place – is that the viewfinder screen is too small and too low in resolution, from using a ground glass surface, that it makes crucial sharpness particularly hard to determine; even when doing moon photography on a tripod, everything nice and stable, I’ll fire off several frames and keep reviewing them in the camera LCD under high magnification until I feel the image is sharpest, and then make it a point never to touch the focus ring.
[This needs a caveat, by the way: if the temperature is dropping, and especially if the lens hasn’t had time to match the outside temperature, re-focusing will be necessary because the contraction of the lens body itself will alter focus – astronomers are very familiar with this.]
Side note: There is another specific option that I finally got around to trying. Tamron has an additional bit of equipment for select lenses, called the TAP-in Console, that attaches to the lens mount and interacts with software via a USB connection; in this manner it can update the lens firmware as well as providing some specific options. I’d purchased one some time back but finally got around to setting it all up, since it wouldn’t work on my present workhorse computer, requiring Win 8+ (or MacOS) only, and I had to load the software on a spare computer. The options, however, were only for three things: manual focus ‘speed’ (how responsive the manual focus ring is to input,) focus limiter range (what distances are effective when using the focus limit switch,) and specific tweaks to focus at different focal lengths and distances. In other words, if you find the lens is consistently a little off at 300 mm focal length and mid-range distances, you can adjust this by small increments for more accuracy. Sounds very cool, but to implement it effectively and accurately, you’d need a significant set of high-contrast targets at varying distances, which you would shoot test photos of at varying focal lengths, examine the resulting images at high magnification on a computer, then adjust accordingly; for maximum efficiency, you’d also need secondary targets slightly ahead and behind the primary ones, offset far enough to be outside of the AF sensor range yet still in the photo, that would tell you if the focus was off slightly ahead of or behind the target. Obviously, setting all of this up and shooting the test images would take a few hours, and this didn’t seem to be my issue anyway (other than the change made above to the camera’s Custom Functions) so I’m in no hurry.
What it didn’t have were any options to change which direction it would begin to hunt within, or something to limit initial hunting to small increments to assist with moving subjects that momentarily got outside of the AF area – no one needs the lens to suddenly rack down to its shortest limit in such cases. There’s a balance point between the lens seeking autofocus as needed, when first raised to the eye for example, and trying to regain or retain focus for a moment when a moving subject proves hard to track, which is (I would think) a very frequent occurrence with a long lens. However, this might be a function of the camera body itself, though not something to be found or altered in the Custom Functions of the Canon 7D.
[By the way, after updating the firmware, the only change I made to the lens settings was to boost the manual focus speed, mostly to manually counteract that damn hunting, and we’ll see how much this negatively affects nailing sharp focus when intentionally focusing manually – these have yet to be tested.]
Anyway, that’s all the jazz I played with to improve autofocus results – turned out to be longer than I imagined. Hopefully someone will derive their own improvements from it.