 From time to time, I play around with infra-red photography, because it can produce some really cool effects, and also because there are ways to make it relatively easy. An old digital camera of mine, the Canon Pro90 IS, can not only capture infra-red light, it can focus it and calculate exposure reasonably as well. All that’s needed is an infra-red filter, such as the Lee 87P3, an inexpensive polyester sheet.
The reason this works is that most digital sensors can actually capture a certain range of infra-red (hereinafter “IR”) light normally, without any modifications. In fact, most quality digital cameras today include an internal filter specifically to block IR light because of this. I tumbled to it entirely by accident, when I noticed that foliage had a tendency to wash out in images made with this camera, as if the foliage alone was being overexposed. I already knew that foliage is one of the best reflectors of IR, so putting this together wasn’t a great leap.
But what is IR light anyway? Well, all light is simply energy in the electromagnetic spectrum, as is radio waves, microwaves, gamma rays, and cosmic rays. What we tend to call “light,” or sometimes “visible light,” is simply a particular range of wavelengths that our eyes are sensitive to, running roughly between 390 and 750 nanometers. Many light sources are not restricted to this range, however, and our sun is a good example. Wavelengths outside of this range are not detected by our eyes, but are still there – infra-red starts above 750 nanometers, and ultra-violet starts below 390 nanometers. Go even further, and it becomes one of those others that I mentioned above. Microwaves, such as those used for cellphone communications, are merely much shorter wavelengths of the same kind of energy.
IR photography simply involves blocking most of the wavelengths we consider visible, but letting through the near infra-red spectrum. Of course, you need a medium sensitive to IR light as well, which can be digital (and tends to produce more consistent results) or special films. But there’s a lot less IR energy than visible, in effect making the IR world more like twilight, so long exposures are needed to get a decent image, and the greater range of wavelengths blocked by your filter, the longer it needs to be.
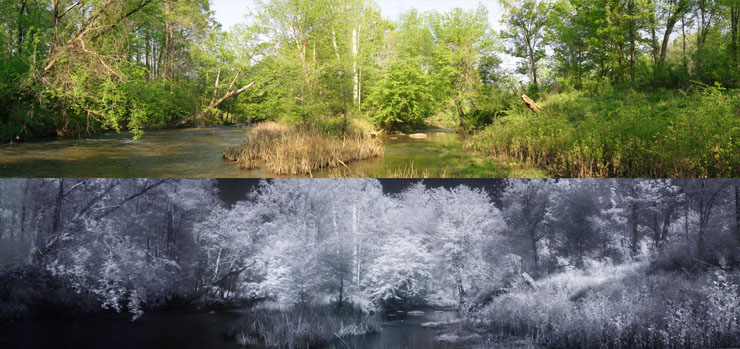
Foliage is a remarkable reflector of IR light, so leaves in bright sunlight come up very bright. But the sky, nice and blue to our eyes, does not suffer from Rayleigh scatter in IR wavelengths, so clear skies turn up very dark, and get brighter with humidity because water does reflect IR. Thus the dark sky and white clouds. And because there is no Rayleigh scattering, indirect sunlight, clouds, and shadow all make IR light extremely dim, so the best results are obtained from brilliantly sunny and clear days (with maybe a few puffy clouds for sky accents.)

Other things reflect IR differently, so experimenting is best. Our skin, for instance, reflects a moderate amount of IR in comparison to foliage, so in a properly-exposed photograph, people look pretty normal, which can make a nice juxtaposition among the ghostly trees and dark sky – provided they hold absolutely still for the whole exposure time, which often goes into several seconds. Yes, a tripod is a must, and a remote release recommended.
Now, here comes more science trivia. Our sun puts out a wide range of energy in a curve, hitting a high peak at about 500 nanometers – yes, smack in the middle of what we call visible light. The thing is, we could see in lots of other conditions, and see entirely different things, if our eyes had a different or wider range of sensitivity to wavelengths. But they’d have to be more efficient, since our eyes now can detect only the wavelengths coming in with lots of energy – this is, of course, no coincidence, but a simple evolutionary advantage of utilizing the greatest available resource. Other species, however, can see different ranges, or with more sensitivity. Many fish can see in certain ranges of ultra-violet (UV) because it penetrates further into the water, and bees use it to spot healthy flowers, which produce a different reflection pattern in UV. Birds have a much more detailed range of color vision than we do, seeing more color overall – where we could tell no discernible difference between 500 and 500.5 nm, for instance, birds can. And they also have a range of UV they’re sensitive to, because it is reflected in plumage to varying degrees and can indicate the health and robustness of potential mates.
But why does it look black & white? Shouldn’t it look, well, red, or very red? With some filters, some color does indeed come through, but this tends to be visible light that is allowed to pass by the filter’s composition. You need to be aware that neither digital sensors, nor the light-reactive chemicals in film emulsion, react to color in any way – both only react to light intensity. To achieve color, you basically need to filter for that color, just like putting on colored sunglasses. For film, it’s different layers of emulsion set into a colored gelatin. For digital, it’s actually a micro-screen of colored filters over every pixel in the sensor. In other words, digital sensors have a dot pattern like a TV screen, but this is eliminated by algorithms in post-processing. IR light, however, corresponds to none of these digital filters, and trickles past all of them equally well in the examples above. Most likely, these colored filters block some of the IR light, which is part of the reason why exposure times can go so long.
Below, some examples of different IR filters on the same camera. At left, a filter allowing only wavelengths above 950nm, well past our ability to see. At center, one allowing wavelengths above 720nm, which intrudes into the visible spectrum and begins to get affected by the color filters in the camera. At right, a sneaky trick – using a black piece of developed slide film as a filter, in this case Provia 100F.

Wait, slide film? Yes indeed. The emulsions on many slide films block most visible light but let IR through, so a black piece of slide film can work. Because of the size of most lenses, you have to go with medium-format or large-format film. The Canon Pro90 IS has a 58mm lens filter size, so I was able to use the blank leader of 120 film which is 60mm wide, mounted in an old UV filter ring.
This leads to another fun trick. Light sensors in other areas are also sensitive to IR light. Slave strobes, for instance, are strobe units that respond to a sudden flash of light (or sometimes aiming them abruptly into bright sunlight, as I’ve blinded myself discovering.) So they fire off when they detect the camera’s strobe unit, and because light travels so fast and electronics introduce only tiny delays, the slave provides additional light to the image. They can be handy to have, since they can throw light from other directions without requiring any kind of wiring or radio linkage.
But let’s say, when shooting normal situations and not IR, you don’t want light coming from the camera, only from the slave set off to the side. Then you block the on-camera strobe with a piece of black slide film, which blocks the visible light but lets the IR trigger the slave. Cool, right? Just one of those quick and dirty tricks to make fancy lighting a little easier. Radio triggers are expensive.
Getting back to IR filters, you should note that all three images compared above have radically different exposure times. When shooting film, you’ll be advised by the manufacturer how sensitive the film is to certain filters (though you’re out of luck using slide film as a filter – the best I can say is that the Provia 100F used above probably lets an additional stop through over a 720nm filter.) With digital, the camera might set its own exposure correctly, or it might require some playing around.
Let’s not forget another tricky thing. Okay, we know that lenses bend light, and looking at illustrations of prisms, they can bend different wavelengths (colors) by differing amounts. Camera lenses are optimized to try and correct this rainbow effect – in visible light. But IR is outside of what they’re created to handle, so to even focus properly, you introduce some issues. Using film, for instance, you can’t focus with the IR filter in place, because we see only visible light, so you have to focus on the scene, then place the filter. But the lens is focused for visible light, and IR gets bent much further, so the lens is now out-of-focus for IR light. You need a lens with an IR mark (only some lenses include this anymore), and you adjust focus according to this mark.
 See the red line by the “4” on this focusing ring? That’s the IR pointer. Once focused without the filter in place, you then shift the focus ring from its alignment with the center pointer (here, pointing at the back of the “5”) to line up instead with the IR pointer. You can’t trust autofocus in most cases because the IR filters don’t let through enough light for the sensor to get a decent contrast reading. The Pro90 can achieve autofocus, but it struggles with the 750nm filter, and is very balky with the 950nm filter – conditions have to be very bright and contrasty for it to lock on.
Want to know if your digital camera can produce IR images? There’s a simple trick, for those where the LCD can be used as a viewfinder. In relatively dim light, use the LCD viewfinder and have someone point a TV remote (any kind should do) at the lens and press any button. If you see a flicker of pale light from the front of the remote, you’re seeing the IR pulse they use, and your camera should be good to go – just find a filter!
Many Canon EOS film cameras are hampered in shooting IR film, because they use an IR light to count sprocket holes when advancing the film – this will fog the bottom edge of your images. It’s not a hard thing to shoot wider and simply crop this out, just be warned of the problem.
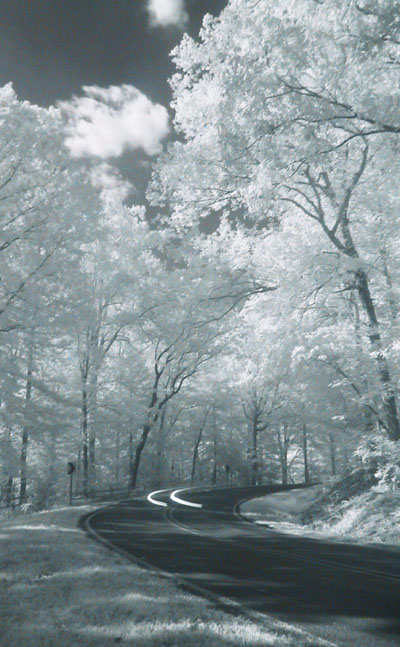
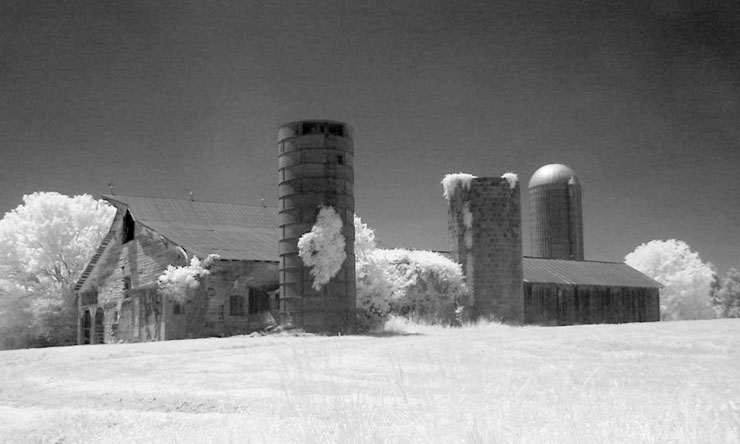
Unless you’re using film, you will almost certainly have some color cast to your images, even the ones that look B&W. You can simply eliminate this by converting to greyscale, or tweak this for good effect. You will probably also find that contrast is low, so boosting it afterward is recommended – play around with the levels until you achieve what you like best. The farm picture above has been converted to greyscale and adjusted in contrast to keep the midtones where I liked them. In the forest road photo at top, I left the color in and tweaked it, very slightly, towards cyan – it’s subtle, but it contrasts nicely with the page background color.
And you may have been waiting for me to explain the bright streaks, or figured it out on your own: yes, it’s a car going past during the four second exposure, with its headlights on. The car didn’t reflect enough light to do anything in the areas it traveled through, but the headlights were distinctly brighter, even in IR. I should have gone for eight seconds…
Two other examples of IR photos can be seen here and here. Finding the right conditions for a good image is trickier, but the results are worth it. Keep watching this space for more examples as I play around some more.


