Going through a slow posting period right now, due to several factors, not the least of which was a nasty virus that masqueraded as a different illness each day, just for the variety it seems. But this also might continue for a little while longer while I leave on a trip, whereupon I should be back with lots to post (right?). So for now, let’s talk about what’s sometimes referred to as “dragging the shutter,” better known as long exposures.
If this is not something that you’ve ever tried, you need to, because it provides a whole world of photographic options on its own. The first real benefit is working with existing light, which might be very dim. But exposure is cumulative, which means that you can keep adding light until you have enough. Slow shutter speeds cannot really be done with a camera handheld, except in rare circumstances, so you will need to be using a tripod, preferably a sturdy one. You may also need some kind of remote release for the shutter, whether it be a strictly mechanical cable release, an electronic one (mostly for the newer cameras,) or even a wireless method such as an infra-red remote. The purpose behind this is to open and close the shutter without physically contacting the camera, because such contact can shake the camera and blur your exposure.
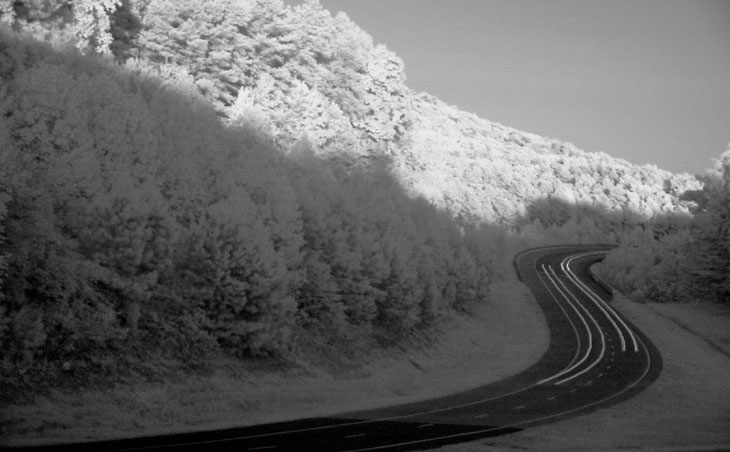
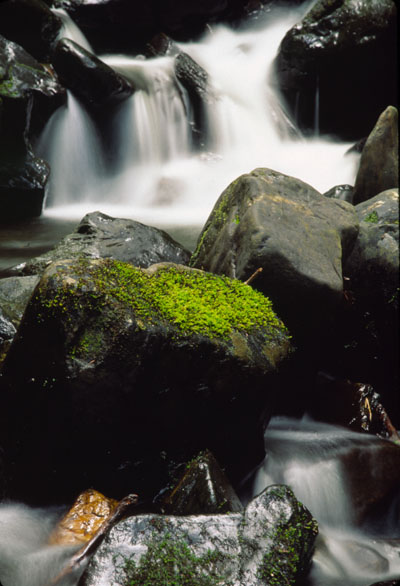
 There is a wide variety of subject matter available, though. In the image at top, there were two reasons to use a long exposure: traffic motion; and the very limited light coming in with infra-red photography. At right, we see one of the more common uses: making moving water go soft and cottony. It can also be used for night photography, especially by moonlight, stroboscopic effects, and even time-lapse video. You’re limited only by your imagination, and I’ll even help with that from time to time.
Judging a proper exposure can be difficult, and sometimes it takes trial-and-error – this is another of the benefits of digital, in that you can at least get a general idea of exposure right after you’ve closed the shutter, with the preview image on the camera’s LCD. Don’t trust this, though, especially at night – the screen brightness often isn’t comparable to what the image will look like on your computer monitor. Bracket your exposures, which means shooting a few frames both brighter and darker than you think is “proper,” just to be safe. I’m betting you’ll find, at least occasionally, that one of the other exposures suits your needs better.
In cases of rapidly moving subjects such as waterfalls, you won’t need a particularly long exposure – you might get by with something as short as 1/10 second, but typically you’ll get nicer results in the 1 to 4 second range. It depends on how much motion across the frame there might be. It doesn’t matter how many centimeters-per-second something might be moving, because this produces entirely different results in the image depending on whether you are shooting very wide, like a landscape image, or zoomed in tight with a telephoto lens. In the latter case, the motion crosses the frame much faster, needing less time to produce a blur, so you can get by with fairly brief shutter speeds.
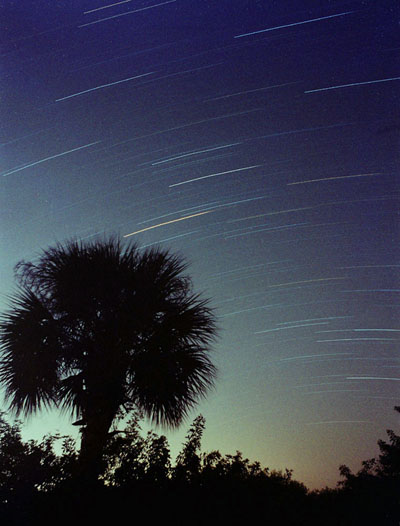
 Often, you don’t need a lot of motion to make a decent image, and too much can produce a mess in the frame. When doing something like traffic or moving people, only a few cars or people are needed, and often only for short distances to convey the idea. Once they begin to overlap, they start getting muddled. For things like bird’s wings or moving wheels, even less time is needed. For star trails, though, it usually takes at least ten minutes for something noticeable, and an hour or more for really distinct trails. This even depends on where you’re facing. If you’re pointing towards one of the poles, for instance, you may need several hours for really good arcs – remember that the stars will produce a full circle by themselves in 24 hours, because you’re actually capturing the movement of the earth. Aiming towards the plane of the ecliptic, basically the equatorial regions, produces much more apparent motion, and you can get by with shorter exposures.
But how do we allow the shutter to remain open without making the image far too bright? The first two steps are by choosing the lowest ISO you can, and by closing down the aperture to a small opening, like f16, f22, and so on. Both of these limit the light coming in, so the shutter speed can go longer to compensate. You can also use lens filters such as a circular polarizer, or something called a neutral density filter. ND filters are named backwards, because they are high density filters (reducing light through the lens) which are neutral in color – basically, they’re sunglasses for your camera (as is the circular polarizer.) ND filters reduce light without changing the color cast or appearance of the image in any other way, and so can help reduce light so a longer shutter speed can be used, for instance in bright sunlight conditions. While these are available in threaded mounts to fit most lenses, you are probably better off finding the versions made for filter holders such as Lee and Cokin, which are large enough to use on all lenses and much less expensive. They have varying values, typically referring to the number of stops they reduce in light transmission. For very long exposures, such filters require a good holder, but for briefer ones like a second or so, you can simply hold the filter over the lens, taking care not to disturb the camera or leave a gap between the filter and the front of the lens.
Circular polarizers, by the way, can be used to cut reflections from water, not only reducing glare, but allowing you to see beneath the surface when used at the right angles. They can also cut reflections from non-metallic surfaces such as glass, and can deepen sky colors.
Also bear in mind that tripods are not the perfectly stable supports that they might seem. It’s easy to make a camera twitch atop one, and if this motion is a significant enough portion of the exposure time, it will show in the image. It will especially show if there are point light sources within, such as streetlamps or bright reflections. This is where the remote release should be used, and if your camera has a delay function among its repertoire, now is the best time to use it. In SLR cameras (including DSLRs,) there is a mirror inside that bounces the image from the lens path to the viewfinder, which slaps quickly out of the way just before the shutter opens, but this often produces vibrations on its own. If the shutter then remains open for periods from 1/15 second up to perhaps ten seconds, this vibration can show in the image. The delay function slaps the mirror up and lets the camera sit for a couple of seconds for that vibration to die down before opening the shutter.
The higher the tripod is extended, the more prone to vibration it is, and even things like a breeze can cause camera motion, something that may not be apparent until you see the resulting image. As a general rule, avoid extending the center column whenever you can, since this is the weakest point, and leg sections should be extended as thickest first, leaving the thin leg sections retracted if possible.
There are some experimental aspects you should try, when you start your forays into long exposures. Something that is present for perhaps half of the exposure will show up, but as a ghostly image that lets the background show through (because, for half of the exposure, the background was not blocked.) Firing off a flash or strobe unit during the exposure can illuminate and “freeze” a foreground subject, sharply overlaying it against the blur of its own motion. Some cameras have a flash setting called “rear-curtain sync,” which fires off the flash at the end of the long exposure, rather than the beginning, and this can be used to have a moving subject lead up to its sharply-defined flash-illuminated portion. A handheld flashlight can be used to illuminate select portions of your subject, or can be used to trace bright lines across the image if facing the camera. Be aware, however, that bright lights straight into the camera lens will produce glare, so flashlights that appear in the image should be minimized or hooded, and car headlights should be at an oblique angle, never directly towards the lens.
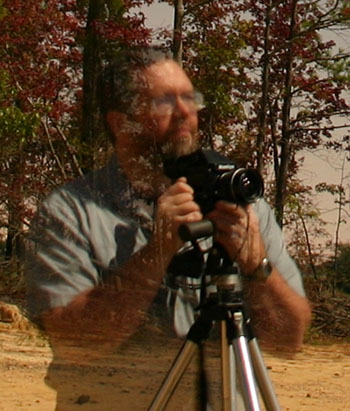
 Exposure relies, naturally enough, on the light actually reaching the film or sensor. In the cases of either partial exposures (where the subject moves or leaves the frame) or multiple exposures (where the light hits the film/sensor multiple times in a single frame,) lighter-colored subjects will overcome darker colors. Note the differences here between the moonlit portions of my shirt, and the shadowed side, even of my face – the transparency shifts according to brightness. And now you know how many “ghost” photos are accomplished ;-)
Another thing you may want to try are multiple exposures – that is, overlaying more than one exposure on the same frame. Some film cameras have this built in, but this isn’t something that digital has been blessed with – or is it? “Exposure” doesn’t have to refer to opening and closing the shutter; that’s simply one method of doing it. What it refers to is capturing light, and this can be done different ways. In very dark conditions, you can provide light for the exposure by firing off a flash or strobe unit, and in fact, this is how those images of extremely fast subjects is typically done, since the shutter can only move so fast, and focal-plane shutters have a certain negative effect (that I’ll go into within another post.) But a flash may be exceptionally brief, perhaps 1/1,000 second down to 1/10,000 second. As long as there’s no other light reaching the sensor or film, the shutter can remain open, and the light for exposure comes only from the flash.
The second method is so simple it’s laughable. Leave the shutter open, and cover the lens with a thick black cloth. Uncover it to expose the film/sensor. Again, it works best if the environment is mostly dark, and you may want the light sensitivity reduced as much as possible, since I’m guessing you’re not that adept at removing a dark cloth for only 1/125 second. At night, I’ve covered the lens with a hat between exposures, so as not to shake the camera. If you’re really into experimenting, some people have taken lenses that have the shutter within them, such as Hasselblads and most large-format lenses, and mounted them via adapters to their SLRs. Then, the SLR shutter is locked open, but the lens shutter is opened as needed for the multiple exposures. A little creativity can add a lot to your photography.
So give it a shot or twelve, and use your imagination. It’s far too interesting to leave out of your stable of techniques.


