


A fundamental part of photography is focusing light onto the recording medium, be it film, digital sensor, or even our own retinas. And the method used for doing this the vast majority of the time is a lens, a transparent substance with a certain index of refraction – the trait of bending light when it passes through the surface of the substance. Put the right correct surface angle in the light’s path, and you can direct it the way you want. What should be known is there is no such thing as a perfect lens, and as a result all photographs demonstrate some form of distortion – some more than others. It can’t be avoided, so it might as well be put to use.
[A small side note here, expanding on a section above: the light bends only at the surface of the transparent substance, both on entering and exiting, which is why the curves of the front and rear surfaces of some lenses are dramatically different. Within the substance, however, it continues on a straight line.]
Far and away, the lenses that demonstrate the most distortion are the wide-angle lenses, the ones intended to capture the widest field of view and cram it all into the frame – the wider they go, the more distortion is present. This is inescapable, at least until we get media that wraps around our heads in order to mimic the scene we would be seeing normally. When you take a view that encompasses 140° horizontally and expect to see it on a monitor which takes up 35° to 55° of our field of view, something’s going to give, and that something is strict accuracy.
It used to be that all lenses were ground spherically – the surface described a portion of a perfect sphere, and only the size of this sphere varied. But the light was being thrown onto the flat plane of the recording medium, not a portion of a sphere like the lens, meaning the edges of the image were further from the point of bending than the center – the result was the center of the photo was typically the sharpest, with the edges dropping off in both sharpness and accurate rendition. Now, with them newfangled computers and them fancy gadgets, it’s possible to make lenses that are aspherical, optimized for a flat focal plane. Such lenses reduce the distortion that used to be found, but still do not fully eradicate it. This means that older lenses, especially the shorter focal lengths that produced the widest angles, are much more likely to show distortion; the same can be said for the more inexpensive consumer lenses, intended to sell at a low price and thus not likely to receive the elaborate grinding.
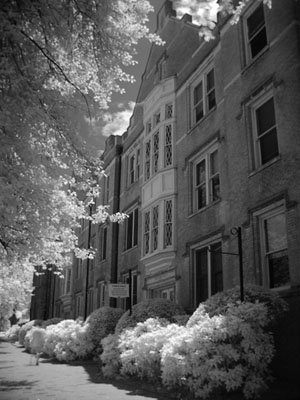 Distortion from a wide-angle lens is often called barrel distortion, but it might be more clear if we consider it fisheye or glass ornament distortion, the kind of effect you see if you lean close to a reflective sphere – your nose gets too big and your ears disappear around the bend of your head. The effect is rarely that pronounced, which makes it deceptive, because then it can sneak in when we’re not expecting it. The most noticeable effect is from vertical elements of the image that are close to the edge of the frame, which may either lean towards the top or bottom center or bow around the middle of the frame – this becomes even more pronounced when one portion of such a subject, like the top of a tall building, is significantly further from the camera than other portions. It can also appear in the horizon if it crosses too far from the middle of the frame, for instance when we aim higher to get more sky in the image and thus the horizon falls towards the bottom of the frame.
There’s not a lot that can be done about this, save for avoiding the circumstances where it’s most visible. Try not to have trees or columns near the edges of the frame when using such lenses; shoot as close to horizontal as possible, so the relative distances are comparable; keep the horizon in the center of the image (bear in mind you can always crop the image later to get the framing you prefer.) The closer a subject is to the camera, the more pronounced this effect will be, too – again, it’s that relative distance thing, and how much the subject intrudes into the dangerous areas around the edges of the lens effect.
We go back to the lens shape again. Since they’re typically round, they throw a round image onto the focal plane – the rectangular frame of most cameras just cuts more off the top and bottom than the sides. So the sides of the frame, and most especially the corners, tend to get closer to the more distorted regions of the projected image and show the worst aspects.
This also applies to a trait called light falloff. If you look at the spot thrown by a flashlight beam, the edges are not sharp – the light fades at the edges, and the same is true for the image a lens produces. This means that the corners of your photo can go darker, and this is true with any lens, not just wide-angle versions. This is most visible when you have clear sky in your photos. It’s subtle, and many people miss it entirely, but it can have a noticeable affect on those scenic shots, especially when enlarged significantly. The nice thing is, this is very easy to get rid of. Simply use a smaller aperture when shooting; the effect usually vanishes when the lens is topped down 2-3 stops from maximum aperture.
 One of the more interesting terms you might hear, especially in regards to lens performance, is bokeh. What it refers to is the appearance of the out-of-focus portions of an image – occasionally, it is used to mean just the highlights in these areas. Ideally, bokeh should be nice and soft, appearing airbrushed and not blotchy as seen here, but it’s a lens trait and, as such, there’s not much you can do about it other than purchase another lens. However, if you already have a selection of lenses at your disposal and you know one is better than another, you can sometimes substitute the better lens in limited situations.
A closely related trait is something I’ve mostly seen from macro lenses, usually when used at or near maximum aperture: image doubling. Some aspherical lenses seem to do it too, and this is likely where it originates. Basically, distinctive portions of an image, like the insect legs seen here, can be doubled when well out-of-focus. This is one that you usually can control, in that it seems to disappear once the aperture is stopped down to f8 or more.
A trait of longer focal lengths is chromatic aberration, sometimes called color fringing. This occurs because different wavelengths of light get bent differently by the same lens surface, and is most visible with very bright objects bordered by darkness – the top of the object may have a blue fuzzy edge, while the bottom has a red one. The effect is often worse the farther the subject is from optical center of the lens. This is usually fairly well controlled in newer lenses, and the reasoning behind multi-coating (a term that isn’t seen much anymore since nearly all lenses feature it,) but the very expensive, high-end telephoto lenses also use additives to the glass to control it, and may advertise “extra low dispersion” or “fluorite” and similar terms. I’ve seen it so rarely, even with the large number of consumer lenses that I’ve used, that I find it much more prevalent in rumor and reputation than in actual appearances in the image.
Color fringing, especially in a very distinctive shade of purple, also appears as a result of many different digital sensors, almost always around bright highlights. This is a camera trait, however, and is not affected by lenses, nor is there much you can do about it except avoid the circumstances where it occurs, touch it out afterwards with editing, or find a different camera body.
 A very common set of effects is glare, lens flare, and ghosting – all closely related and stemming from the same causes. Basically, any time bright light (like sunlight) hits the front surface of your lens directly, the light can bounce around and scatter within the lens assembly, perhaps reflecting off of each surface, maybe only reducing contrast and washing out your image. Note that it is not necessary for the light source to be visible in the frame or viewfinder, only that it is reaching the front surface. Seen here, it has produced red and green ‘ghosts’ on the base of the stump, optically opposite the sun peeking through the roots, and the first way to prevent it is to avoid doing what I did and having the bright sun in the image. But immediately behind that is to use a lens hood – generally, any time you’re outside in bright sunlight, but most especially when you’re aiming in a way where sunlight can reach the front of the lens. In some conditions the hood (especially those made for wide zooms) is inadequate to fully protect the lens, and you might use additional shading, such as your hand or your hat. You can often tell in the viewfinder when you’re successfully shading the lens, as the contrast will abruptly increase and/or the ghosts will vanish.
Also seen here, the sun is made distinct by the presence of the ‘starburst’ arms, which is a trait of lens flare attenuated by the aperture – to see it most distinctly, use a small aperture with a point light source. This is one distortion trait that can be used to great advantage, accentuating the light source and even adding some character to the image. Even the bad kinds of lens flare are often used in movies to drive home the idea of a brilliant,overbearing sun, and this is so much a known thing to audiences that it was even replicated in Toy Story, a computer-generated film that didn’t use lenses and so would never have a reason for the effect to occur – watch for the string of hexagons to appear, towards the end, as Woody sees the sunlight magnified by Buzz’s helmet (he uses this to ignite the fuse on the rocket and save the day.)
All forms of wide-angle distortion can be used to accentuate scale and distances, especially by getting very close to your subject. Any surface stretching away can have the distance exaggerated, but close objects (or portions thereof) can also be made to loom large in the frame. Dramatic, unreal perspectives can be used to give a different impression than what we might normally see, perhaps making a subtle subject leap out at the viewer.
The more an image is magnified, the shorter the depth-of-field becomes, and this applies to both telephoto and macro work. This can be used to increase your subject’s isolation, drawing attention directly to it since everything else in the frame is defocused. Alternately, wide-angle (short focal length) lenses increase depth-of-field and so can allow the entire frame to be in focus – useful for scenic and landscape shots of course, but also helpful in compressing two subjects together into the same apparent plane, like those images of tourists ‘holding up’ the Tower of Pisa.
While distortion alters reality (or at least, that version that we perceive with out own senses,) it isn’t always a shortcoming, and by knowing how to use it, a photographer can create more eye-catching compositions. It’s definitely worth knowing how it works with your own lenses.