


First off, a brief but appropriate celebration.
Woo hoo! Hot damn! Who da man? I da man!
In short, I have just repaired one of my lenses, and it’s working perfectly. The lens in question isn’t one of the old manual ones that I fiddle with off and on, and have repaired many times past, but a complicated modern one: the Canon EF-S 17-85mm 4-5.6 IS USM. Those last bits mean “Image Stabilized” and “Ultrasonic Motor” for autofocusing, and this is one of the real-time models where you can turn the focus ring at any time, while in auto or manual focus modes, and not damage anything in the lens – most lenses cannot do this. All of those things are handy to have, but naturally they increase the complication of the lens assembly to no small degree, and make it challenging to disassemble, but much more challenging to reassemble correctly and have it work properly.
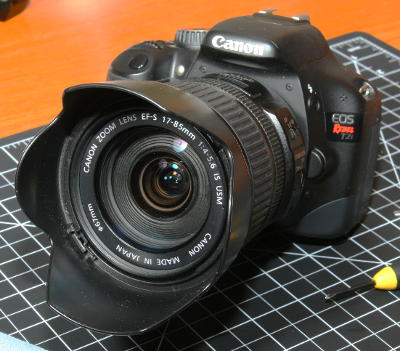 A little background. This particular lens is actually a notorious one from Canon, since this failure issue is well-known and frequent, which may be why I picked it up so cheaply with the Rebel T2i when I got that. It worked fine for me for a year or so, then I began having the dreaded “Error 99” messages when attempting to use it, which basically means the camera body is not getting the expected responses from the electronics within the lens. Sigma was fairly known for this same kind of failure, at least in the 2000s, and they were mostly caused by the same thing: damage to a ribbon cable within the assembly.
Here’s the deal. Both autofocus motors and electronic apertures need to have wired communication with the camera body, to no one’s surprise, but these electronics are usually buried deep within the assemblies on ‘floating’ mounts, meaning they have to move back and forth when the lens is zoomed, often within multiple support barrels. So to maintain electronic contact, ribbon cables are used, flat and flexible plastic with very thin layers of copper laid inside, and these can flex back and forth as the interior bits move. Until they age out, become too brittle, flex too much, or become overheated. Or simply if the lens was poorly designed and they have to flex more than the materials can stand up to. Once they crack or break, the communication ceases and the error messages pop up. This was actually the failure in the old Sigma 28-105 that I am now using reversed as a super macro, and is likely the failure in a Sigma 24-135 that I have gathering dust on a shelf.
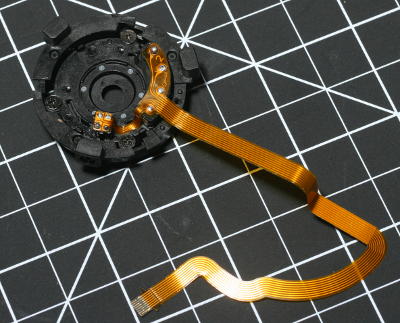 The part itself is quite inexpensive from many sources; it’s just getting to it and replacing it effectively that’s the royal bitch. And I will offer this choice bit of advice to anyone wanting to tackle this themselves: for the Canon 17-85, buy it already attached to the aperture assembly itself. It’s a bit more expensive but well, well worth the extra cost, because said assembly is not intended to be desoldered and resoldered and likely will not stand up to the abuse. I found this out the hard way (which means this was the second attempt.)
There are several videos of the lens disassembly on YouTube, but I won’t recommend any of them: none that I found were done by professionals, or even very good videographers, and all of them left out very crucial details that are absolutely necessary for proper reassembly. Some people just don’t have the knack for instruction, especially of something so complicated and requiring very specific details, and then again, some people shouldn’t even be fucking with the lens in the first place (“I broke this trying to get it apart, so be careful.” No, maybe you have no business trying to tell someone how to do this correctly.) I am presently considering doing my own video, including all of the details (hopefully) that others have missed, but I’m not in a hurry to disassemble this lens again. Perhaps if the failure happens again, or if someone asks me to repair their own…
It also helps to have the right tools, and the right work environment – a house with cats isn’t recommended, though I can’t change that right now. But since I’m involved in car and house repairs, fine-scale model work, and electronics, my tool selection is fairly significant, certainly better than any of the people whose videos I watched, and I wasn’t hunting around for what I needed at all (by the way, I cannot stress enough how useful forceps/hemostats are – I use mine constantly. Get some.)
But all that was Project 2. Project 1 was rebuilding the macro softbox that’s been in use on the Sunpak Auto 322 flash for the past couple of years. The original was made of black matboard, the same stuff you border prints with, and while it worked just ducky, it was showing its age – let’s face it, something made of cardboard isn’t going to last forever, and it’s a wonder that it lasted as long as it did with my usage, really. I’d been meaning to build it out of stronger materials and finally did, making some slight design changes as I did so – not many, really, because the first was carefully planned. I’d added a focusing light mount back in March, and that was a weakness because of the drag that the light itself and the USB cord put on it, but now that it’s acrylic it’s a lot stronger, and the light stays firmly in place.

You can see that I wrapped the base, where it slides onto the flash unit, with wires to maintain strength; the flash head is tapered so the softbox slides on until it gets tight, but pushing too hard could crack the seams in the acrylic sheets that the box is constructed from, thus the reinforcement. Also, if you notice the bright spot on the decking boards at lower right, that’s actually the beam from the focus light visible in the patchy shade of the day – I was only putting the rig together for this illustrating photo, but I realize now that I should have at least aimed the box so the spot fell in front of the lens, and it looked like I was all set for macro subjects.

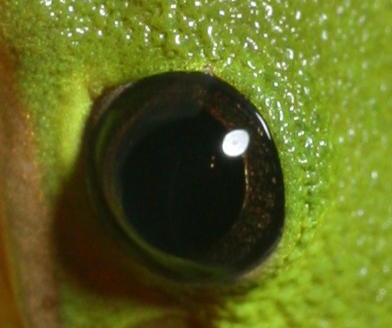 And one other thing that I was wondering about, which was answered when I used it with my subject a few days back. I’d used sheets of clear acrylic for the construction of the entire box, and simply left the big circle unpainted for the flash light to show through. I very lightly sanded it from the inside to make it more diffuse and less harsh, but I left a small circular area directly under the focus light unsanded to keep that as bright as possible, for better assistance in focusing. The concern was that this might show up in sharp reflections on the subject itself, like for instance water droplets, or eyes. As you can see, it does – but if you go back to that original image, it’s going to be pretty damn subtle in nearly all cases. Nonetheless, I’ll probably give that spot a light sanding to soften the effect, at least, and simply deal with the hit to the brightness of the focus light. Since the last version was aiming through a diffusing cloth, which has a heavier effect than sanded acrylic, I suspect I can cope.
Initially I had intended to add a Velcro (hook-and-loop) strap to the top to help secure it to the flash unit, because the rubber band on the old one wasn’t sufficient, but so far the fit has been so snug it hadn’t been an issue; I’ll probably add it anyway just for security. But otherwise it’s doing the job well and I’m pleased with it, even with that little dark spot in the reflection – which exists in the photo of the lens at top, too. You missed it, didn’t you? I used the macro softbox for fill light on the front of the lens, with the Metz 40 MZ-3i as semi-bounce for the main light; Metz on the hot shoe, Sunpak on a flex arm triggered by PC cord. The photo of the aperture assembly and cable was all the Sunpak and softbox, though. I’m feeling pretty good about my lighting rigs now.