I threatened earlier to return to this if you weren’t good, so you only have yourself to blame, but herewith, a quick tutorial on a method of macro photography called dark field photography.
Most times, this is used with microscopic subjects, which technically isn’t macro photography but photomicrography instead. The essence is, the visible background of the image is dark, yet the subject is backlit to shine light through the body and show very fine details. This is accomplished by using an oblique light source, which avoids shining light directly into the lens. For macro photography, this is very useful for small subjects, especially aquatic. It doesn’t require a microscope, but does require either a kickass macro lens, or using one of the varieties of high magnification tricks:
* Bellows – Essentially a long and highly adjustable extension tube. When you move a lens further away from the camera body, it magnifies the image on the film plane just as moving a projector further from the screen enlarges the projected image. Bellows can be used with a variety of lenses for different magnifications and effect, but usually require manually closing the lens aperture since there is rarely any connecting apparatus between camera and lens;
* Lens reversal – A wide angle lens can be mounted on the camera backwards, usually with an inexpensive adapter, providing significant magnification. This usually eliminates any aperture control whatsoever, unless you use a lens that lets you set aperture manually;
* Lens stacking – This means putting a shorter lens, such as a 50mm, reversed onto the end of a telephoto, also producing very high magnification. A tele zoom is recommended just for a bit more versatility, allowing the zoom adjustment to stand in for focusing – otherwise focus is largely achieved by moving the camera forward and back, because the standard lens focus becomes almost ineffective with stacking. Both lenses should be very sharp examples, by the way, because aberrations are compounded with stacking;
Now, here’s the rig:
 “A” is the camera and lens setup, in this case a bellows and 50mm enlarger lens. It is highly recommended that this all be mounted on a slider of some kind to allow the camera to move closer to and further from your subject stage, which is how gross focus is achieved at such high magnifications. Here, I took pains to get the camera and stage at a height to make it easier to use from a chair, avoiding other pains such as a badly stiff back and neck from crouching. Learn from my trials.
“B” is the stage itself, a basic drinking glass. In the bottom sits a small piece of black cloth; in the top is lodged (perfectly level) a lens filter. Anything reasonably clear will work – mine is an old UV filter. Essentially, it’s a clear support for your subject, and for aquatic subjects it’s a shallow pool. Many filters aren’t perfectly watertight, so adding a little wax, petroleum jelly, or caulk to the underside edges will help prevent draining. All of this is placed on something to get it close enough to the camera to be in focus range, and for preference on a surface that allows sliding the glass sideways smoothly, which is much easier than moving the camera as your subject moves to a new location.
“C” is your camera strobe/flash, aimed upwards at a 45 degree angle or so through the bottom of the filter. The goal is for the light to hit the subject, but be aimed well away from your camera lens. While you can link this to your camera with a TTL cord seen here, this can also be triggered with a radio slave, optical slave, or even by hand if necessary. A strobe with manual power output is much more versatile, but you can adjust light on even a cheap strobe with white plastic bag diffusers, angling it slightly away from the subject, or by adjusting the distance of the strobe from the subject. Bear in mind that you’re probably going to be working at small apertures to force depth of field as high as possible, so a lot of light output is often necessary.
“D” is a strong light source so you can actually see to focus, since most of the lens options will reduce light significantly. With such a close subject and/or small volume of water, the light can heat up your subject to an unhealthy degree, so keep it as far as you can to still allow enough light to focus, and swap out your subjects and water frequently.
Also seen is the eyedropper used to fill the filter with water, as needed, and wrangle your subjects to the stage. With most tiny aquatic subjects, only a millimeter or three of water is sufficient for them to swim around happily, and will prevent them from going ‘deep’ and out of focus range. In essence, you’ve produced only two dimensions of movement (which still can be enormously frustrating, given the tiny view angle you’ll probably have, but much less frustrating than three dimensions.) It helps a lot to have some bit of debris or whatever in the water at the same depth/distance as your subjects, so you have something to do focus and light tests on that isn’t moving, and in fact a few of them provide visual cues as to just where you’re aiming when your subject starts going walkabout across the stage.
So, how does it work?
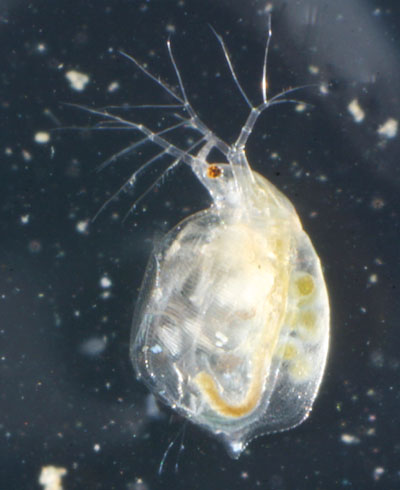
 Fairly well I think, considering that nothing I used was designed to accomplish this. This is a daphnia, an aquatic microorganism that fits into the overarching term of “plankton,” but if you want more of a description than that I’ll urge you to use that link. This one is fairly large as my captured examples go, meaning the total body length spans about the size of a pinhead. I had several within the rig, and this one paused long enough in its mad perambulations for me to focus. The antlers are antennae that serve double-duty as swimming appendages, and yes, that’s an eye visible. I’m guessing that’s an intestinal tract and not a walking cane carried internally, but seriously, I just take pictures; someone else can expound on the anatomy.
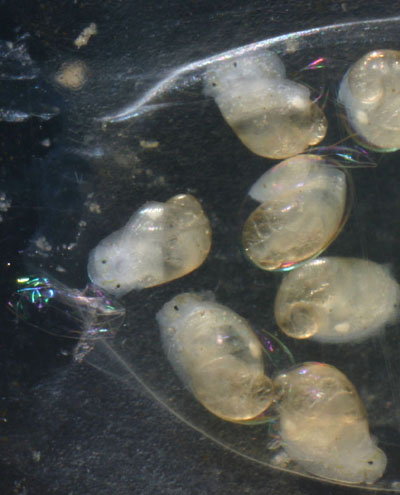
The dark field method tends to give great views of anatomy and internal structure, though it is faintly misleading in helping someone spot one of these on their own, since it uses transmitted light and not reflected. Daphnia and copepods usually appear very pale brown in color, and little more than ovals, but they’re easy to obtain – I have zillions in the tank right now. I also, without trying, had snagged up some snails eggs that had detached from their adhesive sac, so these went onto the dark field glass too. If you want to have fun, show this picture to someone (preferably female) and see if their reaction changes when you tell them these are baby snails not long before hatching.

Aren’t they adorable? Yes, two of them are facing the camera (though I’m not too sure about smiling) and one is in profile – those are indeed eyespots. The diameter of the entire egg is roughly that of a straight pin shaft. Note how the light angle gives nice definition, if not a three-dimensional effect, to the transparent eggshells, and I have an even better one coming. Granted, less schmutz in the water is desired, but it’s hard to filter the water without screening out all the little cuties living within.
Setting up such a photography rig is a little fussy, requiring a small devotion of time, but it’s hardly elaborate – I’ve done setups, a collection of frames on multiple subjects, and tore it all back down again within an hour. The tripod is the key – effective focus is a very tiny range, a few millimeters at best, and even going to minimum aperture doesn’t change this much, so you’ll want a camera support that doesn’t twitch or settle at all. You’ll also want to get in the habit of not touching the camera except when absolutely necessary, and then doing so gingerly.
As for lens choices, that really depends on what you can lay your hands on. I’ve used the bellows with a screw-mount Vivitar 135mm that I purchased for $25, an Argus Cintar 50mm, and a cheapo Omega 50mm enlarger lens. I have also done a combination extension tube and lens reversal. Since the bellows had come with Nikon lens adapters, the latter two lenses were mounted to Nikon body caps, drilled out to the right size to admit their mounting rings (Dremels are wonderful things.) Getting the lenses mounted perfectly centered isn’t absolutely necessary, since shifting a lens slightly to one side only shifts the image in the opposite direction – that’s how image stabilization lenses work, as well as perspective-control lenses – but having them mounted flush is important. Lenses are optimized towards a flat plane projection surface, the digital sensor or film, and having them tilted slightly will reduce depth of field, not something you can afford to do with macro work. These pics here, by the way, were with the enlarger lens.
 You can also do dark field work directly through the side of an aquarium, camera mounted horizontally like normal rather than vertically as shown above, but this reduces your flexibility a bit. First off, you’ll be waiting for your subject to hold still against the glass, or choosing a fixed subject (no, you’re not going to nail a free-floating subject with magnification this high, and you’ll die of apoplexy trying.) You typically have to move the camera every time the subject shifts, and with focus this short it often takes a couple of minutes to get everything back sharp – or even find it! And the sides of the tank introduce more distortion than simply shooting through the top surface of a film of water – a lot more, if they’re plastic and in rough shape.
Here, I picked one of the egg sacs on the glass, catching the snails in the process of hatching. The soap-bubble-like diffraction shows empty eggshells, and you can see several fully-hatched snails, and one (center bottom) in the process of freeing itself. The flash is aimed through the top of the tank towards the back of the tank side, and coming at this oblique angle, with settings of f16 at 1/200 second, the rest of the tank went too dark to show in the background. I’d polished the scratched sides right over the egg sac (Dremels are wonderful things) so I’d have a better surface to shoot through.
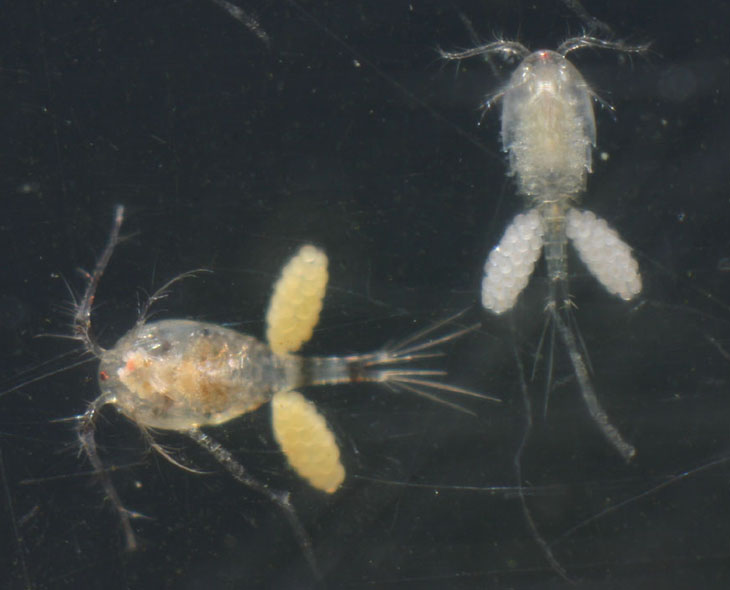
Unlike the image below, where two egg-bearing copepods paused, with remarkable cooperation, right smack alongside one another long enough for me to move the rig and get some nice detail shots. The horrible condition of the sides is what produced the streaks, yet I still managed to get the image sharp enough to show more than a little internal detail. Notice the difference, however, in the resolution of the antennae versus the eggs, most especially of the one to the left. That’s simply a result of the eggs being a different distance from the lens than the antennae, and the very short depth of high magnification was enough to throw them out of sharp focus, even though we’re talking fractions of a millimeter.

So, put it all together and take a shot at it. It’s definitely very cool to see the details of something barely visible to the unassisted eye. Have fun!


