


Focal length. Some people consider it the “zoom” of a camera. It’s expressed, though not really explained, by the numbers on the lens that say “18-55mm” or some such. Essentially, it determines how close the subject appears, the magnification or lack thereof. There are, naturally, the obvious aspects of using focal length in composition – “short for scenics, long for telephoto” – but there’s much more that can be used to create the images you want.
Only slightly less obvious is the cropping aspect, allowing the photographer to select how much of the frame their subject, and its setting, will take up. In the efforts to simplify the image, or to select just the setting that communicates a particular idea, focal length becomes very important. It’s too easy to include too much, distracting the viewer, or too little, and provide inadequate information for context or locale, so changing the focal length allows for the best control of these.
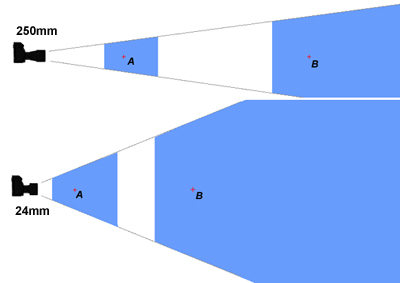 However, there are specific properties of focal lengths that can be exploited as well. The first of which is depth-of-field. DOF automatically becomes greater at shorter focal lengths, assisting in the pursuit of scenic images – and DOF also reduces for longer focal lengths. This means that it is easier to ‘isolate’ your subject by having it much sharper than the background if you use a longer focal length; the blurry background fails to grab the viewers attention and becomes inconsequential. But be aware that DOF is shorter the closer you focus, for any given focal length. In the illustration here, depth-of-field at f16 is indicated in blue for given focus points A and B, for a long focal length such as 250mm (top) and a short focal length such as 24mm (bottom).
So when focused at point A, DOF is relatively short, but at B it might include everything behind the focal point, all the way to ‘infinity’ (this is called hyperfocal distance.) Notice that DOF is different for the different focal lengths; also notice that it extends further behind the focal point than it does in front of it – this it typical.
And then there’s the sneaky trick: you don’t have to use a long focal length solely for distant subjects. Since DOF is shorter both with a long focal length and with closer focus, you can achieve a narrow DOF by using a telephoto lens, focused as close to the camera as possible. The focal length you use can determine how well DOF works for you. This is the reason why you might hear that focal lengths in the range of 80-120mm are good for portraiture; this allows DOF to cover a person’s face, nose to ears, but not much further, letting the background go soft.
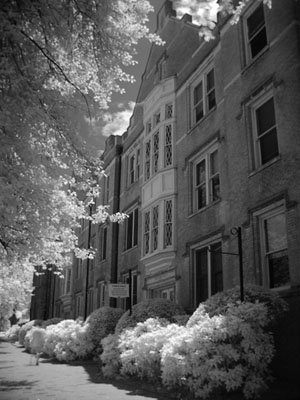 There are other effects as well. Short focal lengths, often referred to as wide-angle lenses, typically introduce a certain level of barrel or spherical distortion, as if the image is projected onto the surface of a sphere. Aspherical lenses correct for this to some extent, but the effect is usually still visible, and this can be made worse by straight lines near the edge of the frame, or that are not parallel to the image plane (for convenience, just consider this the camera back.) Thus, if you tilt the camera back to capture a tall building, the building may lean or even bow in the resulting image. This can be used to accentuate height, if desired, but it can also give your images an unrealistic distortion. Most especially, this can turn up when you’re attempting a wide panoramic image, and efforts should be made to keep the horizon centered in the image to avoid producing a bowed horizon. You can always crop the image more usefully later.
This leads to two quick tips. The first is, shooting frames a little wider than what you envision the final print to be will allow for some wiggle room – it’s easy to crop down, quite a bit harder to add to the image afterwards. Shoot as many frames, in different focal lengths, as needed to ensure you have what you need.
Also, if you’re considering doing a ‘stitched’ panoramic image, putting together several images in a line to make a really wide vista, you probably do not want to use your shortest focal length (widest angle,) because the lens distortion will work against you and the edges will never match up correctly. Instead, use a focal length as close to ‘normal’ perspective as possible, which typically means roughly 32mm for APS-C digital sensors (1.5 or 1.6 ‘crop,’) and 50mm for full-frame digital or film. It will mean more frames, especially when I tell you to overlap the frames by 25-30% – this provides that wiggle room in choosing where to overlap and helps to mask distortion, which gets worse towards the edges of the frame.
 Then there’s a little something called forced perspective. The distance of the subject from the camera determines how big it will appear against the background, and this remains the same regardless of the focal length used. While the sun and the moon are quite small in the sky, able to be covered with your thumb at arm’s length, the focal length determines how big they will appear in the frame. Something like a bird or a beachcomber can be distant enough to be quite small – as small as the setting sun, perhaps – and a very long focal length can make them both loom large in the frame (even more than this – remember that you can always crop to make such things take up even more of the frame, but the foreground subject has to be the right distance to give the perspective you desire.) Closely coupled to perspective is your own shooting position, so don’t just stand there – crouch, stand on tiptoe, climb on or under something. Do what it takes to make the most of the different effects of focal length.
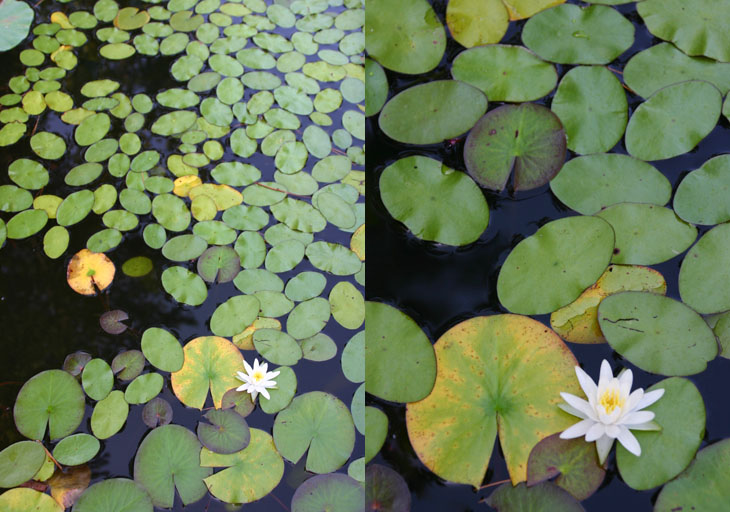
Also, the distortion of a wide-angle lens can make small, close subjects become accentuated and very dramatic in the frame, something you can often accomplish easily because short focal lengths can usually focus very close. Also visible in that image is the apparent difference in viewing angle between the bottom and top of the image; you seem to be looking downward at the bottom, but straight out at the horizon at the top – and this really is the case, the same distortion mentioned earlier, and this can be used to good effect to make the image draw the viewer in (it can also be seen in the first image for this post.) Sometimes it helps to consider that a wide-angle lens will produce an image that can ‘curve around’ the viewer. It’s also not hard to imagine why a short focal length is very bad for portraiture.
Something to be aware of, when switching (or zooming) focal lengths, is that the exposure may change because more or less bright sky will be captured, or the background isn’t consistent between a narrow and wide viewing angle. Watch the automatic settings that the camera produces as you switch, and override them if you feel this is necessary.
Another quick tip: longer focal lengths often do not focus very close at all, limiting their use for close subjects, but a simple extension tube can help overcome this. At the same time, it will further shorten depth-of-field, and will eradicate focusing at ‘infinity’ entirely – the longer the extension tube, the more long-distance focus gets cut off.
I never push anyone to obtain more equipment, but if you’re getting the impression that a good range of focal lengths provides for the greatest photo opportunities, you’re not mistaken. And to make the most of it, you should aim for the fastest lenses you can afford (meaning those with the largest maximum f-stop, or smallest f-number, like 2.8 or 4) – these provide even more flexibility in using depth-of-field to your advantage, as well as improving autofocus and giving better low-light performance. I’ll be the first to admit these get expensive, often ridiculously so, and you have to be your own judge about cost versus usefulness; if you’ve only shot a few hundred frames in the past year, spending a lot on lenses may not be justifiable. First, make sure you’re using them to their fullest potential, and remember that it’s your own creativity that produces the image, so exercise that foremost.