I think most people know that there are certain kinds of fires that you don’t throw water on to extinguish, primarily grease, oil, gasoline, and electrical. In such cases, water is simply going to make matters much worse, either by splashing and floating the burning substances to disperse in a wider range, or by producing greater damage to equipment and creating the potential for electrocution. For this knowledge, we can thank numerous organized campaigns that drilled the information into our heads, usually at a young age, but what this highlights is that some things that we might do in the belief that they will improve a situation end up doing more harm than taking no action at all. This really cannot be emphasized enough; intentions must be married to actions that produce a positive result.
While this might seem obvious, that’s what becomes so disturbing about so many things we come across. People for the Ethical Treatment of Animals (PETA,) for example, has a fairly inarguable goal: to prevent animals from being treated poorly. Unfortunately, this goal is used as supposed justification for activities running from pretentious and condescending ads to pointless vandalism; the end result is a widespread public view that animal activism belongs to the fringe elements. Having worked at a humane society, I got to see this firsthand; while we never engaged in any kind of sensationalist media ploys or extremism, we still received an attitude of “guilt by association” from far too many people, and were at times considered to be radicals.
Feminism, as I’ve touched on briefly before, is another example. Unable (or unwilling) to differentiate between legitimate sexual inequalities and fantastic patriarchal conspiracies, feminism generates a “women with emotional issues” dismissal among a significant percentage of our population – which, all too often, is then considered by feminists as proof they were correct about the conspiracies; the polarization within the topic probably exceeds even that of politics, since politicians are not one-tenth as likely to be called potential rapists routinely.
And, the list goes on: the anti-vaccination movement, abstinence-only education, the anti-GMO crowd, Greenpeace… superficially, all displaying noble goals that could be said to benefit the entire human race. The part that gets missed far too often, however, is that there is a difference between the emotional and practical aspect – the intention and the execution. Despite stupid proverbs about paving, good intentions are something we really could encourage more in any society (as opposed to the idea that we’re all in competition with one another,) but what makes any difference at all isn’t the intentions within our heads; it’s the ways they translate to real-world differences. The question that should be asked before any kind of social activism (and most especially any action linked therewith) is, “How is this going to improve things?”
We’ve all seen videos of Greenpeace boats harassing whaling ships or trying to block waste dumping in the ocean. And I think it’s safe to say that we’ve never seen any of those targeted ships give up and go home. The only thing that’s going to stop industrially-sourced damage is legislation – the threat of legal consequences that hits someone much harder in the pocket than doing business in an environmentally conscious manner. Someone can argue that Greenpeace’s actions are “raising awareness,” but such a statement should be supportable by solid facts, not just the belief that it could work. And at the same time, the “awareness” that is raised should be predominantly positive as well – there really is such a thing as bad publicity.
With many of these subjects, the underlying motivation is emotional: compassion (over the plight of children or animals,) frustration (over the ills provoked by a capitalist outlook,) and even, perhaps mostly, ego (I am the one who’s going to make a difference!) Emotions are good, in that they motivate us towards choices and actions, but they are misleading in many ways too – it’s possible to appease an emotional desire without in any way improving something, meaning all that the emotion produced was self-indulgence, a placebo if you will. Without asserting the rational processes in ourselves to examine consequences and results, we may start to believe that we did something useful when our actions were simply a “knee-jerk” response – this is what underlies drug addiction and standing on streetcorners with signs bearing biblical quotes.
I’ve written about genetically modified organisms before (otherwise known as “GMO”) and this is an extension of the “chemicals are bad” meme that started with Rachel Carson’s book Silent Spring and the birth of the environmental movement. It soon became the demonization of “processed food” and the belief that all corporations were completely dismissive of negative consequences. Most of this, however, is the result of people who have reduced their thinking processes (if it can even be called that) down to pre-school levels of “good” and “bad.” Processing food does not destroy all nutritional value, and chemicals are not all detrimental to our health. My statement above may be taken to mean that I think the environmental movement was a bad idea, but that’s just an ironic demonstration of how the point is entirely missed: no such all-encompassing term such as environmentalism can be branded with a binary “good/bad” label, and the functionality of environmentalism comes from careful consideration of the consequences of any action. Arguments go on to this day regarding the effects of DDT – it’s incredibly damaging to the environment; no no, it could have eradicated malaria if we hadn’t banned it! Looking at the facts, DDT is less of an environmental hazard than mercury, but it does remain in soil and water for long periods of time, and does produce serious negative effects. The reasoned approach is to examine the negative and positive effects (which every practice has) and know how to compare them to determine an acceptable outcome. Instead, what we often see are people seizing onto whatever factoid they can use to support their existing standpoint and wielding that as a bludgeon – coerced by their emotions away from the most functional aspect of our species, the ability to think rationally. Or, we see the unwarranted extrapolation of any given fact towards the extremes, resulting in people believing that chopping up fruit or heating vegetables turns them into worthless dust (which, even if it did, does not translate into being bad for health either.)
There is another hazard that goes along with this kind of thinking: someone else will recognize the lack of critical distinction and exploit it. The vast majority of the ‘health food’ movement revolves around shameless manipulation of the facts, when facts are even involved; the movement is rife with things that have no basis in reality. Those that believe that “organic” means “healthy” are suckered into paying premium prices for foods with a meaningless label: “organic” has no regulated definition in regards to food labeling, at least in the US (I cannot vouch for other countries.) Meanwhile, poison ivy also fits in with just about everyone’s definition of “organic,” which shows the problem with resorting to simplified thinking. A pesticide that washes off and isn’t retained in soil has not harmed anyone’s vegetables in any way, and some pesticides don’t even have a negative effect on humans anyway. Their use results in higher crop yields, which means lower prices and more efficient use of land and resources. Alternately, some pesticides really can do a lot of damage – the word “pesticide” does not tell us anything other than “intended to reduce insect damage.”
But then there are the times when simplified thinking completely fucks things up. The catholic proscriptions against condoms, and the absolutely brain-dead attitudes towards sexually-transmitted diseases, results in thousands of unnecessary deaths every year – solely from the pursuit of piety, perhaps the most self-centered activity we can get up to as a species. Not only does this ignore every last vestige of evidence, research, and logical thought, it relies on a self-proclaimed authority produced entirely from an arbitrary interpretation of scripture. Condoms (and STDs, and abortions, and myriad other concepts) were completely unknown when scripture was written and there are no references, even obliquely, to their existence – religious pronouncements on such topics come solely from creative interpretation. While a fool might declare their utter confidence in a subjective line of supposition, it takes a special form of hubris to declare such authority from it that one is promoting lethal consequences – especially when also claiming that all life is sacred from the other corner of the same frothing mouth. What’s at work here is strictly emotional, a fixation on some idea that produces strong feelings (such as distaste over pre-marital sex,) that motivates a specious line of rationales in support, rather than any consideration at all that the original idea might be ill-conceived.
There’s a curious progression that can often be found buried within any individual’s activism, or just their strong attitudes – something I touched on in an earlier post. A kernel of trustworthy information forms an initial reaction – say, several corporations have been found dumping hazardous chemicals into public access water – but then the snowball heads downhill. Any and all similar occurrences reinforce the idea that this is widespread or common, without the comparison to how many corporations do not engage in dumping, or the realization that a connection between “corporation” and “toxic waste” is a complete failure of logic, as much so as a connection between “human” and “criminal.” On occasion, supporting “facts” may be selected only on the basis of how much they fit the concept, with no examination of how strong they are or if they even exist. Tied in with this might be frustration that others do not find the topic as important; alternately, that the individual can save many others through their efforts – a hero, if you will. Compounding it might even be an inherent distrust over government bodies, meaning any and all contra-indicators could possibly be deliberate misinformation to allay the public’s reasonable concerns. No single part is particularly farfetched – there have been numerous cases of corporate-level social disregard, and even campaign contributors that received special dispensation from favored politicians.
What’s missed is that the goal is not to concoct the plot of a novel, but to establish real facts beyond a reasonable doubt – not plausibility, but a high degree of probability. And to determine this, anyone must be capable of viewing the details objectively, and with the realization that their emotional commitment can affect their judgment. The problem is, their emotional commitment is the very part that provokes them away from the rational consideration of all the factors – it is more satisfying to prove oneself right (and, quite possibly, heroic) than to find many of the factors to be unlikely or just plain wrong. This immediate emotional indulgence, and often the justifications of an attitude by dismissing the negative evidence, can easily produce actions that actively, irrevocably harm others far more than the imagined fears of the topic of activism ever could. It is not enough to start a journey in the right direction: it must maintain that direction throughout.
Mark Lynas illustrates this at length, in his quest of contrition over his GMO activism. I have a great deal of respect for his ability and desire to correct his mistake, and I sympathize with the guilt he undoubtedly feels. But there’s another lesson in there as well: finding the flaws in his attitude sooner might have prevented a lot of emotional turmoil, and might even have lessened the impact that anti-GMO activism had over the past decade. It’s much easier to prevent a wrong than correct it. To do this, we need to be ready and willing to find where we go wrong – ignoring errors does not make them cease to exist.
Some of our thinking shortcuts can contribute to these errors significantly. For instance, few major decisions present distinctive ‘sides’ or boundaries – they’re far more likely to be shades of grey that require a lot of consideration, but we prefer things to be polarized and often try to make them more so. We also allow ourselves to be influenced by a majority, or believe that someone we like is more trustworthy; celebrities are used as spokespeople because it makes so much sense that a tennis player knows a lot about cameras, right? Large groups of people (that have self-selected by finding only those who agree) cannot be wrong? We can even fall for the idea that if someone came to the same conclusion that we have, their reasoning must be correct. There is no rule that can be applied here, but if we have strong feelings about something, this is a great warning sign that we might be about to mislead ourselves.
There is a semi-common attitude that critical-thinking is almost antisocial, basically displaying distrust in everything (and everyone.) Yet, the alternative can and does result in feeling perfectly accepted in social circles while producing horrific consequences for many others. There’s nothing wrong with protecting animals, with promoting healthy eating, even with discouraging casual promiscuity. But the results are what matters, not the personal feelings of importance.


 I’m making this post because I have to face up to my problems if I want to defeat them.
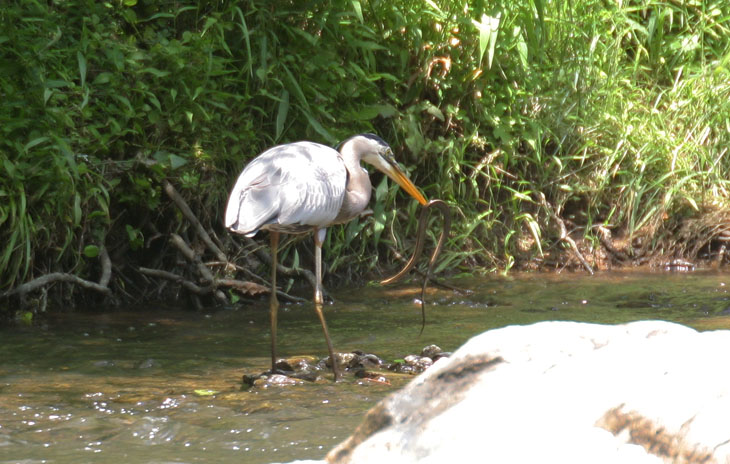


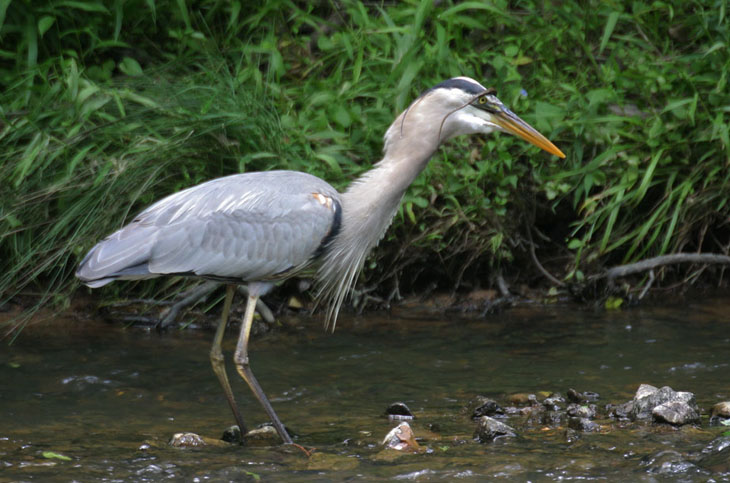
 With a little stretching and internal adjustment, the snake was gone, and if you’re looking at the peculiar shape of the neck and wondering, yeah, so am I; I wish I could tell you more, but I’d only be speculating. Immediately afterward the heron took a couple of drinks of water, possibly because snakes are drier than fish and herons have minimal salivary glands – they just go down better with a chaser. There’s also the possibility that the heron was picking up a few river stones to aid in digestion, but I have not determined yet if they actually do this. Without teeth, most birds have to break up the tougher foods somehow, and this usually occurs in the crop, a kind of pre-stomach at the base of the neck. A few stones or, in the case of smaller birds, some coarse grit added to the crop serves as grinding surfaces to break down their meals for better digestion.
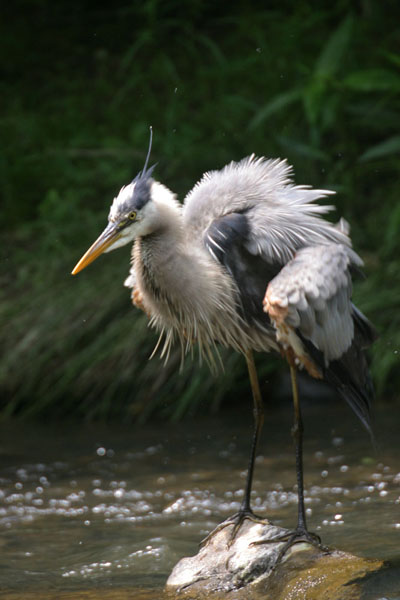 While it might seem ‘easier’ for birds like herons and hawks to simply re-evolve teeth, that’s not how evolution works – even though it might only require a very simple genetic change, since the gene to develop teeth likely remains but is inactive. Genetic change is haphazard, initially random changes, and if it proves to be beneficial to the species it’s more likely to be passed on to the offspring. It could be that a change similar to teeth just didn’t occur again; it could also be that it did occur, but at that point in time it wasn’t useful, since the herons’ ancestor then was not eating snakes and crayfish and such (modern great blue herons will eat about
 I had the flash unit dialed up a little too high for the first shots, like that seen here, and eventually changed the camera angle to see if I could get the adults and young framed better. There’s a bit of folklore that animals are scared of a camera flash going off, and I’m happy to tell you that in my experience this is total nonsense. If you think about it, most animals have seen thunderstorms in their lives, and a brief flash of light doesn’t appear on their list of mortal dangers. I’ve seen some give a quick start in surprise, only on the first flash, but none that have ever appeared negatively affected – I’m even skeptical that species which are sensitive to light, such as sea turtles and cephalopods, could possibly be affected by a brief flash, because sunlight (which is sustained and many times brighter) would permanently blind them. The bluebirds paid more attention to the shutter noise, and that wasn’t much, since I have 36 images of feeding in a little over an hour – they weren’t exactly spooked. And with most songbirds, the feeding instinct is so high that there’s little that makes them hesitate too long, though it still isn’t worth harassing them to find out what their limits are.
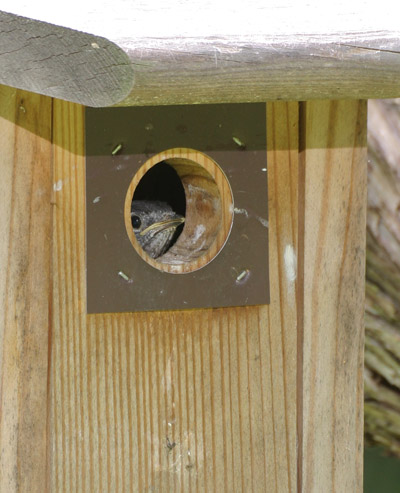 I knew we were getting close to fledging time, since I’d peeked in on the young every few days to see their development. Last year I had missed it when it occurred, and I was determined to try and get it this year. The young were also giving some strong indicators, including fairly regular peeks from the box, giving the impression of an elderly woman noting that the new neighbors have small children. In conditions like this the flash angle is important, because the depth of the box can throw shadows across the sprogs within, so I’d repositioned the flash to be high above the camera but in the same line – note how the shadow of the roof just misses the box opening (the sun actually sits behind the north-facing box, which I believe makes the adults happier but isn’t exactly a bonus to photography.)
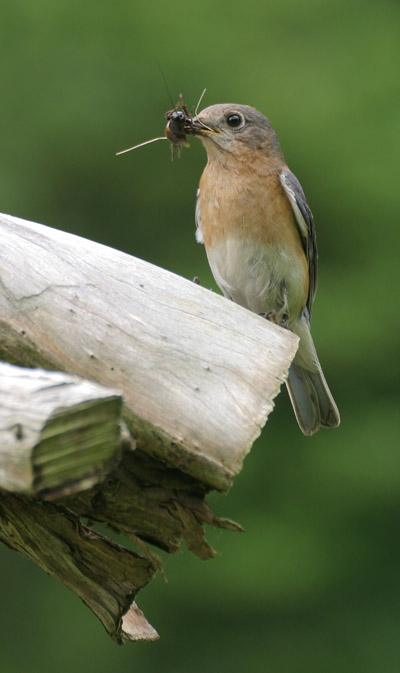 Last year we’d witnessed two different broods in the boxes, so it’s possible I’ll get another chance this year – I’ll just have to keep my eye on them (and keep encouraging the insects in the yard.) In the meantime, I’ll close with the first image I got, while I was still setting up the equipment. I glanced up from focusing the camera to find the female waiting impatiently for me to finish so she could stuff the kids – she was on the stump just to the right of the box. I twitched the camera around and fired off a frame before she could bolt, not even sure if the settings were solid, but I can’t complain about the image at all. And just FYI, we didn’t do that butcher job on the stump, which had been a thick variety of cedar bush. Inexperienced help which misinterpreted the landlord’s instructions had treated it like the pampas grass, which really does need cutting back to practically nothing each winter; the grass grows back, the bush was a goner. If I was more ambitious, I’d try to carve something creative out of it, but right now it serves as a nest box support just fine.
 Sunpak makes a flat-panel flash unit, the


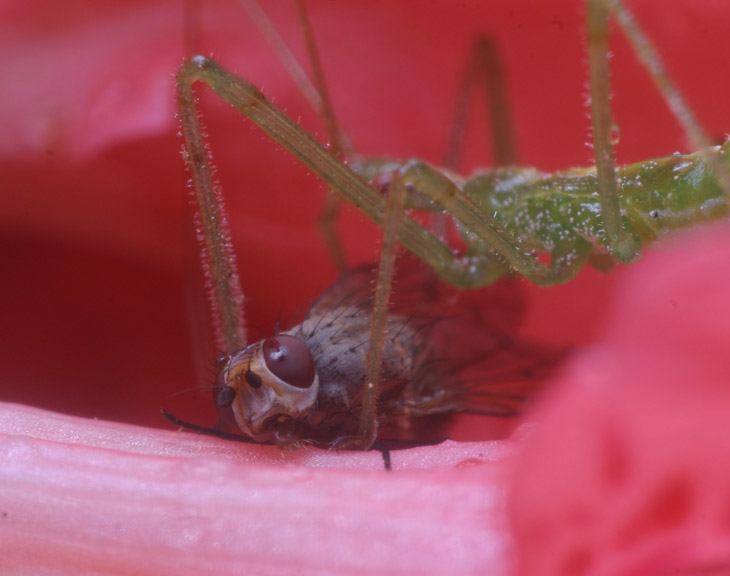
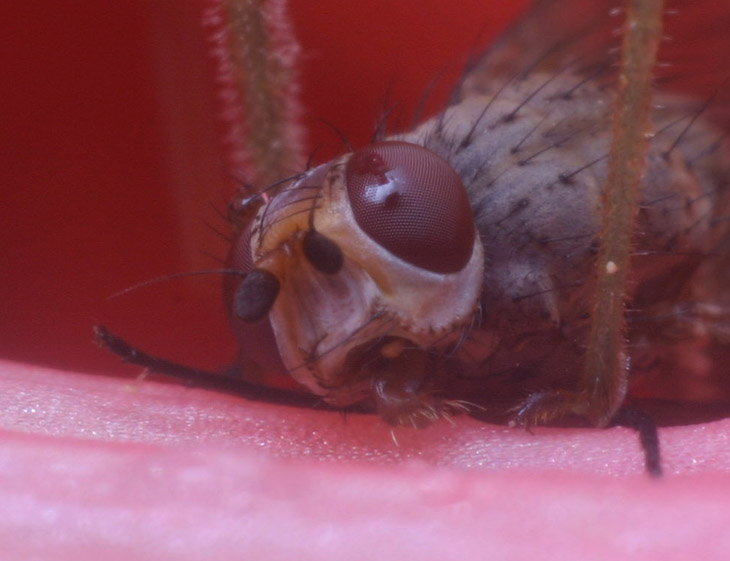
 Perhaps this displays better with a side-by-side comparison of the same species of cricket – direct flash on top, and the flat panel with diffuser on the bottom. Shiny black subjects are the hardest to achieve good lighting of and virtually need a diffuser of some kind, for reasons shown here – pay attention to the shadows too. The color is better, the textures more apparent, and even the implied conditions much more mellow – the top image communicates searing sunlight, high noon in the desert. Diffuse light is just a more pleasant result. Further samples can be found attached to some of the past several posts with arthropod images, for example
  I’ll also take a moment to throw out a comparison with the ring flash. This is a flash tube that surrounds the lens, which produces almost no shadows – this is sometimes a bad thing, because it’s the shadows that give shape and depth; you just don’t want them too dark. And with reflective subjects, the effect is much more disturbing than the “window pane” shown above.