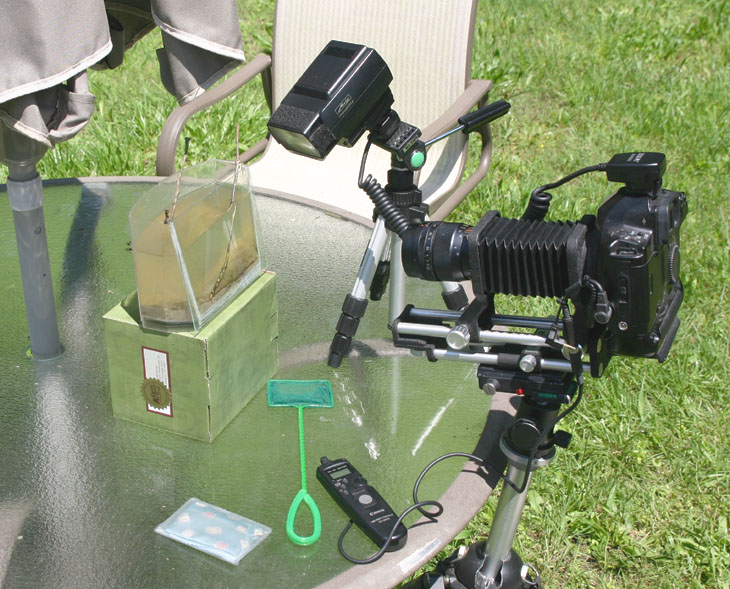
Earlier I talked about some of the basics, so now I’m going to introduce you to a new form of cheating (but one that may make your life oh so easier and perhaps considerably longer because, you know, stress…): captive aquarium photography.
Aquatic subjects are something that takes considerable effort to capture in the wild, and much more so if you’re after small subjects that need high magnification. And if you’re approaching freshwater pond or bog denizens, you can practically write off such pursuits. Gear rated for underwater use is one thing (and a significant expense); macro lighting underwater is another; and trying to find things that live in shallow, murky, and above all mud-bottomed areas is a class all on its own. Just trying to get close will stir up obscuring sediment and likely send your subject scurrying under cover. The detritus on the bottom and the thickness of border plants will prevent you from ever achieving a camera angle that lets you get adequate lighting in there. I’ve even messed with reverse periscopes, finding that they simply don’t allow many opportunities. But you can do fantastic aquatic subject images with only the equipment you have now and a few additional inexpensive items. While it may take a bit of preparation, the results are well worth it.
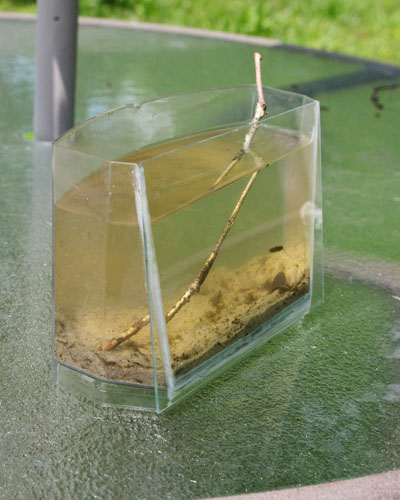 First off, you need a macro aquarium, a small watertight enclosure to keep your subjects hydrated and natural-looking while still allowing you the visibility you need. This one is a small Betta tank I obtained from WalMart for five dollars, that I sliced one of the plastic sides from and replaced it with glass (in this case a sheet measuring 5×7 inches from a photo frame.) I angled it back as far as the tank design would allow, for three reasons: first, you want to try and shoot dead-on through the glass, and not at an angle, because glass will easily distort a macro shot, and angling back lets you work without your chin resting on the tabletop; second, your additional lights may bounce off of both the front and the back of your tank, so this angle helps reduce the occurrences; and third, it lets you use more of the bottom substrate as your background, meaning you won’t have to cover the back of the tank with something appropriate as often (but still have stuff handy.) When you do this, remember that you’ll have to wrangle subjects and arrange your “setting” within the tank, so don’t make the top opening too small. At the same time, restricting your subject’s movement as much as is reasonable means you spend less time waiting for it to wander into range, or shooting through suspended sediment.
As for sediment, I’ve found the best substrate is beach sand, which settles out of the water quickly when stirred up, and looks natural for most subjects. A few clean sticks and some leaves can round out a setting nicely, but if you use some aquatic plants, all the better. Just keep it limited, since it can block lights and provide too many places for your subject to hide behind or under. Also, be aware that leaves have to be presoaked or they’ll float – leaving a few in a bucket in the rain for a few days will give you some nice “props.” Behind the tank, all you really need is something green or brown and not too reflective – you actually want it remaining very low key. You might also notice that I used the curved side of the tank as the back, which reduces unwanted reflections even more.
I’m showing this rig in bright sunlight, which can help with natural light photos and tends to be more ambient and throw less shadows, believe it or not – the water helps scatter the sunlight in all directions, so you can see subject details on the undersides as well. However, there are reasons this is bad, too. For decent depth-of-field you’re likely to be using a small aperture, and this will often mean slower shutter speeds, which your subject is not likely to hold still for. Also, the small volume of water in such a tank will heat up quickly, and the brighter light often drives subjects under cover, so being able to shade the tank frequently is paramount. A separate strobe unit is recommended, but you may spend a lot of time adjusting for appropriate angles, and the light will reflect from suspended sediment and even from the glass surfaces themselves. Also, a strobe tends to be very contrasty, leaving dark shadows on your subject, so a second light or some bounce material can help.
Seen in the top shot is another necessity, a microfiber cloth for cleaning the front surface of your tank (and another reason I used glass for my viewing surface.) Do not scratch the surface you want to shoot through, and clean said surface meticulously because every last bit of dust and gunk will show in your images. Even facial tissue leaves behind lots of lint fiber. And a small squeegee, or a soft food spatula, is recommended for cleaning the inside wet surfaces. If you use tapwater (which I don’t recommend because of the chlorine and ammonia additives you’re likely to have,) you may find tiny bubbles forming on your glass surfaces.
And finally, a way to wrangle your subjects is necessary. I use small sticks and a small fine-mesh aquarium net, and a lot of patience – disturbing subjects too much can make them anxious and overactive, and will prevent feeding behavior or anything interesting like that. I don’t house my subjects in the macro tank, but keep them in a larger aquarium or outdoor tub and collect them individually (or a few at a time) for photo sessions. Once done, I set them loose back where I found them.
Does it work? You be the judge.
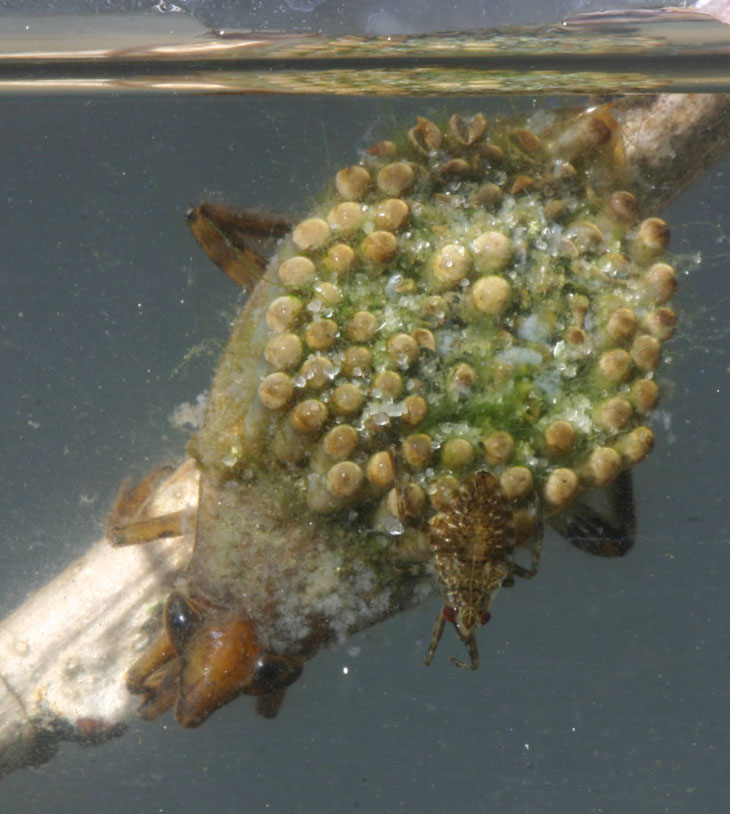
My model here is a giant water bug (genus Belostoma, possibly Belostoma flumineum) carrying eggs on his back. Yes, his – the female cements the eggs onto the male’s back for protection. He runs only about 20-23mm long (less than an inch,) which makes the newborn riding along about 4mm long, able to hide under a pea.
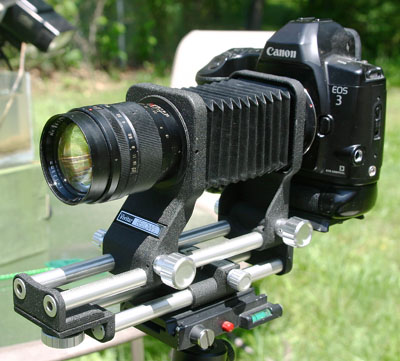 In my previous post on the subject, I didn’t talk about one method of macro photography because I didn’t have the equipment – now I do. Seen here is a macro bellows, which is much the same as an extension tube, but able to be extended much further, which means increased magnification. There are some distinct limitations to using them. They need to be rock-steady, because depth-of-field will drop down to levels where a tiny twitch will throw your subject well out of focus. They don’t usually work with automatic lenses, because the linkage or electronic contacts between the camera and lens aren’t maintained. And they’re bulky. But they make up for it in performance, if you’re after very small subjects. The variable extension provides lots of options in subject distance and focal length of lens used (here I’m using a Vivitar 135mm f2.8.) Magnification is a factor of lens focal length versus extension – the more extension you have over focal length, the greater the magnification. So while the 135mm provides some decent working distance, a shorter focal length will provide even higher magnification (stay tuned.) The extension also reduces light, not helped by the fact that you’ll typically be using f11 to f22, so you will needs lots of light, as shown by the very close Metz flash being used at full power at top. In most cases, you’ll have to close the aperture manually after you’ve focused and before you trip the shutter, and in some you may have to manually calculate exposure based on lighting and extension – luckily the Canon can do it without needing to communicate with the lens.
By the way, this model bellows (Vivitar’s t-mount version) features a second rail under the first, which allows the entire rig, with the camera mounted, to slide smoothly forward and back without moving the tripod – this is far more useful than I’d imagined. Without it, I’d recommend the separate macro rails that can be found. You don’t have to have either of these for aquatic work, as there are several macro options, but a bellows can add a lot to your repertoire.
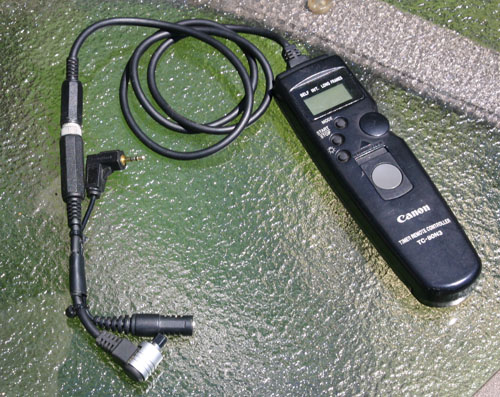 Since another detail is visible in the top image and I’ve been meaning to mention is, I’ll throw it in now. While I have a DIY project for a basic Canon remote release (Canon eliminated the compatibility with a standard cable release in the EOS line,) I eventually ended up purchasing the Intervalometer, which can be programmed. But it comes only with the N3 connector, while a couple of my camera bodies sport the E3 connection (which is exactly the same as a 2.5mm micro stereo connection.) Both connections do exactly the same thing, and the power is provided entirely by the camera body, so all that is necessary is closing the contacts in the right order (a small aside: the Intervalometer has its own battery to run the logic circuits.) So, I cut the cord between the remote and N3 connection, and wired two adapters; one using the N3, the other an E3/2.5mm, both ended with a 3.5mm mini stereo connection. There are two benefits to this. One is that I can effortlessly switch the remote between cameras; and the second is that I can use a standard headphone extension cable (3.5mm connections) to extend the remote for the length of whatever cable I find.
You may note that the adapters I made are bound together but in opposite directions – this makes it impossible to mistake what connection I’m using, and I can even select them in the dark by feel. I do get clever every once in a while ;-)


