Mostly trivia here, with a closing bit of amusement, but at least I’m posting some more. Now, if we could only get it to be something good…
Despite the up-and-down nature of the temperatures, actually requiring us to move a few things back into the greenhouse, many of the plants around Walkabout Estates are kicking it this spring. The largest butterfly bush (Buddleja davidii,) the Black Knight variety, has been especially happy with the new location after transplanting it from the old place. I thought it was doing decently there, but it showed me how much it could grow in the right conditions, having now just surpassed me in height and no slouch in width, either.
We didn’t actually know it had calla lily neighbors when we planted it, I’m not sure why not, since we planted it in October I believe and the lilies should have been well in evidence. Last year they were competing over the same space and we ended up trimming the butterfly bush back a bit from that side, which is hardly noticeable. If you look near the new blossoms on the left, you can see the lilies sprouting up behind, and they’ll get quite tall themselves.
One of those flower spikes you see there, by the way, has a small mutation.
I’ll revisit it when it’s in full bloom, but while the bush will flower all summer long, the individual spikes like this don’t last that long and will die off within a couple weeks.
I remarked last year that the almond tree, started spontaneously from the compost pile two residences back (making it 14 years old now,) had finally surpassed me in height – that would be 182 cm. This spring, however, it laughed at such feeble comparisons.
For years, we watched it to see if it would thrive, wondering if it would even take in this climate, and so we never shaped it as a tree, much less a producing one, which is why it looks more like a bush. Having discovered that its growth is stunted if it gets clipped by foraging deer in the spring, we began treating it before it even buds out with deer repellent, and this has made quite a bit if difference – the deer nibbled a small handful of leaves and realized it tasted like shit and let it be. Meanwhile, the soil here seems to make it a lot happier.
And you did see me peeking out of the tree in there, right? I hope so – I’d hate for all my advice about observation and patterns to have gone to waste.
We did a better sense of scale while we were at it.
We realized, sometime late last year, that we did not do enough initial photos on moving in, to show what it was like before and how big certain plants were, but I went back through Google Maps images and confirmed that the almond tree was perhaps a little over a meter tall at the old place, just shy of two years ago. So yes, it’s doubled its height in about 19 months, to say nothing of the volume.
Another comparison:
If you look closely right around my ring finger, you’ll see the knot on the brown trunk that marked the peak of the tree last year, turning to green above that to signify this year’s growth. I measured this: so far, it’s extended 60 cm above that.
Still, however, it hasn’t really produced almonds. Oh, it’s tried, and several times we had the fruits developing, but they’ve never actually matured fully, most of them disappearing before this occurs. This year it blossomed exuberantly, but I suspect the multiple cold snaps that we had since then stunted any further development of those, since I can’t find any on the tree at all. While it’s not like we’re hoping for a bountiful almond harvest, it would be nice to see it develop into a reproducing tree.
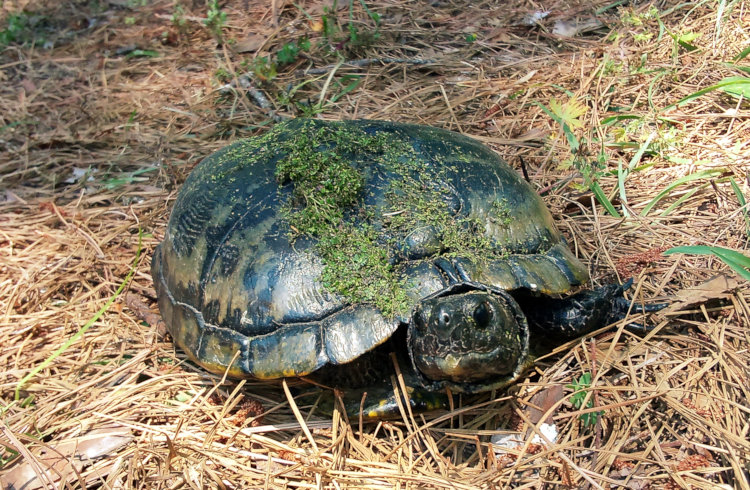
The other thing that’s been happening right now is the turtle onslaught. Abruptly, the yellow-bellied sliders (Trachemys scripta scripta) have entered laying season, and they go a pretty decent distance away from the pond to do this. Three days ago The Girlfriend and I watched one female closing off her nest after laying, almost exactly where one had done so last year, and the day after I found another in the laying process, not 30 cm away from that one. Notably, this is on the highest part of the property, better than 80 meters from the water no matter how you measure it. Then yesterday we saw one on the driveway, we think heading out to a nest site someplace. A little over an hour later as I was collecting damnable pine cones from the side yard, I encountered one again, this time heading back down towards the water. She hesitated of course, then made a slight detour to avoid me and made tracks down to the pond. Still later, as we were getting the pics above, yet another was found in roughly that same area (and direction of travel,) and this time we stopped to get pics.
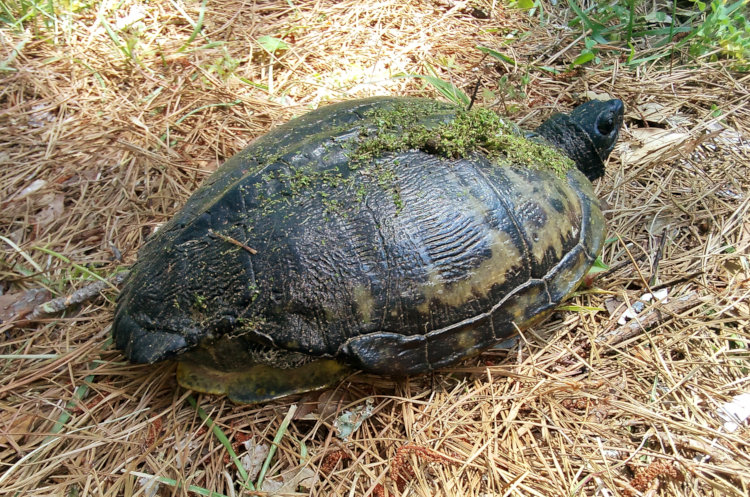
About typical size for adult sliders, this one had a carapace that was roughly 25 cm long and 20 wide, give or take. She’d been out long enough for the duckweed that she swam through on her way out to have dried out on her back. We wondered if this or the previous one had been the one we saw heading out, but this one had a very distinct identifying characteristic that ruled her out.
That’s a hell of a missing chunk there, well-healed over so likely it occurred long ago. She’s lucky she didn’t lose a hind leg, but it was intact and quite functional. I felt the edges of this old wound just to see how the healing had gone, to which she took grave exception, which is where it gets amusing. I sat down in front of her with the smutphone to record her movement, if she would deign to do so for me, and nudged her in that portion of the shell.
Failing to follow my own advice about making sure one has a safe escape from any species, I sat down cross-legged, which put me at a distinct disadvantage when she blasted past the phone and dove headfirst into the region of my crotch. I used to be able to stand up without hands from a cross-legged position, but that was some time (and weight) ago. The Girlfriend’s scolding tone, as if I was ignoring the turtle, was amusing; meanwhile, the turtle was having none of this shit and had actually seized the strap of my sandal in her mouth. I dropped the phone to deal with this, regretfully since I would have liked to have gotten a pic or video of her savaging my sandal, but she soon relinquished it and I turned her towards the pond. Definitely far more aggressive than I expected, but it made for an amusing clip at least.
So, yeah, that’s what we’ve been up to. I’ll be sure to let you know if and when we see any of the nests hatch out – last year I had three marked and yet there was no evidence of hatching, not sure why. Hopefully we’ll fare better with these.
I actually have some other things that I was about to post, but while down distributing critter corn I noticed the moon was looking pleasant, and quickly got set up before it disappeared behind the house. So it’s bumping the other things temporarily.
Ehhhh, not bad, and at 7.4% illuminated, hardly the smallest crescent that I’ve captured, but we can do better.
This is a tad brighter than the earthshine was actually appearing, but that’s okay – I didn’t have a lot of time to play around. And really, I’m not complaining about the detail – you can see Tycho’s impact rays, for dog’s sake! And the fact that some thin, wispy clouds were adding their own touches.
That wasn’t all, though. You might have heard this, but Venus is appearing quite close by tonight too.
Venus is very bright right now, in gibbous phase though you really can’t tell that without a moderate telescope – I think I’ve captured a hint of it before, but not much.
Venus goes through phases just like the moon, but since it’s on its own orbit around the sun, these have different impacts. When full or close to it like now, Venus is on the far side of the sun from us and about as small as it can appear. It gets much larger as it gets between us and the sun, but then it’s down to crescent phases and often not even visible at night, though if you know where to look you might see it during the day. Otherwise, you’re trying to catch it at twilight when the sun isn’t visible. One of these days I’ll snag a detailed crescent, but it will likely take planning and still won’t be that big in the frame, considering how small it appears when it’s as close as it can get.
A ‘studio’ subject: main light to right, fill light left and behind to faintly counteract most of the shadows Learning how to manage light is an important part of getting the images that you want, and improving those subtle little nuances that can affect your images negatively. Yes, you can spend beaucoup bucks on lighting units and modifiers and reflectors and diffusers, and these will certainly make your life easier if you’re doing portraiture in a studio – but not so much anyplace else, since they’re bulky and heavy and need lots of power. Plus, you may only occasionally need such things in your own pursuits, too rarely to justify the hundreds or thousand of dollars you could easily spend. There are simpler ways.
First off, direct light, like that from a flash unit directly on the camera or the little LED of a smutphone, is boring, often unflattering and diminishing in detail. It’s the shadows that provide shaping and textures – when they don’t obscure details or produce harsh contrast, and we’ll cover handling these. So let’s break it down.
Off-axis. Getting your light source away from directly over the camera can help tremendously. Just a simple flash bracket to move the flash unit off of the hot shoe gives you greater control and ‘modeling,’ the aspect of making the shadows work for you and not against you. The more versatile your bracket is, the more you can do with it, but this (like a lot of things we’ll cover here) is a matter of taste and purposes. I do a lot of macro photography, so my brackets are geared towards throwing the light down close to the end of the lens, but portraiture might require getting a lot higher or wider.
The key to this, of course, is being able to trigger the flash when you need it. Usually, this is best done with a dedicated off-camera cable that retains all of the communication that your camera and flash are engaging in, but it might be a two-piece radio unit (which can be obtained for surprisingly low amounts of money anymore) or even a basic sync cord that only triggers the flash at full power. But you’ll need something when working with a bracket.
Reducing the ‘spotlight’ effect. Bright highlights where the light is reflected the most and deep shadows where it doesn’t reach produce high contrast, made worse because photos capture a narrower range of light than we see, thus increasing contrast. This is sometimes useful and artistic, but often far from ideal. There are multiple factors to consider with this.
Difference from ambient light. If you’re trying to improve your shutter speed, or stop down the aperture for greater depth-of-field, ambient light becomes less of a contributor to the image and thus the shadows thrown by the flash become more prominent. Whenever you can, if you’re using a single light unit with no diffusers or reflectors, getting as close to an ambient light exposure as possible will help. The major manufacturers offer various methods of managing this (E-TTL with Canon, i-TTL with Nikon, etc.), which can help, but they can also slow down the shutter speed to capture lower ambient light, causing motion blur.
[Side note: “TTL” stands for “Through The Lens” flash metering, meaning it measures the light that the flash provides directly through the lens of the camera, rather than just what gets bounced back to a light meter on the flash itself, or those with no metering whatsoever. Letters added to these indicate a proprietary algorithm or function to improve upon this, which can be handy, as long as you know how it works and what might defeat it.]
Light angle versus shape. Different angles will of course throw different shadows, and occasionally (perhaps often) these will obscure details that you wanted to keep, or simply create harsh dark areas. This is one of the few occasions where ‘chimping’ actually helps, in that you can see how the shadows have popped up and how they affect the subject you’re tackling. Sometimes, all that’s needed is a slight tweak, or even turning the camera sideways. But there is a reason the main flash bracket that I use with macro work is reversible: I can switch sides in a minute or so as needed.
It’s the shadows around the neck that provide a lot of the ‘character,’ yet they’re not too deep Many studio light units come with a ‘modeling light,’ one that can be turned on and off, that aligns directly with the flash tube so it will throw the same shadows as the flash and let you judge before tripping the shutter. And this is occasionally available with smaller units too, or you might simply make your own, that may also help focusing in dimmer light (again, you can see the macro influence here.)
Diffusers. There are lots of options here, from factory-made caps that fit directly onto your flash, through large softbox units that spread out the light over a broader area, to a simple tissue. The idea is to reduce the single direction that the light comes from and spread it out a bit, bouncing it around to come from a broader area, or simply reducing the harshness. It’s not hard to find thin white fabric, mostly sheer, that can fit over the flash head, or you can use wax paper, semi-translucent plastic (like plastic drop cloths for painting,) tissue paper – whatever works. But, it works much better when it is wider, sitting some distance from the flash tube and capturing more of the cone of light emitted. This is what a softbox does, or a light umbrella. Better still is something that encloses and reflects the entire cone of light from the flash tube, bouncing all of that through the diffuser material. But in a pinch, just a tissue over the flash head can help a lot.
The broader softbox also allows you to ‘cover’ your subject, allowing light from a much greater angle to blanket your view. There’s the tradeoff between usefulness and bulk and/or portability, of course, but if you can create a light source wider than your subject or frame, you’ll greatly reduce shadows while showing off more of the subject and getting details down in areas not directly facing the light source.
Bounce lighting. It’s amazing how well this works, in the right conditions. With a white ceiling or wall over/near your subject, you can aim the flash unit at that instead of directly, and the light it reflects over a much broader area will completely eliminate that spotlight effect, and will often look perfectly natural, like ambient light. This is why so many flash heads can tilt (and fewer can swivel, but I’d recommend looking for both if you’re shopping for one.)
Be aware that you want to aim not at the ceiling/wall directly aligned with your subject, but about the halfway point – aim to ‘ricochet’ the light to your target. Also be aware that this requires a lot more flash power than direct, and it doesn’t take a very big room before you’d better have a powerful flash (high guide number.) And if you’re calculating this manually, you have to take this distance into account, roughly adding half-again to double the distance to your calculations for light output. The advanced TTL options will usually do this for you, though.
Reflectors. A different approach to more even lighting and fewer harsh shadows, a reflector can be used on the opposite side of the light to bounce some light into the areas that the light source doesn’t reach directly. Naturally, you want this to still illuminate the portions facing the lens, so typically, your reflector will be positioned on the opposite side of the camera as the light source, just outside the frame, where it will capture the edge of the light cone and reflect that towards the subject from another angle. Again, think ‘ricochet,’ but getting as close to both the light source and the subject as possible, while remaining out of the frame, will give the greatest percentage of light to fill those shadows.
So many things can work as reflectors, including the dedicated foil reflectors intended for exactly this purpose and costing about four times what they should. I use one of the old-style windshield reflectors to keep your car cool, one that’s round and twists down to 1/3 its diameter for storage. Or you can use a foil-covered board, or a simple whiteboard, or even a index card for small, close subjects. Shiny is better, but an actual mirror will usually work against you and make a spotlight effect on the opposite side of your subject; something that diffuses the light is usually better.
But of course, managing this reflector and getting it at the right angle is key, and this is where an assistant comes in. Lacking that, some kind of arm that permits specific positioning is more useful.
Secondary lighting. This is a big part of studio portraiture: the idea of lighting carefully balanced to maintain the modeling shadows but not get too deep. Usually, there’s a ‘key’ light that is the primary illumination, and a secondary ‘fill’ light that’s lower in power. Easy to do with light stands and adjustable output lights, a bit harder to do portably, especially mounted onto the camera itself.
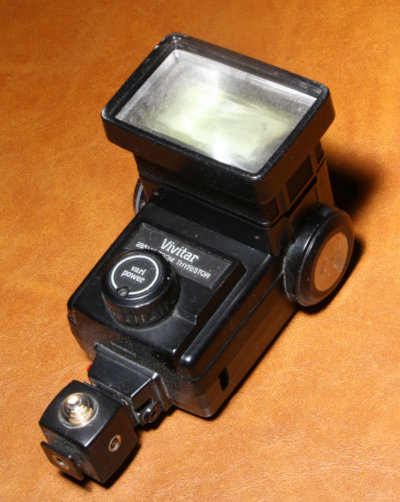
Vivitar 285HV variable-power flash unit with slave foot attached; will work with nothing further[For macro work, there are dedicated two-light units that have adjustable output between the two and the ability to turn one off. These are often expensive, and I have yet to use one – my present rig offers more versatility than small flash tubes flanking the end of the lens, as these usually are. However, there’s a distinct benefit to simply dialing in the light ratio that you want.]
Syncing two (or more) lights can require specialized equipment, whether it is as simple as a sync-cord splitter or a dedicated power unit that takes the signal from the camera. Most times, however, it’s even simpler than that: only one flash unit receives the signal of the shutter tripping, and the others are ‘slave’ units that trip as soon as they pick up the light burst from the main flash, and yes, this happens fast enough. You can find slave sync shoes for any basic flash unit for, really, not much money at all, and many kinds of lights come with them built-in – I have two that just screw into standard light bulb sockets and can be positioned as needed from any old table or floor lamp.
Light output. This is key to multi-light setups, but also to manual flash work. For instance, you can easily get a cheap, used flash unit to use as a secondary light, attached to a slave shoe, but you usually (not always) want it producing less light than the primary flash. You can calculate guide numbers and distances and so on, but it’s often easier than that, though it might take a few tests to get right (much easier in the digital age.) You can reduce light output as simply as aiming the flash unit slightly away from the subject, or moving it further away, or covering the head with some tissue paper – I’ve even done adjusted lighting with those tiny little on-camera popup flash heads by covering part of the head with my finger. And this doesn’t just have to be the secondary unit, either – you can reduce the primary so its output isn’t as out-of-proportion with the secondary unit.
Of course, with flash units that possess adjustable output, you can dial in what you need. Just be aware that these are proportions of the highest output, the guide number, and only correspond if your slave unit is the same guide number. If your slave has a significantly lower GN, then you have to adjust accordingly.
[Stupid trick that I’ve done a few times. The light sensors on slave units will also respond into the infrared. And black slide film (unexposed, but developed) blocks visible light but passes infrared. Covering the primary flash tube with a bit of black slide film will still allow it to trigger any slave nearby, great for not having a sync cord of any kind with you.]
Ringlights/ringflash. Larger ones are routinely available to the influencer/content-creator folks, and smaller ones are made to go on the lend of the lens for macro work. This provides even, shadow-free lighting by illuminating from all angles around the lens. Sometimes helpful for very close subjects that are hard to get the flash aimed it, but again, this removes all of the shape-modeling and makes subjects appear flatter. Suit to taste, but I’ve rarely liked the results of using them, so they stay packed away most of the time. And they look horrible in direct reflections.
Direct reflections. Glass and shiny surfaces, wet surfaces, eyes, and many insects will reflect the light back into the camera, sometimes very distinctly. These are usually called specular highlights, but regardless, they can get out-of-control easily. They may also betray the shape and appearance of your lighting unit – you’ve probably seen it, at one time or another, in someone’s eyes. This is why my custom macro softbox heads are always round, even when rectangular would be far easier to build and manage: they just look like the sun. While a softbox can help, on very reflective surfaces it only reduces the effect. And two lights or reflectors will still show up.
Bounce lighting off of a wide surface or ceiling can be the solution. Otherwise, you might resort to a gobo, which is only a light blocker, often a little piece of black cardboard or plastic cut to shape and stuck on the end of a supporting wire. This goes between the lights and the subject, and blocks only that light which would bounce directly to the camera, allowing the rest of the illumination to pass by. Easier to use with a direct light unit rather than any diffusers or softboxes, since this means it doesn’t have to be big at all – a hair larger than the flash head itself. The positioning, however, is absolutely crucial, and this means studio work where everything is in a fixed position. I’ve done it once, and probably could have used it a few more times if I wanted to mess about with it, but very few of my subjects would ever benefit from it, or hold still long enough…
Also note that such reflective subjects will also show anything else that the flash might catch inadvertently.
Your subjects and approaches will dictate what works best for you. This is important, since what I use most often may not work for too many other people – I’m trying to be broad-minded and cover as much as reasonable here, but I’m likely missing things. Experiment freely, and look at your results closely, to work out what is most beneficial to you. Just know that there are lots of options, and multiple ways to achieve almost anything, even on a budget.
Good luck!
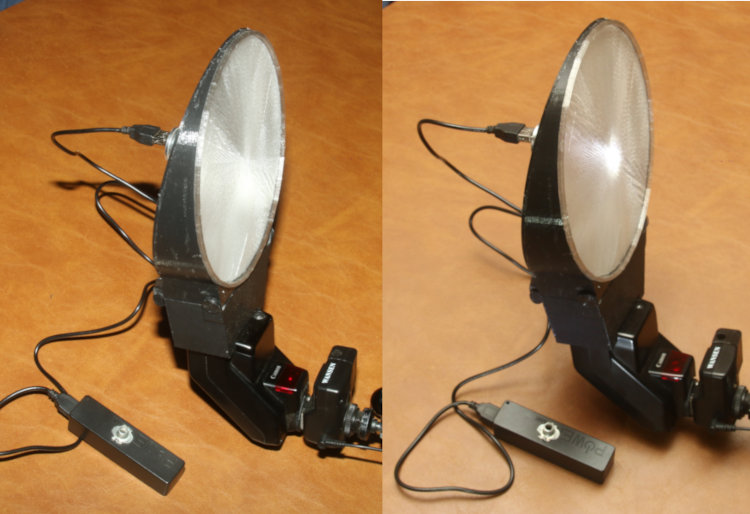
For illustration, the various iterations my macro softbox has gone through:
Almost the latest, 3D printed to fit a Canon 300EZ. I have two of the Sunpak Auto 322s, both of which stopped working, and it’s a project of mine to swap parts and get at least one working again, since they were small, variable-power units and that’s quite handy. This Canon is filling in until I get off my ass on that project – not variable, but decent light output, and I adjust aperture or angle to modify the light depending on the distance to the subject.
The diffusing panel has been sheer white fabric, a single 3D-printed layer of white, and a double-layer of clear, which beats the others – best light transmission while still diffusing over a broad area. As you can see below, the clear filament isn’t exactly clear when printed, but less opaque than the white.
Current softbox iteration with focusing light; direct flash on left, bounce flash from ceiling with handheld flashlight to provide highlights on flash body on right
I’ve known for quite a while that human memory is malleable and surprisingly easy to alter, and while there are certainly some things that I believe I recall correctly, I know I’m just as likely fooling myself. But I definitely don’t like it when it’s proven to me.
I was speaking to my cousin the other day, and remarked how, many years back, I’d been picking through the records in the record shop attached to, and affiliated with, the House of Guitars in Rochester, NY. I grew up a little over a hour away, and the TV commercials for the “great great House of Guitars” were common, so much so that I can still recall their address from the repetition, yet altogether bizarre. The HOG was a huge place jam-packed with every kind of musical instrument you can imagine – I’d purchased my first electric bass there – and it also had a custom guitar shop upstairs that catered to some of the biggest names in the business. Meanwhile, the record store was a great place to find the obscure, out-of-production LPS that you might be looking for.
I told him that I recalled seeing at least the lead singer of Therapy? (an Irish thrash rock band,) but possibly a few of the other members as well, shopping for records in that record shop – the thick brogue drew my attention, and he was instantly recognizable because I was quite familiar with the video for their release, “Screamager.” And despite them being from Ireland, the HOG was one of those places that bands visiting the US were fairly likely to stop at if they were in the area, so this wasn’t that farfetched. I didn’t, however, say anything, because I was drawing a blank on the band’s name at the moment, and didn’t even know the lead singer’s name (Andy Cairns.) So, rather than embarrass myself and them with some version of, “Hey, aren’t you… that guy?” I just let it slide.
“When was the last time you were there?” my cousin asked after I’d recounted this.
“I don’t know – ’88 or ’89, I think,” I replied; I’d moved from NY in 1990, and probably hadn’t been in a while before then.
“Well, ‘Screamager’ was released in ’93,” he pointed out, and I knew he was right because you never question his knowledge of music, ever, plus I remember watching it on MTV in North Carolina while I was actually rooming with him. And abruptly, some fairly distinct memory that I’d had for quite a while was suddenly revealed to be false, indisputably so, and I was left wondering how I got it in the first place, and whether I’d been shopping somewhere else and somehow remembered it as the HOG, or if I’d spotted some other band members, or if it was only a distant dream that got accepted as real after a period of time (not that I recall anything of the sort ever happening before, but then again…)
It’s easy to say (and I have, internally anyway,) “But I remember his goatee, and that he was shorter than I would have thought,” Yet, once one memory is shown to be unreliable, it’s easy to question anything else, and pretty soon you’re just going, “What the hell, man?” I’m inclined to put it down now as a dream, except that it was the accent that drew my attention and I don’t think I knew they were Irish. That little fact may have come along at any time, though, and remained in my subconscious. Who knows? I mean, seriously, because I don’t anymore.
The thing is, my memory is usually pretty decent, and I can find my way back, even on a map, to a place I’d visited only once, years before. Or at least, I think I can. It’s entirely possible I’m just a replicant brain in a jar, with implanted memories of terraforming Mars with catfish…
For the past two weeks, the desire and motivation to post simply hasn’t been there, nor have I even been getting many pics, which is weird, because this is the best season to be pursuing such things. Not only that, but I blew off World Migratory Bird Day (last Saturday) and Endangered Species Day (yesterday.) Part of this is, I’ve been a little under the weather, part is, I’ve been tackling them other projects (there’s always something,) but mostly, I think, I just haven’t felt like it. Hopefully this will change soon. I have, for instance, far more video clips than I know what to do with, and have been debating about tackling them in a different manner.
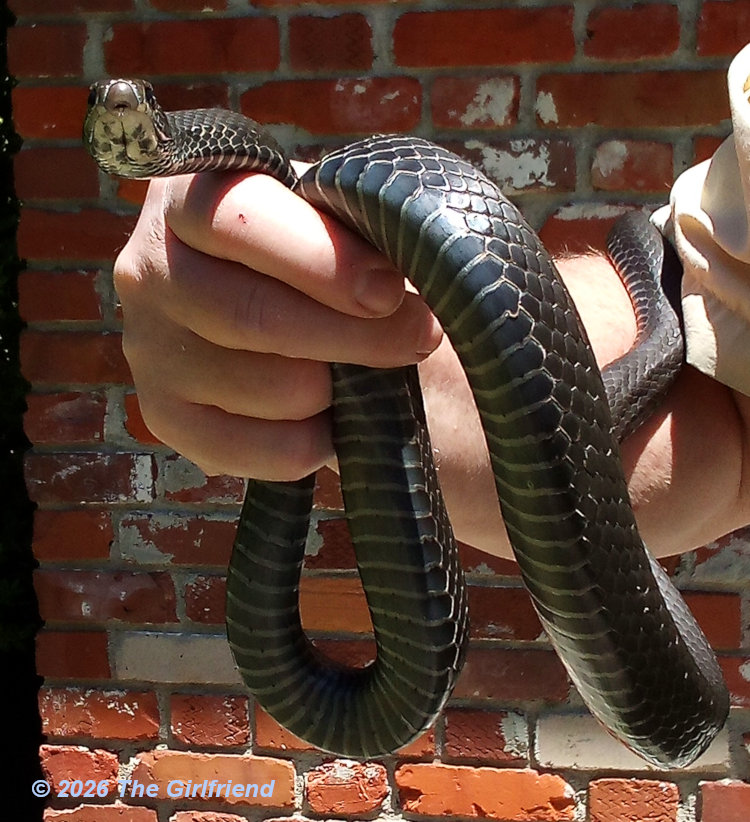
Anyway, a quick post to show that I’m still alive (for the time being,) even when The Girlfriend took most of the photos for it. Yesterday I was out in the yard and collected some old roofing material that was sitting around, cleaning up a little and having a potential use for it anyway. I was well aware of the fact that it might serve as an ideal hiding spot, so when the snake hurtled out from under it, I wasn’t at all startled, even when it cut some tight circles around my feet in panic mode – I’m guessing I woke it up abruptly. As is my wont, I gathered it up and took it over to show The Girlfriend, though from a decent distance since she doesn’t share my feelings about snakes, especially not ones this large.
This (the one on the left) is an eastern racer (Coluber constrictor,) of which there are eleven subspecies – this could be a northern or southern variant, since I can’t find a decent guide on how to tell them apart. It’s quite a decent-sized specimen, and I initially mistook it for an eastern rat snake even though I shouldn’t have; despite the close similarities in appearance between the two, their behavior tends to be radically different, as we’ll soon see. But first, some closer-ups.
While I have struggled to capture images of snakes with their tongues extended, it’s often quite tricky because it happens faster than you might imagine and not regularly. Except for this one, who was annoyed enough that it practically did not stop. Overall length was estimated over 1.5 meters – I didn’t attempt an accurate measurement.
This shows one of the more distinctive ways to tell the species apart from the black phase of the eastern rat snake, since racers usually have almost entirely indigo bellies, the white limited to just under the chin, while rat snakes usually have mottled or even patterned undersides. However, rat snakes also have keeled scales on the sides and back, a little ridge running longitudinally down the middle of each, while racers are smooth as you see here. But there are two other traits that can let you know right away what you’re dealing with. The first is, racers are fast (duh!), often hurtling away at high speed as soon as they perceive danger, no lollygagging about it. And the other is, unlike the rat snakes, racers don’t hesitate to bite, often enthusiastically.
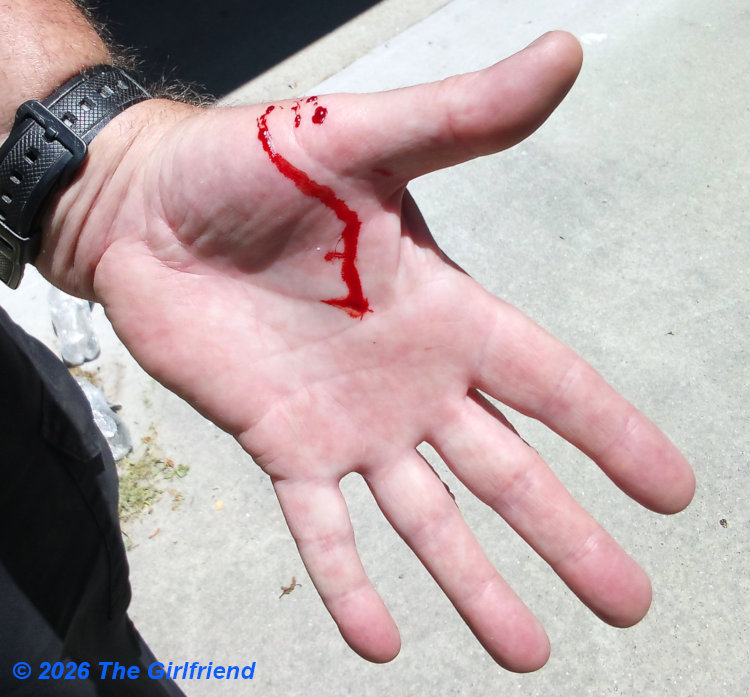
Actually, it was impressive how much it bled, but this makes it look much worse than it was. Snake’s teeth (save for the pit vipers, in this country at least) are tiny little things no more than a couple millimeters in length, but they are sharp, and this specimen was giving it everything – the stinging had ceased within about ten seconds, but the blood ran for a minute or so. Once cleaned, however, you could see the actual extent of the injury.
Psshhhfff. I’ve done worse walking through raspberry bushes.
The snake also provided a few nice demonstrations of a typical warning, which is vibrating the tail madly. Rattlesnakes, of course, have a handy noisemaker to make this more effective, but many species do this, counting on the buzzing in the grass or, for preference, some nice dry leaves to provide the noise. I didn’t have the proper camera in hand and didn’t get the smutphone out in time to snag video of this, but it was a vigorous display, twice – once as I was releasing it back where I found it. It dropped into the grass and semi-coiled, giving me every indication that it was still ready to fight, before abruptly realizing that nothing was actually preventing it from leaving and it shot off into the undergrowth.
It’s been about thirty hours or so, and I haven’t changed color nor had anything drop off, so I think we can consider this harmless. And no, I’d been feeling under the weather well before this all occurred, so zip it.
From the title, some people may think I mean going ‘off-grid,’ disconnecting from social media and internet and so on, or even disconnecting from a regular job or routine pursuits. But I mean something much subtler instead, and that is, thinking in terms of the strictly visual and not the ‘object’ and ‘location’ aspects in our heads.
To illustrate what I mean, I have occasionally asked my students, when out on a lakeside or similar, what color the water is. The answer very often is, “greenish-brown,” which is technically true, but not correct from a photographic standpoint. Out there, it was bright blue with white patches where it was reflecting the sky, closer to us it was dark green where it was reflecting the nearby foliage, and right at our feet it was sandy brown-grey where we could see through it to the bottom. The idea wasn’t what it was, but how it appeared in any image that we took, especially what we were framing against it for contrast or complementary colors. Our minds put things into certain categories and we automatically associate them as such, but to use our elements wisely as photographers, we have to forget about that and only see what’s there. It’s quite easy, but we often have to remind ourselves to do it until it becomes second nature.
The overcomplicated background, the trash, the pole! Ugh…Related to this is inattention blindness. We can become fixated on a particular subject, looking over the details carefully or waiting for it to do something specific (which are not bad traits at all – we should be doing these,) yet we miss what’s going on around the subject, in the background or appearing nearby within the frame. This is how most ‘photobombs’ work, but it’s also responsible for the bit of trash in the shot that distracts from both the subject and the setting, or the sharp line of a pole or branch that cuts across and breaks up the frame. We’re thinking three-dimensionally, and forgetting that the photo will only be two and will group all of the elements together in a flat plane.
This can be exacerbated by depth-of-field as well. The viewfinder shows us what the frame looks like at maximum aperture, which may be defocusing other elements more than they will actually appear when we press the shutter release and the aperture closes down. The hardest one to allow for though is the flash, which may illuminate aspects that we couldn’t even see in the viewfinder, but also change the brightness and contrast of everything in the frame.
These are especially important to remember when doing portraiture, of people or animals. One of the things that makes a good portrait is that the background/setting is appropriate but otherwise garners no undue attention, doing nothing more than adding a little framing as needed; it’s the main reason why portrait photographers usually have a selection of simple backdrops for studio work, or specific locales for outdoor or location shooting. The trees may seem quite even and pleasant to us, but the sunlight angle may turn them into high-contrast blotches, ones that even interfere with the subjects’ hair or clothes.
I ran afoul of several of these when doing wedding photography, primarily as candids. It’s too easy to try and capture ‘a moment’ and be unaware of the background, and even if you are, you may not have time to correct for it. I have a few frames where the flash illuminated straight down someone’s cleavage, at one point even bringing out the lower strap from their bra, and one memorable frame where the flash brightened a spiky palmetto plant hidden in the shadows outside of the venue lighting, right behind the bride’s head, turning her into the Statue of Liberty. Good times.
[I actually still have both of these that could be used as illustration, but I make it a habit of not featuring people without their permission, which technically I do have: it’s a typical clause in wedding contracts so photographers can show off their work. Still, not what the clause intends, plus I doubt they’d want such pics available online at all.]
We also need to remember that photos increase contrast, so awareness of those deep shadows is important, as well as the bright highlights; on sunny days, even foliage can bleach out to pure white with the right light angle, to say nothing of snow or the actual white fur or plumage of our subjects, Better to underexpose slightly to keep the highlights under control.
Which brings us to the conditions that nature photography often produces: things like shooting against a bright sky, or the deep colors of shadowed foliage, no matter what kind of lighting our subject is in. Anything that takes up enough of the frame will affect the exposure, often in a direction that we don’t want, so we need to be ready to dial in exposure compensation as needed following my old adage of, “If it’s bright, make it brighter.” Seems counterintuitive, but the camera will probably already be compensating for that brightness and making it darker, so we’re bringing this back into line. This is especially true of birds against the sky, often shadowed on the underside since the light comes from above, so it’s easy to get something little more than a silhouette if nothing is done about it.
Yet there are aspects of the background that will also help the composition along, providing framing or leading lines or other elements that improve the image, when we have the foresight to see them and use them. The color of water mentioned at the beginning, the leading lines of branches or paths or anything really, the one cloud that will help define the sky but needs to be in the open space away from the subject – these are waiting to be used once we’re aware of them and not simply considering them ‘background.’
Going back to the birds for a moment, this is where we wait for the bank angle that lets the sun hit the side of bird facing us and causes the colors to pop, or the bird to pass that one photogenic cloud (or the moon, or that cool tree, etc.) I often examine the sky for the best background conditions so I’m ready as I’m tracking the bird in that direction, and for weddings, I’d scout the venue quickly for the best backgrounds and try to use those as often as possible.
And then there’s the idea of multiple subjects, which can be an absolute bear to work with. Far more often than not, one subject is doing something captivating while another has its head hidden, or something along those lines. Watching for that perfect moment when everyone is posed well can be frustrating, but worth it when it finally works. Of course, doing this while also making sure the background isn’t distracting or cruddy can become quite tricky.
It takes practice, but soon enough it becomes automatic, and it can make the difference between a decent portrait and one that really stands out, so it’s a good habit to develop.
I’m going to add on a secondary aspect of disconnecting, in regards to animal photography, and I’ve covered this before but it bears repeating. We automatically think in terms of our own social instincts, behavior, motivations, and so on. This means that we often apply them to animal behavior without thinking, and these are almost always completely wrong and misleading.
Just observe. Don’t assign emotions, motivations, or reasons for behaviors, but simply note them and the conditions. Animals have their own instincts, as well as the aspects they find important (to survival, mating, territory, obtaining food, and so on.) We may eventually determine what’s actually going on, but not without both lots of observations, and dismissing the tendency to already assign reasons as if they’re human too.
As an example, this post was a bit tongue-in-cheek regarding their behavior, but it wasn’t until seeing exactly the same thing with the ducklings we raised last year that I realized what was going on: they were watching something overhead, almost certainly a bird wheeling, which often denotes a threat to goslings. While their beaks were pointed in my direction, their attention was almost certainly on something else, because animals that have wide-set eyes use them independently to spot threats from any side, while we have a much smaller region of attention and use binocular vision for nearly everything. This is an example of how we lead ourselves astray.
I’ve had a topic sitting in my ‘Other Ideas’ file for a while now, waiting for me to tackle it, and in the meantime, an article popped up that, well, tackled it. Again, actually, because within my file were two links to different articles. They’re all related to a standpoint I fostered in a much earlier post, to wit: ‘Infinity’ is a pointless concept.
Now, the first thing I will say is, I’m much more inclined to the practical, rather than the philosophical and theoretical, and call this a personal viewpoint/stubbornness if you like. If it can’t actually be applied to solve or describe something, what’s the use? And at the same time, I recognize something that is ignored wholesale far too often in mathematics, and it’s that any number that we apply to anything is by nature inexact, and only exists as an approximation. I have two coins on my desk; therefore, by the very nature of math, either coin is exactly half the mass of both together, perfectly equal to the other, right? Of course not – even if they were exactly the same type of coin, they’re bound to have minute differences in mass and size and so on. We accept “two” only for the sake of convenience, and because this is as far as we need take it.
Anyway, the article, What Can We Gain by Losing Infinity? by Gregory Barber, is about the concept of Ultrafinitism, the idea that infinity does not actually exist and everything has an end, someplace, even if it’s extremely far away. For all practical purposes, this is indistinguishable from infinity in most applications, with one pertinent exception: that something cannot be endless. It is, admittedly, more of a philosophical distinction than a physical one, even when it specifically pertains to physics (and perhaps most physicists have already embraced it,) but it establishes a fundamental ‘law’ within mathematics, in that numbers do not represent real things, and can play by rules that exist only within mathematics and nowhere else.
As mentioned therein, a simple axiom: you can always add 1 to any number you produce, and keep this going indefinitely. Fine. Provide proof of this – demonstrate that this really is the case. You’ll die before you get even close to some of the proposed numbers in mathematics, and even if you have a computer doing the additions, billions of times a second, that computer is going to fail – probably before you do, to be honest. The present mathematical view is that, to put things into my own words, “There’s nothing stopping it,” but actually, there is – you’ll run out of resources to achieve it, no matter how you tackle it. More pertinently, however, you’ll never find a reason, an application, to actually do this. It exists only as an abstract that cannot be realized.
Here’s another example, a simple one:pi. Pi is an irrational number (look, it’s admitted right there in the name!) meaning that the decimal notation of the ratio itself is never-ending. So, we cannot actually measure an exact circle, because we cannot calculate a never-ending number against the radius we start from. So we, always, use an approximation, shortening it to the necessary decimals that allow us to get ‘close enough.’ Except that, shortening this number means our circle will actually fall short and never be complete, never actually close – there will always be a gap. And since the number never ends, the gap can never close, and we can never complete an actual circle!
But of course we do, and even if you want to argue that there’s an infinitesimal gap that we never actually jump across, this is obviously nonsense – what, do we sit here against a wall? Did we start another circle to arrive back where we started? No, the answer is much simpler: we use a base-10 number system that doesn’t handle the ratio of pi in a useful manner. Pi is not never-ending – we just have a counting system that is inadequate for the task.
[I realize that the ‘unclosed gap’ in the argument above is closed by a straight line, however small, and this demonstrates the practical application of math and its inherent inaccuracy: there is never a perfect circle no matter what – there’s always some wandering from it. But so what who cares? Even NASA doesn’t use pi beyond a mere 15 decimal places, for all of its huge orbital calculations.]
One of the major stumbling blocks in the acceptance of ultrafinitism, according to the article, is that there is as yet no axiom that addresses it, that specifies how and where we will find this end. It is not a specific theory, and has no distinct definition. Yet to me, this is backwards. Most of the other sciences require that a theory fit the known facts and serve to explain them, but a strong theory is also testable, and predicts results. In math, ‘infinity’ is an accepted theory, but based solely on ideas as simple as, literally, “You can always add one more,” or, “You can always make a smaller decimal distinction between any two given numbers.” Is this testable, and/or can it predict results? And most especially, is it applicable to anything at all that we can use in any other discipline? When you think about it, infinity is an incredibly weak idea, based more on word games than anything physical or applicable. Therefore, ultrafinitism is not a theory in itself, but the recognition that infinity shouldn’t have ever been considered one.
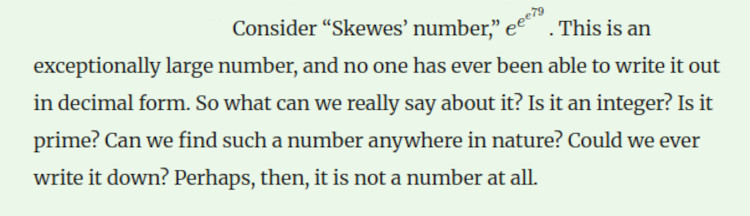
And too much of advanced mathematics is like this. From the article (which I had to do as a screenshot since the notation within isn’t easily rendered in any formal typesetting):
And we can consider another, one that a few more people are familiar with: googol, defined as a one followed by 100 zeroes, which I tried to type out for giggles but the page format can’t handle it. And if that wasn’t enough, there’s googolplex, which is a one followed by a googol of zeroes. These are well known and well defined – but to what possible fucking use can any of these be put to, ever? These are word salads, not functional concepts. We really need to ask, why do these even exist?
To no small extent, however, there is also the human trait that we don’t let go of things that we believed for a long time, and this is intertwined deeply within mathematics (and indeed most philosophies, at least, but probably no small number of other sciences as well.) Mathematics relies on its axioms and functions, and can create a theory from “n+1,” the simple idea that no matter what number, you can always add to it. And since there is no number that you cannot add to, this process can go on ‘infinitely.’ Which is fine, simple and neat and all that, but this in no way implies that there actually is anything infinite, even though it is usually taken to mean that. Since there’s no stopping point, no “number so big” or rule that you can only do this so many times, it implies no end. But the end, quite simply, is when you get too goddamn tired of doing it, and all you’re really doing is repeating yourself. It’s a pattern, nothing more, exactly the same as the bare fact that we don’t have infinite numbers – we only have 0-9, and then we start over again in the next column. In seeking ‘truth’s within mathematics, axioms were created from things that really are nothing more than functions.
There is also a fundamental problem that comes up if you rephrase the approach slightly. In essence, ‘infinity’ exists because we cannot demonstrate that it doesn’t, that there is any end to n+1 and all other such axioms. But we could apply this to anything that we want, anything we can imagine – does this somehow mean that such things are allowed to exist until we can prove otherwise? And it must be said that, in a lot of concepts of an infinite universe, many people do make such claims; given some event that might have odds of 1 in 1,000,000 or even higher, in an infinite universe it is virtually guaranteed to happen – and to follow the axiom to its logical (heh!) conclusion, happen an infinite number of times. Most of the sciences, however, rely on a more practical approach: it exists when you can demonstrate or measure it. Outside of that, well, nice idea perhaps, but not worth considering until you have some proof.
Mathematicians are not unified though, and some (it’s not clear how many) recognize the difference between provable, demonstrable, applicable axioms, and the ones that cannot be and exist only in theory. There remains recognition that the value of math is how it applies to real world scenarios, problems, and circumstances. To me, that’s the only value, but there also seems to be an awful lot of emphasis on theoretical concepts that can only exist in the imagination, that have no possibility of applying to anything at all, and as long as this is considered important, the concept of infinity will continue to be protected in this Harry Potter universe of Skewes’ number and googol and i.
For consideration, the evidence for the entire universe having started 13.78 billion years ago is substantial, so substantial that we continually refine that number with further decimals. The speed with which it can expand is of course finite, because we can see and measure it. So while the phrase “infinite universe” is bandied around quite frequently, this really depends on whether you mean the actual contents like stars and gases and so on, or the empty space that it is expanding into. If the former, we actually have a calculation for that, and it’s a sphere roughly 92 billion light years across (an incomplete sphere, of course, because pi) – not infinite. And even if it’s the latter we’re referring to, well, the difference between a boundary we haven’t found and none at all is indistinguishable, except this is the only place where infinity might be found, and we couldn’t prove it anyway. It’s also possible that the expanding universe hit an outside barrier a billion years ago, and the visible effects have yet to travel back to us. Adding to all that, physicists and cosmologists operate on a fundamental concept that the matter/energy within the universe is finite and fixed, and has been from the moment of the Big Bang – not increasing, not decreasing, only concentrating or dissipating. While we cannot actually prove this in any way, we also have quite a bit of evidence that this really is the case, evidence that helped formulate the laws of thermodynamics to be exact. Most of the hard sciences don’t mess about with ‘proof,’ but rely on evidence instead, and reams of evidence provide all the support necessary, as well as functioning without any issues whatsoever. So this would mean that everything does have an end, and has to, to be contained within said universe.
Even if we try to go in the opposite direction, going perpetually smaller in size instead to demonstrate the value of infinity, we reach the Planck Constant, what quantum physicists have determined is the smallest distance we can find, measure, and use. There is no such thing as “0.1 Planck scale” and no reason to invoke such a thing.
Both of these effectively trash infinity as anything real, and while we may yet determine that we were wrong about some aspect of these measurements, what it does mean is that we have plenty of reasons to treat ‘infinity’ as flawed, an inapplicable idea, and ignore it entirely. Meanwhile, we have found the principle thing that separates math from science: math has axioms or ‘truths’ that it relies on, while science ignores the entire concept of ‘truth’ and relies on evidence instead. Ultrafinitism doesn’t have ‘truth,’ it has evidence, and so it threatens the core of mathematics – the unsupportable, untestable, inapplicable core.
We go back to something mentioned earlier, that’s exceedingly simple:numbers are just placeholders in our heads, a simple way of tracking ideas. They are not real, and cannot even be applied to real things consistently with all the axioms of mathematics. They do not define anything at all in the universe, they’re only there to help us manage our understanding – but when they cannot, when they’re dead wrong, they need to be recognized as flawed. Axiom or no, mathematical ‘theory’ or no. They’ve reached their limit of function.
Now, since there are some applications where specifying that no end is in sight is necessary, the definition of ‘infinity’ can be changed to, “beyond any reasonable or useful calculation” – which, again, is indistinguishable, but it’s more precise and explanatory without implying that there really is such a thing as ‘endless.’ It would probably be better to coin a different term, however, to avoid confusion with an established, though flawed, concept. In fact, the name is right there: BAROUC, or barouc for common usage. I deserve some credit for coming up with this…
I’m glad I stalled on this post as long as I did, because the two other articles that I had bookmarked didn’t cover as much ground, nor help guide my thoughts, as well as this one. They were The Man Who Stole Infinity, and one that is either What If Infinity Didn’t Exist? or Some Mathematicians Don’t Believe In Infinity, depending on whether you treat the page header or the URL as the title. The former is simply about the likelihood that Georg Cantor, the mathematician that formulated set theory and “different sizes of infinity,” plagiarized his main paper, while the latter is much more on-topic but also more superficial than the one I worked from for this.
If you like, you can also check out two links from within the primary article, Why Math’s Final Axiom Proved So Controversial, and Banack-Tarski and the Paradox of Infinite Cloning. The former outlines the principle axioms of mathematics, the Zermelo-Fraenkel (or Zermelo-Fraenkel Choice) set theory based on (not) Cantor’s work, wile the latter shows the utter fucking nonsense that can be produced in the Harry Potter universe of mathematics.
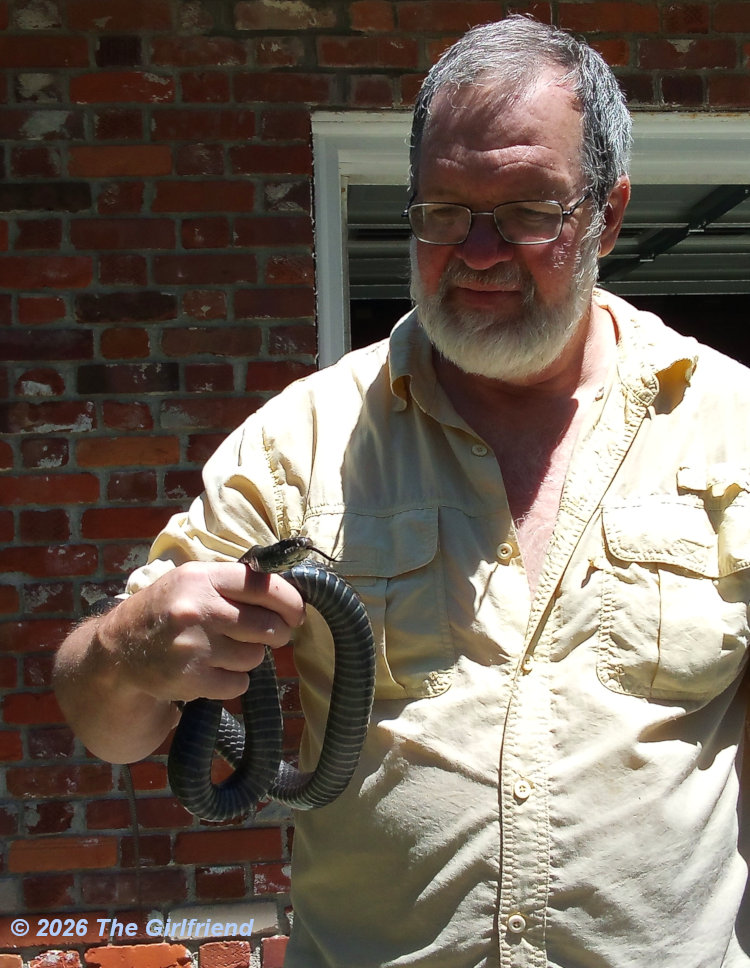
Looked out the garage window at the driveway yesterday afternoon and saw an odd shape that, as I watched, moved a little. I immediately hit the button to open the overhead door and scampered out to snag it, confirming my suspicions as I did so. With the exception of a glimpse of one out on Topsail Island, this is the first I’ve ever seen, certainly the first I’ve done pics of and handled (simultaneously, I might add.)
The stocky body with abrupt tail, and the lack of a demarcation of the neck, clued me in, and my go-to herp site confirmed the precise species. This is an eastern glass lizard (Ophisaurus ventralis,) occasionally called a glass snake, but it’s one of the various species of legless lizards. You may say, “Well, that pretty much defines a snake, doesn’t it?” but that’s not exactly true – don’t assume it’s Order. There are a few distinct differences, some of which I can illustrate, and some I can’t.
But first, a little bit of a scale shot.
The Girlfriend’s distaste of snakes extend to glass lizards, and she probably wouldn’t handle any given lizard for photographs simply from the fear of injuring them, so it’s generally up to me, until I hire a wrangler with all the ad proceeds from this site. Notice the general shape of the head, and the thickness behind it, and the fact that the eyes are aiming downwards here. Snakes have fixed eyes and no eyelids, while glass lizards (all lizards) have movable eyes that they can close, though this one was disinclined to wink at me. There’s also the lack of the small gap at the front of the mouth to extend the tongue, since only snakes sample the air with them; I got a glimpse of this one’s tongue, very dark and not long or forked like a snake’s, yet never offered for view while the camera was ready.
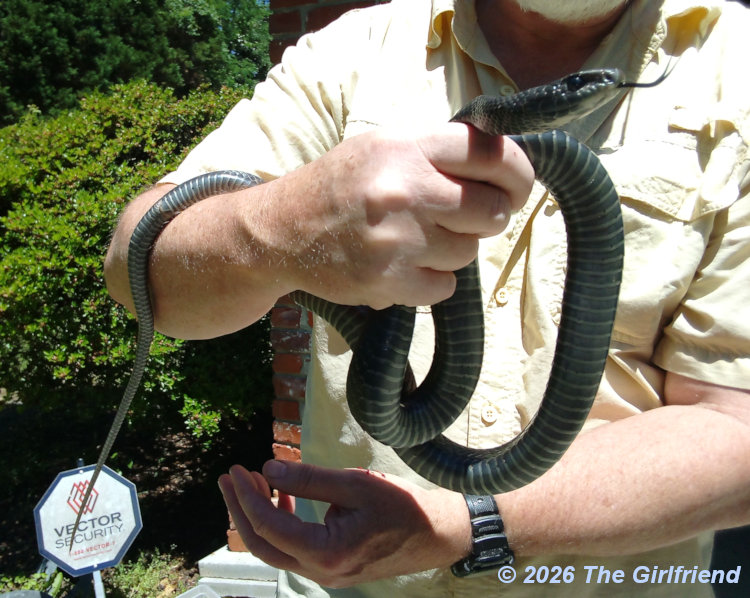
Lizards also have ears while snakes don’t; this is barely visible as a small horizontal slit/dent a little ways back from the mouth. And that side pattern is groovy.
This is the part that surprised me, however – I just assumed it was more snakelike:
Down at the right edge of my hand you’ll see something that looks like a scar on the underside of the lizard. This is the vent or cloaca, and with snakes it’s roughly 3/4 of the way along their body length, but for these guys it’s only halfway, indicating that their digestive tract is significantly shorter. Not surprising, perhaps, since they can’t open their jaws anywhere near as wide as a snake, nor spend weeks digesting meals, so they eat more regularly, mostly arthropods.
They get their name from a common habit when captured, which is to drop their tail to distract their attacker (so they ‘break’ like glass) – this of course writhes vigorously, the motion attracting attention to allow the lizard to escape. And this one displayed its own evidence of this from the past.
The distinct change in coloration and the general stubbyness of it indicates that this tail is growing back, and according to that linked source above, adults without such regrowth, meaning they’ve never had to drop their tail, are actually rare. There is no indication that this does them any harm at all; it has evolved to be this way, so there’s no reason for it to be painful or debilitating or anything, and in any event, it’s significantly less traumatic than being eaten.
After getting enough images and confirming the species (and that I wasn’t throwing away a further opportunity for something interesting,) I sent this one on its way back where I found it. Yet another species for the area, and another Find. Very cool.
Still hoping to get pics of a wild cottonmouth, but I won’t be handling that one if and when I come across it…
If you’re pursuing anything even remotely ‘serious,’ much less as a profession or sideline income, some (a lot) of what you do won’t be the actual pursuit, but all of the supporting tasks that are required, and for photographers, one of those is ensuring that you always have backups of your work. Hard drives fail, sometimes without warning, and of course accidents and viruses happen, so this should be a regularly-scheduled thing. Here’s a bit of my routine, and why I’m doing it this way.
First off, there are four hard drives in my system, obviously not a laptop, though one of them is only the solid-state drive with the operating system on it (Ubuntu Studio.) One is the work drive, and two are for backups and archival stuff (and 3D printing files.) Not only that, but I maintain an additional, external hard drive with backups as well, mostly because anything that hits system-wide won’t affect that one – this would primarily be viruses, but I’ve also seen a corrupt power source affect the boot sector of all drives on the system. It’s often recommended that external backups be maintained off-site, meaning not at home, in the event of a fire or flood or whatever – I’m not presently doing this, partially because I haven’t found the way to make it work well enough.
What about cloud storage? Yeah, no, or more specifically, [vehement obscenity of your choice] no. Cloud storage is simply another computer, so the same as an external hard drive, but one that you have no idea where it is or who has access to it, how often it’s backed up and how legitimate or even solvent the business is. It is, literally, safer to bury your hard drive in an ammo can in the woods than place that kind of faith in any businesses today. Feel free to use cloud storage if you’re adventurous, but read all the fine print first, especially about their access, security, and liability, and even then, should they simply disappear, good luck pursuing that in any legal or useful manner.
How often? Depends on your volume, really, and how much stuff you can stand to lose if a failure occurs. Weekly, monthly, bi-annually, whatever you’re comfortable with, but a schedule is recommended.
Now, this has a little of the ‘do as I say, not as I do,’ aspect to it, since my image backup is not scheduled or routine, but based off of whenever I finish a major sorting job – and it’s usually major since I don’t sort as I go, which I probably should. So, the database for the blog is weekly, downloaded and compressed, because it’s always just a few minutes to do and takes place on a schedule, the same time that I check out the stats and look at the spam folders on the remote server.
[I also maintain local files of the posts, both published and in draft form, and a folder of the uploaded images, and once a month these are compared for accuracy. It’s been this way ever since a previous hosting service wiped the site and I had to rebuild from backups – which run back three months now, since I’ve also found that some updated software or plugins have issues that are not immediately apparent.]
Routinely, however, the images in my Sort folders are backed up to one of the other local hard drives, even though they will eventually all leave the Sort folders to the Catalog folders instead, such as Arthropods, Mammals, and so on. This is because, every once in a while during sorting or picking one to edit for use, I delete it accidentally. Yes, I know there are ‘Recycle Bins’ on the computer for everything deleted, and I routinely do not use them, the reasons being, they don’t actually clear any space until they’re emptied, and anyone can have access to the contents before this happens, which is shitass security for anything financial or private. So I do my own ‘Recycle Bin’ only for the Sort folder, and delete those when they hit a few weeks old.
Backup programs. I’ve been using FreeFileSync for several years now, and it works superbly. Simply pick the folders you want to compare, the source on your workhorse drive and the backup elsewhere, and click ‘Compare.’ The program selects all of the new or changed files, and allows you multiple backup options like Mirroring (make these folders identical) or Update (add in the new stuff, but don’t delete anything.) Pretty flawless, and quick as well. Whatever you use, make sure that you understand what it’s doing and keep a close eye on the projected changes before approving them – it can be too easy to wipe out something that you want to keep.
[The Linux operating system, by the way, is maintained weekly by Timeshift, which has one notable flaw: it cannot be specifically scheduled, but decides on its own when to do a weekly/whatever backup, and will tie up a lot of resources when it does. As yet, I have not done a restoration except when I was first installing Ubuntu Studio, so I can’t vouch for how effective it is.]
At the same time that I do the image folders backup, I also do the website, video projects, and documents folders as well, and usually backup the Bookmarks/Links file from the web browsers so I have a current list of saved links, which is disturbingly large.
Heed the warning signs. If your computer stalls more than occasionally, if you get any warnings on boot that a drive cannot be accessed, if you find corrupt files when reviewing images in your image/thumbnail viewer, back up immediately. Also do backups before any major changes, like upgrading operating systems or moving drives around.
Is it necessary? Enough people telling you to do this should be reason enough, but also, think how bad you’ll be kicking yourself if/when the failure does occur and you’ve lost irreplaceable images or work. We are, for reasons unknown, a gambling species, and we like to bet on events not happening if it’s the slightest bit inconvenient to be prepared for them – a bet with trivial payoff and significant losses. Recognize how stupid this really is.
As a personal account, I’ve only had one drive fail when I was unprepared, and that was at the worst possible time: when I was migrating to a new computer and had my digital images solely on one hard drive, with only a few of them backed up to CD-ROMs (this occurred 22 years ago, so hush.) A significant number of images taken in Florida were lost, trapped on a drive that became inaccessible. I actually still have it, having tried several different tricks to get into it, and it awaits a time when I’m willing to dismantle it and switch read/write heads, which is not likely to be the problem but my last resort. Data recovery services are available that can read raw data from a hard drive, by dismantling it and installing the media in a specialty unit – and they charge out the ass for such things.
That said, I’ve had several failures which turned out to be the SATA ports on the motherboard going bad while the drive was still good, and have used my Sort backup to restore images an unknown number of times (a dozen or so?) I have had warning signs from drives and switched over, one of which did indeed fail soon afterward and is now inaccessible even from an external drive dock – nothing lost, since I acted quickly. Worth noting is that I also learned ages ago how to avoid viruses, of which Linux is largely resistant to in the first place; a friend of mine has learned no such thing, and has been infected to the point of reformatting drives at least three times (good rule to follow: if it seems too good to be true, it is – don’t click.)
Another little tip that may be useful. I discovered after much trial and error that having this many drives is a load on the power source, and even if it has enough SATA power connections, this doesn’t necessarily mean it can provide adequate power to all of them simultaneously. Also, this might simply have been, instead, individual power leads going bad, but it’s the same symptoms as a hard drive going bad, so don’t assume anything. Switching drives and power leads can help pinpoint this, but be warned; you’re also risking a power warble affecting the boot sector of a drive and rendering it inaccessible.
So, if you’re not doing backups routinely, change that right now. Don’t lose work that you can easily maintain with some good habits.
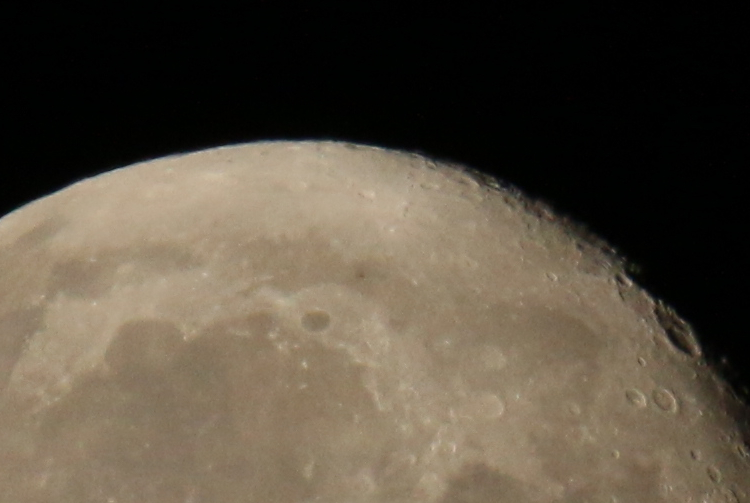
So, checking out the ISS Transit Finder site, I had warning that early this morning (like, 4:21 AM) the Chinese Tiangong space station would transit (pass in front of) the nearly-full moon. The weather looked like it was going to be right, so I set my alarm and made sure I was up and ready, camera focus locked in, exposure set for 1/800 second (f8, ISO 800,) smutphone synced closely with UTC (it was off by not quite a second, but I could work with that,) and waited for my moment.
Don’t bother looking at that image up there, since that was a focus test before the event. And I can tell you that the actual transit took 1.01 second, so I was prepared to simply fire off a sequence of frames at the higher frame rate of the 70D (about six a second) starting a little before the time and extending afterward, to ensure that I captured it. Behold!
Booyah! Nailed it!
What? You don’t see it? It’s right there!
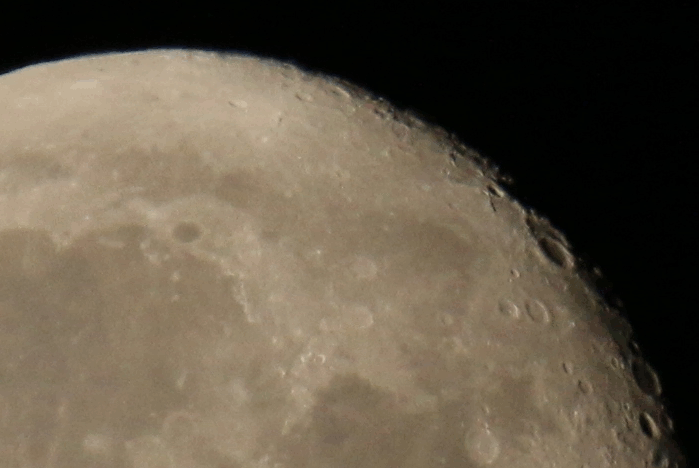
Nah, don’t feel bad – it took me four or five passes through the images before I spotted it, and I knew much better where to look, but it’s that little dark smudge right in the center of this crop, above and to the right of the prominent crater (which is Plato.) I was seriously hoping for better than this.
Let’s see it in five frames in an animated gif (pronounced, “ger-VASE“):
Five frames, 200ms delay between each, pegs this at close to real time. But if that’s still hard (and I’m there with you – remember, five passes looking specifically for this,) we have the annotated version, at half-speed:
Better?
Now, a bit of info. These frames were all taken from a tripod with a remote shutter release and overlaid at full res before being cropped down, so the movement you see is not my lousy editing, and might be slightly due to the tripod twitching a little, but it’s mostly a) the moon shifting to the right naturally, as it does, and b) atmospheric distortion, which was egregious this morning. Look at the details on the right side and how they warble and smear – that’s not camera motion, that’s just the distortion from the air. And within a single second too. It’s no wonder I didn’t get anything more distinct from Tiangong.
Funny, when I put this on my calendar to remind me, I failed to notice that today is Not… Really Worth the Effort Day, otherwise I would have skipped it and stayed in bed. I have to tackle things like this from a place with much lower humidity and high-altitude wind shear. Or not at all…


 And you did see me peeking out of the tree in there, right? I hope so – I’d hate for all my advice about observation and patterns to have gone to waste.


 That said, I’ve had several failures which turned out to be the SATA ports on the motherboard going bad while the drive was still good, and have used my Sort backup to restore images an unknown number of times (a dozen or so?) I have had warning signs from drives and switched over, one of which did indeed fail soon afterward and is now inaccessible even from an external drive dock – nothing lost, since I acted quickly. Worth noting is that I also learned ages ago how to avoid viruses, of which Linux is largely resistant to in the first place; a friend of mine has learned no such thing, and has been infected to the point of reformatting drives at least three times (good rule to follow: if it seems too good to be true, it is – don’t click.)