


For the past two and a half years, I’ve been using a specialized rig for macro lighting, one that produced dependable and pretty damn good results. But it was not to last. The Sunpak FP38 flat panel flash is a surprisingly neat little package, but like everything that I ever really like in photography, it’s been discontinued, and I knew it was only a matter of time before I had to find something else. Through a stupid move (always check voltage on the AC power unit before plugging it in,) I hastened that fateful day by blowing a capacitor, which is the heart of any flash unit, and until/unless I can find a replacement, I have to work with something else.
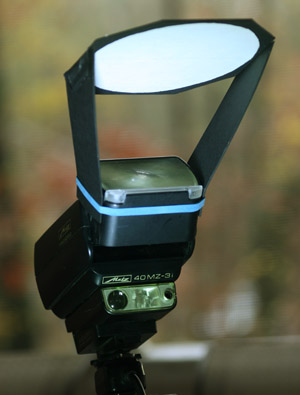
My workhorse flash unit is the Metz 40MZ-3i (a model number I can never remember,) which is a slick little unit selling for half the price or less than the Canon models with similar capabilities. It has a lot of power, numerous creative options, and best of all, it has manual output and can be adjusted in 1/3 stops through a wide range of light. This makes it great for any demanding lighting situations. But, like all unmodified flash units, it produces a spotlight effect, bright highlights and harsh shadows, which is why I went with the flat-panel flash and softbox in the first place. I’ve used the Metz with a Lumiquest Big Bounce diffuser, which worked fine, except that the Lumiquest is heavy and bulky, and had to be strapped up into macro position because the tilting flash head of the Metz wouldn’t support its weight in the position necessary for close work.
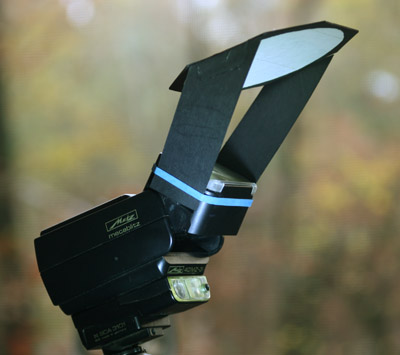 So the other day, I tried out another homemade option. To make lighting less harsh, it needs to be spread out and diffused a bit, preferably coming from a broader area rather than the small point source of the flash tube or the scatter panel right in front of it. This can be done by a) bouncing it off of a wider reflective panel, like an umbrella or a ceiling; b) sending it through diffusing material like thin white cloth or tissue paper; or c) both. Because I was doing macro work in close quarters, especially in ‘the field’ where the flash unit usually has to move with the camera, the distance for bouncing is limited; it would also be nice if the rig could pack into a camera bag easily. So this is the current experiment, a very simple deal. Two arms hold the bounce panel a short distance from the head, at an angle that accommodates macro work.
One distinctive change that I made over the flat-panel rig was the reflector, which is round now. This will produce a round highlight from any highly reflective surface that I photograph, rather than the curious square ‘window-pane’ that the Sunpak showed. While minor, able to be seen only if someone was paying close attention to the shape of the highlight in the eyes of something in my photos, it always bothered me when it showed up. So I made the reflector panel round and painted all other surfaces black so they wouldn’t throw stray reflections.
 It’s all constructed out of mat material, the same stuff used in picture frames, basically stiff paperboard – I had some black stuff with dingy ‘core’ color instead of bright white, which made it unusable, really (always buy bright white core stuff.) The reverse surface is matte white, which I made brighter and more reflective by putting clear packing tape over it in a circle, then painting the surrounding bits black – the circle measures 11cm across. While I could easily put some hook-n-loop patches on it to hold it in place, right now I’m just using a rubber band, which is more than adequate for the negligible weight. And the arms are attached with fabric ‘hinges’ so they’ll fold flat when not in use.
So with all that, how does it work?
Well, in the previous post, the two assassin bug images and the one with the spider and prey were all taken with it – meaning the spider one was taken while upside-down. For close work it seems to do pretty well, though I’m thinking the reflector panel might have to be a little bigger. But let’s take a look at how it works with a larger, more distant subject.
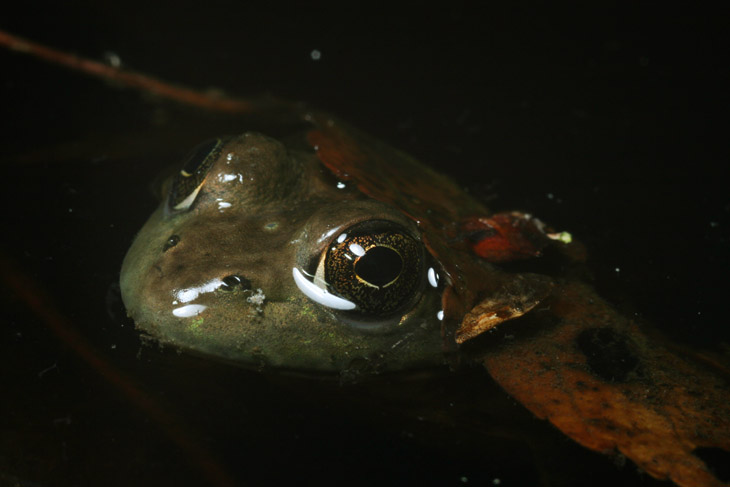
I mentioned before that I’m working on a pond which will have multiple pools fed through waterfalls, and one of the smaller pools has been cast in concrete and sits in the yard next to the big pond liner, which has been occupied by frogs most of the season now. With regular rains, the little pool has remained filled with water, and one of the smaller frogs has taken a shine to it.

This shot was taken by ambient light on an overcast day, and the pool doesn’t get direct sunlight anyway. But it’s the fartsiest one, and good for comparison. The next two are detail shots with the new flash attachment.
Now, penetrating the water wasn’t really expected, and I’d need a really broad reflector (like a meter or so) to come close to the ambient light effect, which wasn’t the goal for this device. I probably should have taken the device off and done a few shots with direct flash, just for comparison, but catching the frog during its brief, shy appearances is tricky enough – several previous attempts have failed. So let’s take a close look at the effect from the round reflector.
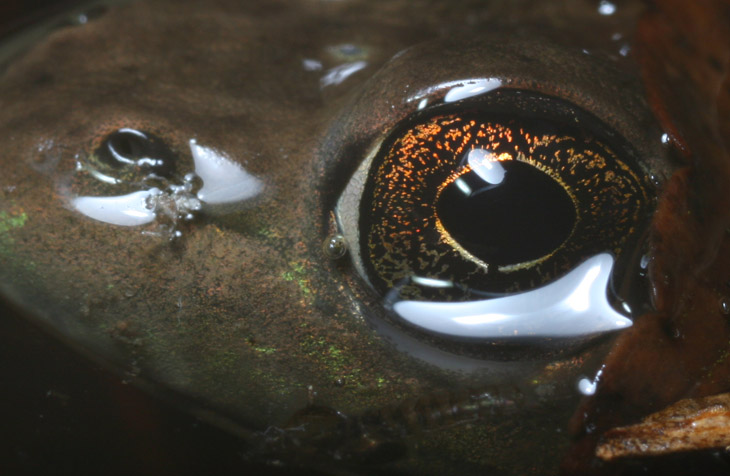
This is a rarer subject, because due to the water adhering to the entire frog, every surface is reflective, but that’s the trickiest and most demanding type of subject. Thus, there are highlights in several areas, but if we look to the eyes, we can see how it all works. The round reflector is clear, and much less obtrusive than the former square one – but there’s a few other traits too. The very faint reflection from the arms I think I can cope with, but the flash head itself peeked into the shot for a secondary highlight – I might have to put up a small shielding panel for that. And the head has a distinctive reflection in the reflector, putting a bright highlight in the middle of the round patch. Hmmmmm.
To be sure, this is only going to show in circumstances where I’m very close to an eye, or something comparably reflective and smooth like that, though it happens often enough in my pursuits. But what about the more generic subjects?
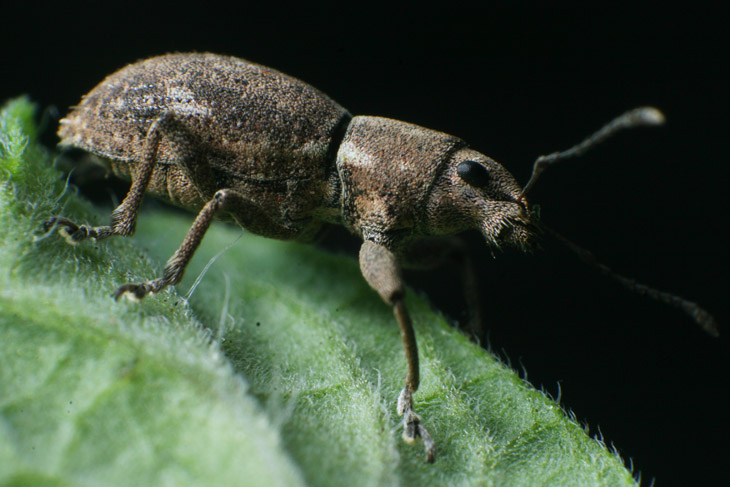
This unidentified weevil, possibly one of the broad-nosed weevil subfamily (Entiminae,) was caught one evening when I was chasing spider food, so it served as a test subject briefly before I let it go. Mixed results here: I like the soft light across most of the body, but the shadows off to the right are a bit deep, indicative of light from one direction – it’s easy to tell where the flash was located. Perhaps a bigger reflector is in order, but it’s worth noting that the diffuser for the flat-panel unit was only 16cm in width, five more than this, so I think this is only indicative of having the flash too far off to the side rather than above the subject; a second light source is often useful in such circumstances, if difficult to implement in a rig that can he handheld.
A major plus with the Metz, and the primary reason why I wanted to adapt it, is the recharge time. The Sunpak flash used four flash tubes and a fixed output – the light was always the same, and it worked well for the f16 aperture setting I liked to use for macro work. But it took several seconds to recharge, so quick sequences were out of the question. The Metz, while still using four AA batteries like the Sunpak, can be set for lower output, and at the settings I normally use for macro it can recharge almost instantly; the capacitors charge up for full output, but I’m often using 1/8 that, give or take, so the capacitors only discharge fractionally and can fire off several times before total discharge, while the batteries are working to keep them at full. This means I can do sequential shots and faster frames.
So for now, I’ll maintain things the way they are and keep experimenting; we’ll see if the rig has to be adapted more, or just some slight changes in habits. Plus, with the potential of higher output, I can start shooting at smaller apertures too.