It’s been a while since the last composition post, so let’s waste no further time and get into planning. Wait, somehow that doesn’t seem quite right…
No matter what the preferred style, sooner or later every photographer gets into planning a shot; envisioning exactly how they want it to appear, and then endeavoring to actually bring this out in the image. Some styles of photography largely demand this as a matter of routine (like studio portraiture and commercial model shoots,) while others rarely delve into the practice at all (nature photography, candids, etc.) It can be very nice to simply snap off the image that you wanted without planning or imagining it, but very often, the shot that is planned, at least to some extent, comes out better overall.
The image at top seems like a simple time exposure, taken from an overpass at night, but there was a lot that could make this weaker, or outright detract from the image. Headlight glare can be pretty intense, so a position offset from the oncoming cars was chosen. Too many cars will overlap and muddy the frame, but empty lanes can make the road seem unbalanced. This was taken right where an on-ramp merged in, so getting a single car in each of the eight lanes available, for the eight seconds of exposure time, would be pretty tricky. As it was, only two cars came through on the oncoming side, both sharing the same lane, and even one of the lanes beneath the camera was empty, yet the remaining vehicles helped balance out the composition – the one at far right was a truck with extra running lights, so it produced a nice collection of streaks without overlapping as multiple sets of taillights might’ve. Timing the exposure to start just as the close vehicles emerged from under the bridge maximized their time in the frame, and wonder of wonders, one driver was even captured using their turn signal properly. Must not have been a local…
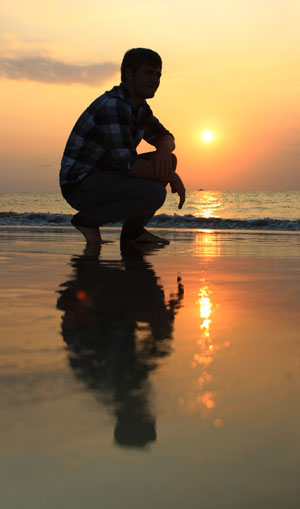 From a nature photography standpoint, as well as portraiture, one of the better bits of planning is using the best natural light. Sunrise and sunset, often referred to as the ‘golden hours,’ offer softer, low-contrast lighting that has a pleasant warm hue, not to mention often producing nice displays in the sky, so being in position when this occurs can be very useful. If you don’t have a developed sense of where the sun will be, a compass and any online guide or app can tell you exactly where it will contact the horizon, allowing you to use this tiny window to frame the sun (or moon, as it may be) against some foreground interest. The colors change rapidly at these times, and the best displays may last only a minute or so.
Shooting into the bright sky like this is certainly going to affect exposure, often producing a silhouette. While it was not a technique used in this particular case (you may notice that I don’t show recognizable people without express permission,) having a flash unit handy to throw some fill light into the scene can produce a better portrait – but it also has to be the right level of light. A manually adjustable flash unit, or a variety of diffusing materials to soften the output, can allow you to throw just enough light to see detail without looking like the subject is unnaturally lit, so you’d best have these materials on hand. A reflector can also work, but usually needs another person to wield it with accuracy.

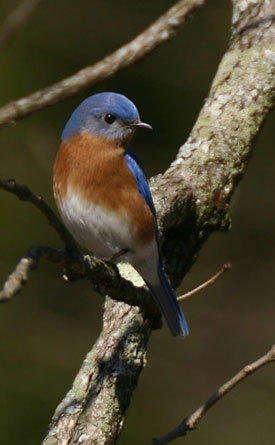 Anticipating the action is also an important facet. This might mean setting up a complete rig to be able to capture birds feeding their young without being close enough to spook them, with light levels adjusted ahead of time so everything’s ready when the action starts. Or it might simply be knowing what pose or position is going to work best, and being able to trip the shutter exactly when it occurs, no matter how fleetingly. Most animals look better with a bright point reflection in their eyes, called a ‘catchlight,’ but don’t often pose where this can occur because it also means that light is making it hard for them to see; thus it might happen for a second or less. Yes, this takes practice and fast reflexes – you’re seeing the successes here, but I have enough misses as well. A little forethought made me position myself so that the bluebird’s head fell in the gap between the background branches, rather than intersecting them in a distracting way, and then it was simply a matter of waiting until the bird turned to look in exactly the right direction.
The more involved aspect of planning is, naturally, the studio shoot, whether this be a full modeling session or a small natural-looking setting for arthropods, or anything in between. It’s easy to imagine that taking an illustrative photo of an inanimate object for advertising purposes is easy – until you try it, and discover the issues with deep shadows, and reflections from shiny surfaces, and that there’s one angle that shows off the object with the necessary details, and so on. The same can easily be said for people, where different bodies or facial structures require different approaches to lighting, and the background has to complement the clothing, and let’s not even talk about trying to get the right expression from the model. But what all of these point to is having a lot of flexibility in equipment and approach, and this often means being able to cobble together something that works for the immediate needs. It can help to have a variety of lighting options, but it isn’t always necessary – a lot of effects can be achieved with homemade apparatus like reflectors, LED lamps, and tissue paper for diffusing overly bright or direct lights. However, you will almost always need something extra to make a studio session come out well, and it can take a lot of time and experiments to pin down what works best.
[A quick note: not long back, one of the primary tools of the studio photographer was a Polaroid back, an interchangeable film cassette for the medium or large-format cameras which permitted an immediate view of how the photo would look with certain lighting or sets. This was often necessary because the strobes used were not ‘constant’ lighting but fired only momentarily, and judging their exact effect couldn’t be done without capturing the instant of triggering. With digital, many studio photographers now have their cameras hooked into a large monitor for previewing in the same manner, because the dinky and poorly-corrected LCDs on the backs of the cameras just aren’t sufficient for critical evaluation.]

Above, a fairy shrimp (Anostraca) photographed within a custom-made macro aquarium that greatly limited its ability to move out of focus range, using a dark-field technique that brightly illuminated the body details against a black background. While not too elaborate to set up, it was a much easier way of illustrating a subject that measured only 8mm without a lot of aggravation trying to nail focus in an open aquarium, as well as not firing the flash directly into the camera lens.