 We all have experience with missing something right under our noses, or someone speaking to us who remains totally unheard because we’re concentrating on something else. The proper term for this is inattention blindness, and lots of videos and examples can be found online (Richard Wiseman, over there in the sidebar links, deals with this trait from time to time.) It is something that is amazingly prevalent in photography, so let me emphasize that any photographer needs to keep making the effort to remain aware.
The primary manner in which this occurs is by focusing all of our attention on the subject itself, with no awareness of the background, the surroundings, and so on. This can have two distinctly negative effects. The first is that we let something else become visible in the frame, a distraction from the subject, or perhaps something that detracts from the overall feel of the image – trash or wires in the background are good examples. But the other effect is that we don’t frame the image with respect to the surroundings, how the image interacts or fits within. We are not simply after a photo of a bird, but a scene which contains the bird (yes, this is directly related to my spin on the Rule of Thirds.) Everything visible within the frame should be working as a whole to convey a certain idea to the viewer, or at least, doing nothing to detract from it.
Something that often defeats us is the aperture, or f-stop if you prefer. It remains at maximum opening up until we actually trip the shutter; commensurately, it also remains at the shortest depth-of-field. This means some details and distractions are much further out of focus to us in the viewfinder than they will be in the resulting image, though we can easily spot them when not looking through the camera. So it helps a lot to note everything in the field of view before raising the camera to shooting position; then when the white blotch is visible in the viewfinder, we know it’s a road sign or discarded paper bag and can shift position accordingly to eliminate this.
 Even when we have achieved an appropriate, uncluttered and undistracting background, we can sometimes do more. For the fall shot featured in part seven, I waited for the (painfully slow-moving) clouds to provide a break behind the peak, while for the lizard seen here, I shifted position slightly to put its head against a leaf that provided better contrast. Such things make us aware of the three-dimensionality of our shooting locations – when we shift position, closer items within our frame move differently from more distant ones, and we can easily change their height, size, and position relative to one another.
That, actually, is an important factor in using the background and settings. Your subject can stand out better if it is framed among, or against, something that complements it well, providing contrast as needed. Getting lower can frame a subject against the color of the sky, or a slight shift may put it among a more solid, consistent background rather than a cluttered one with too much detail. This image isn’t actually showing the sky in the background – it’s showing the pond surface reflecting the sky, which was an angle that I could actually achieve. In using such a technique, a shorter depth-of-field very often helps, but be warned: some consistent patterns, like fences and walls, remain and betray their presence even when significantly out of focus. And as indicated at that link, you can also do some simple things to improve the appearance of the background.
We can also plan around a background, most especially weather conditions. This is usually the place where ‘background’ becomes ‘setting’ or even ‘mood,’ but this doesn’t diminish its importance. A subject can become even stronger placed against a background that is appropriate, more colorful, or more dramatic, and this can mean coming back at another time when the weather or sky conditions produce better effects. When on photo trips, I almost always have someplace that I want to see the sunrises and sunsets against, and make sure that I’m on location well before this occurs (usually) – I also carry a compass to know exactly where these will occur in relation to my subject. Be aware that sky conditions can change very rapidly, so suddenly realizing that there are great conditions and then trying to find an appropriate foreground interest for it won’t work unless the choices are very close. Some sunset, rainbow, and cloud conditions are drastically changed within just a couple of minutes, and sometimes even seconds.
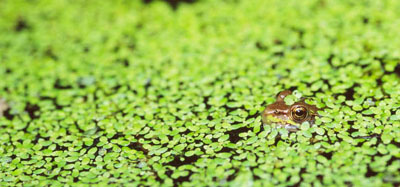
 Then we come to the really sneaky part of composition, bringing us back to the idea of the scene. Whatever reaches the edge of the frame essentially goes on forever, or at least represents the principle traits of the setting. This means that what you don’t include is as important as what you do. I use the image at right in my workshops to illustrate how this works, because it fails to show any indication that it was taken in a plastic pond liner only a meter across. What is communicated to the viewer (provided I keep my mouth shut) are only the immediate conditions, and the viewer fills in the locale with their own imagination. Some settings and backgrounds produce their own ideas from common association, the metaphorical aspect that can lend a lot to your compositions.
For all of the cameras that permit the photographer to frame their image in the LCD on the camera back rather than the viewfinder, I always recommend using the viewfinder as much as possible, primarily because it just makes for more stable habits. But there’s another reason why the LCD can be bad, and it’s because the manufacturers want to jam so damn much info onto the screen at the same time that you’re supposed to be composing your image. All that stuff at the edges tends to make the photographer subconsciously push the subject into the middle, and often can hide distracting elements that will nevertheless be in the final image. Chances are, you’re not going to be getting much of anything from the LCD info, since you already have spare batteries and memory to back you up anyway (right?), so just switch it all off. Use the entire frame, and look at everything in your image. If you see something that doesn’t belong, changes the mood or idea, or makes the image too complicated, get it out of there. While you’re at it, you may well find something that makes the image even stronger, if you change your position slightly. And be sure to examine the scene without looking through the viewfinder as well, to see what else can be used to better effect. A few seconds of awareness can change a snapshot into a stunning image.


