It’s been a while since I tackled another aspect of this topic, but this is the right time of year for this one, so let’s delve into orphaned wildlife and rehabilitation.
I used to work in this field a fair amount, both in administration of wildlife organizations and as an active raptor [birds of prey] rehabilitator, plus I served as wildlife adviser in several different situations. So I’m familiar with most of the more common reactions people have when they find ‘orphaned,’ injured, and ill wildlife. It’s hard to give enough useful information without trying to cover every situation or alternative, so treat this as an overview. One thing that I especially want to emphasize here is that there is an immediate emotional response in most cases, which tries to override the advice given by those who work in the fields, so be aware of it. There isn’t an ‘instinct’ we might have that applies to wildlife, and the rational mind is the part that needs to take control.
Additionally, the amount of folklore regarding wildlife is not just abundant, in most cases it’s ridiculously wrong. I’m not even going to say, “If in doubt…,” because you should doubt right off the bat, and consider that most of what you’ve heard is highly suspect. This means, contact someone who is supposed to know, and go with their advice.
Number one rule, and I can’t repeat this enough: Don’t try to raise wildlife on your own. Their diets are specialized, their needs varied and specific to the species, and their adult behavior dependent on how they’re raised. This isn’t the place for guesswork or experimentation. Even if they seem to be ‘doing well’ (like the viral video of the guy raising a baby hummingbird,) they may have developmental issues from an improper diet or exercise, or simply have imprinted on the wrong species, and you are in essence just prolonging the death of the animal. In the US, it’s illegal to raise any species without a specific permit, and songbirds are federally protected. It’s possible to obtain these permits, and quite frankly encouraged, because there are few places with enough rehabbers, but if you’re going to do it, do it right. More further down.
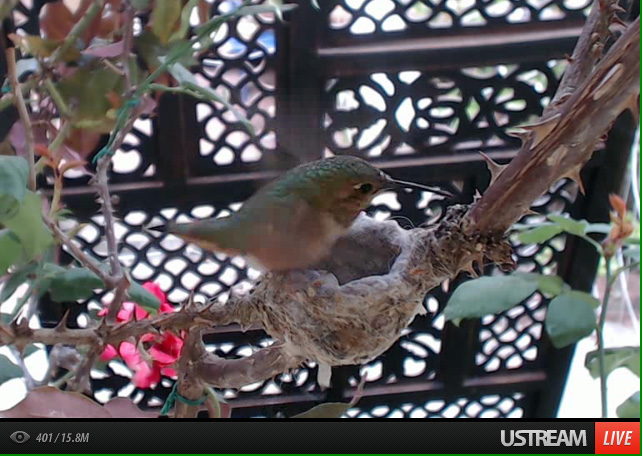
So, we’re about to enter baby bird season, and this accounts for a large percentage of wildlife encounters. I’ll dispel the first myth that touching a baby bird will cause the mother to abandon it. Utter hogwash, pure and simple – yet, I don’t always discourage parents from teaching this to their children, because it’s one way to try and get kids to leave them alone, which is a good thing. Better, perhaps, to teach them to leave them alone for the right reasons, which is to avoid interrupting their feeding schedule, or injuring them, or thinking it would be neat to have a pet robin. But returning to the myth, baby birds will occasionally fall from the nest, and it’s perfectly fine to return them to it, and in fact this is recommended.
It doesn’t always work, however. Some species will discard young that are not doing well, and some even kick their own siblings out – this is nature’s method of selecting the most viable offspring, as ruthless as we find it, and we’re not going to change it. Basically, if it’s a baby bird not ready to leave the nest (not fledged; we’ll return to this,) put it back. If it keeps coming out, there may not be much you can do.
Can’t reach the nest? Try to find a way, first. If that’s not possible, occasionally the parents will accept a substitute nest, such as a plastic berry basket with soft tissue as bedding – this should be placed as close as possible to the original nest, firmly anchored so it doesn’t come down. Observe the nest carefully, but from a safe distance, for 30-60 minutes to see if the parents have indeed found the substitute. If not, seek out a rehabilitator or wildlife official.
Abandoned nest? Maybe, maybe not. Once the eggs hatch, the parent birds go into feeding mode, gathering food constantly during daylight hours and stopping at the nest for brief periods to jam it down the gullets of their ravenous progeny. The 30-60 minute rule above is because waiting less may mean you’ve simply missed the brief feeding period between the extended gathering periods. Observation has to be done at a distance that does not alarm the parents – minimum is six meters (yards,) and more is recommended. Also, being low key is paramount, so take a seat (with binoculars, for preference) and remain still and quiet. Yes, it’s boring, but it’s for the health of the offspring, and if you didn’t care about that you wouldn’t be reading ;-)
 As the nestlings become fledglings, they abandon the nest on their own in learning how to fly. This does mean that they’ll be found unable to fly, fluttering around at low level and even just sitting there staring at you. This is normal, and they should remain undisturbed. The parents are nearby, providing food and encouraging the flight attempts. Most bird species know enough not to give away their progeny’s locations to predators, or draw attention to themselves by moving a lot, so your ability to approach, or not being attacked by angry parents when you do so, means nothing at all. Again, observation is good here, as is knowing the calls of the species in question – the parents may be coaching their young towards them.
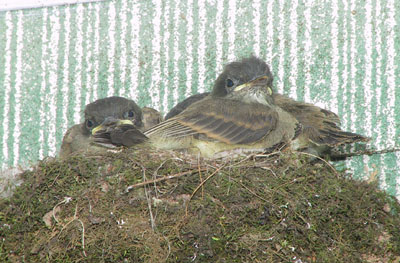
Now, telling the difference in ‘nestlings’ and ‘fledglings.’ A nestling is a baby bird that must remain in the nest for a while; they will have few feathers, or perhaps even odd ‘quills,’ which is what the feathers look like as they are growing out. Unable to support itself? Eyes not open? Nestling. Fledglings are the babies that are ready to learn how to fly. Their feathers will have good coverage with little to no stragglers or ‘stuffing coming out’ (the baby down.) One rule I always used over the phone was to ask if there were tail feathers – if there are, they’re about ready to fly. These are fledglings and should only be observed.
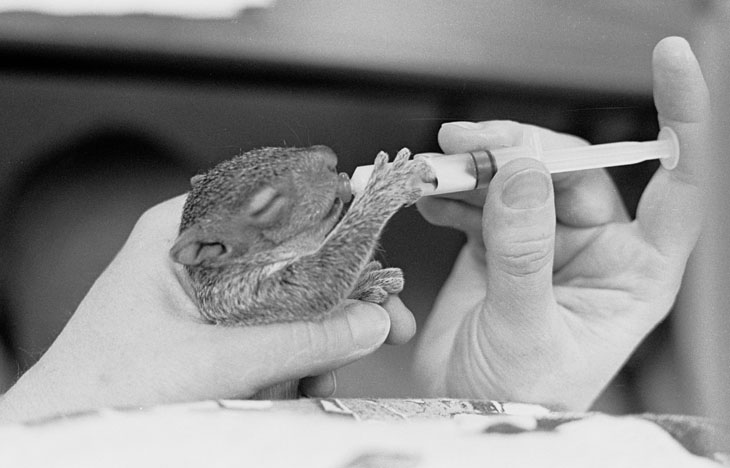
If in doubt, contact a rehabber/official. This is before doing anything else, save for getting it out of immediate danger. No food, no water, nothing at all. I can’t tell you the number of times I’ve heard people say, “We’ve tried giving it water and worms” – birds can aspirate the water if it’s not given the way the parents do (you’ve noticed the beak getting jammed halfway down the throat, right?) and only one species in North America eats earthworms. Again, folklore – ignore it and be safe.
Also, bleeding in birds is serious, no matter what. Birds have very thin blood that doesn’t coagulate easily, and they can bleed out quickly. Also note that those ‘quills’ of new feathers mentioned above have a blood supply for a while, and these can be broken and start bleeding as well. Time is important in such situations.
 Baby raptors will tear you up – they know how to use the beak and talons very early (often on their siblings) and will not hesitate to protect themselves. And adult raptors will protect their young. This is where it’s best to leave it to the experienced.
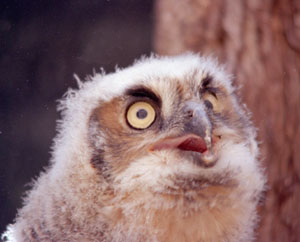
And it may seem funny to have to say this, but baby birds do not look like their parents. Adult kestrels and screech owls, both diminutive raptors, are often considered “babies” when found by those not familiar with what a real juvenile looks like. Basic rule: if it has a smooth appearance and good coverage of feathers, it’s at least fledgling age, probably older.
What about mammals? This is a little different – mammals are generally not found away from their parents unless something has gone wrong. Most especially, if the youngster’s eyes aren’t open, they’re wet from the rain or dew, or if they’re cold or dehydrated, this is the time to contact someone. Test for dehydration by gently pinching up the skin over the shoulders or side in a ‘tent’ and releasing – if the skin takes more than a second to go back into position, this is dehydration.
Always use gloves. Juvenile mammals can certainly bite, and there’s an additional risk to this: rabies is active throughout much of North America. This is an invariably fatal disease once it passes a certain point (much more so than HIV,) so this needs to be taken seriously. It is not just the bite that can transmit it, but contact of an infected animal’s saliva with mucous membranes can introduce it as well, which means that picking up a damp animal and rubbing your eyes puts you at risk. Animals do not have to be showing symptoms to be infectious, and symptoms vary anyway. BE SAFE.
It’s not just rabies. Mammals are far more likely to introduce other zoonotic issues than birds – they’re enough like us that parasites (internal and external) and some viruses can be transmitted to us. Bringing them into the house may mean you just introduced fleas, lice, giardia, and so on into your home. You’ve been warned.
 Also, and it pains me to have to always say this, but cute does not mean safe. Any animal can defend itself. I have never been bitten by a raccoon, despite their aggressiveness, but I have a scar and a touch of nerve damage from a grey squirrel – one, moreover, that was raised in a house. Rabbits and mice can bite the hell out of you. Shrews even have a toxic saliva. Yes, I am trying to scare you – if you’re scared, you’re cautious, which is better than incautious.
In many cases, mammals about half of the adult size can be on their own without issues – they learn how to forage for their own food reasonably quickly. Again, the stillness thing doesn’t mean they’re lost – it may simply mean they’re trying not to attract attention. This is especially so for white-tailed deer fawns – they often curl up in the grass and conserve energy while mom forages, and will not move even when someone approaches – occasionally not even when picked up. Leave them be, and come back in a few hours. If they’re still there, that’s when you should contact someone.
Rabbits are notorious for abandoning the nest if it’s been disturbed, even with a full brood of young within. This is doubly hazardous because their nests are often in clumps of grass and can be inadvertently discovered by cleaning the yard. If it happens, immediately put everything back as it was, without touching the young, and place a few distinctive blades of grass across the nest opening (preferably something you can see from at least a short distance away,) then leave it entirely alone. Come back in a few hours and check to see if the grass has been moved. If it has, things are probably okay. If not, it may be time to check the warmth and hydration of the young. Contact a rehabilitator.
Again, trying to raise them yourself puts them at a high risk. This is especially true for rabbits, which are among the hardest mammals to raise in North America. I can’t count the number of people who have assured me that they did it once before, so “they know how to do it.” While this may be true, it ignores numerous things, such as how viable the released offspring were and whether they lasted longer than a month, whether they had developmental deficiencies because of improper nutrition, and even whether they had habituated to food or behavior that left them ill-prepared for their conditions. There is a shortage of rehabilitators, so believe me, if it was easy most people would be encouraged to tackle this on their own. The fact that not only is it discouraged, it is unlawful in most areas, should be a good indication that there’s something more to consider. And the welfare of the animal should take higher precedence than anyone’s ego.
Injured animals are extra dangerous. Yes, they may seem incapacitated or helpless, but you know what they say about appearances. One of my colleagues rashly checked an injured, near-comatose squirrel bare-handed, and it bit through her finger, joining its teeth together in the fleshy part of her index finger – I actually heard them grinding together. It then passed out without letting go. Animals in pain (even pets) often respond aggressively – they have no concept of your attempts to help them, and restraint can make them even more agitated. Deer can do vast amounts of damage by thrashing with their hooves, and the big waterfowl like herons and cranes can drive that beak into your face (and yes, they aim for effectiveness.) I really want to emphasize this, because the nurturing instincts are badly misplaced here, and extreme caution is necessary instead.
“There’s a nest of animals in my attic/crawlspace/walls and they need to be removed!” No. Most especially not when they’re raising young, which is most often when anyone notices them. Once the young are there, no further damage is going to be done to your house, because the parents are concentrating on raising their brood. Trying to relocate them is hazardous, both to the animals and to people in many cases, and pointless. Let them be, and in a few weeks the young will be old enough and move out on their own – about the only exception to this is bat colonies (more below.) Once there are no young to raise, the adult animals often leave on their own – nests are primarily for young – but they can also be encouraged to leave or stay out at that point. Squirrels are pretty bad about wanting to return to successful nest areas, and will even chew through wire mesh at times, but most others take the hint and find better places to live.
“But what about rabies?” Animals raising young, even in the eaves of your house, are not an especially high risk. Contrary to belief, rabies does not cause animals to leap suddenly out and attack people; those events are remarkably rare. While anyone should be quite cautious of any mammals that openly approach, living near them does not place anyone at special risk – you’re at greater risk of being killed by the tree near the house falling on you, and we won’t even talk about road risks. Like snake bites, most contacts with rabies vector wildlife occurs by people initiating the contact.
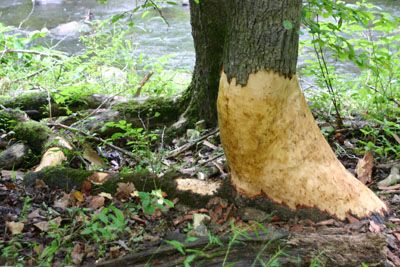 “Animals are doing damage to my property and need to be removed!” No. I can’t tell you how much this attitude annoys me, but that’s what a blog is for, right? Wildlife goes where the habitat is ideal, and pays no attention to humankind’s imaginary idea of “property.” First off, anyone should enjoy the opportunity to see behavior, something that is often hard to accomplish even when making the effort. If someone has wildlife around, chances are they aren’t in a high-rise apartment, which means they wanted to live with at least some vestige of nature visible; surprise surprise, it comes with other animals. While we might decry the damages to our gardens or landscaping, that’s part of the territory, just like road noise and power lines. Learn how to cope, and the ways to exclude animals from certain areas so we can have tomatoes. I’m sorry that a $500 tree was stripped, but no one should have planted something that was that appealing to the local species in the first place, and chances are, numerous appropriate trees had been cut down first so that the fancy landscaping could be put in its place (and I used to work for a landscaper, too.)
Trapping and removal is rarely effective. If there’s a habitat, someone else will move in. And wildlife populations have been shown through numerous studies to be fairly self-regulating; the issues come because habitat destruction by humans is not. We can put in housing developments much faster than the natural cycles of population reduction and management, and those displaced animals end up somewhere. They likely feel the same way about us – dread the point where they develop opposable thumbs.
But what about bats? Ah, the poor little guys! Much of our population considers them ugly and creepy, not at all helped by folklore and horror stories, yet bats are actually way cool mammals, and good to keep the insects down. But most species nest in colonies, and this does sometimes mean in attics, which can produce lots of guano (bat poop) and increases the risks of rabies exposure, primarily when one gets lost and ends up within the human spaces of the house. However, the damage that they can do is minuscule, since they do not dig or gnaw, and excluding them only takes 1/4″ hardware cloth (small-holed wire mesh.) Again, this should be done when no young are being raised, and should always be done with gloves and a breath mask (guano turns into dust easily and can be inhaled.) Should you find a bat in your house, contact your local animal control, since states differ on how they handle potential exposures.
I said I’d get to this: So you want to learn how to rehabilitate wildlife? Once again, this is actually encouraged, but like riding a motorcycle, it should be done properly and responsibly. If there isn’t a wildlife center or organization available in your area, contact your regional Wildlife Resource Commission office (for the US at least) to find out who in your area can train you, and most especially what permissions you need. In the US you’ll need at least one permit, possibly several. What you’ll mostly need is training, because any species requires a decent body of knowledge to tackle well – which also means pick a species, at least to start. Your local rehabbers can suggest a few, which might mean picking something you didn’t initially desire, but which is either easier to learn or presents the greatest needs within an area (and again, is this about you, or the animals?) Expect to spend a lot of time at it, since most animals need lots of attention – mammals may need feedings every four hours around the clock, and birds every 15-30 minutes during daylight (yes, I knew a songbird rehabilitator that kept baby birds in the desk drawers of her office.) And it’s almost certainly all coming out of your own pocket.
I feel obligated to say this, too: wild animals are not pets, and should not be raised as such. There are lots of reasons. The domesticated animals we have as pets, like cats and dogs and horses, have been bred that way for thousands of years and quite likely were chosen because they already had traits that assisted the process. Animals do not domesticate by simply raising them around people, and in many cases have behaviors that cause them to run afoul of our own (I mention once again the squirrel scar I bear, and will post that story later on.) Many animals also do not have diets that are easy for humans to replicate, meaning that they’re unlikely to thrive and may develop serious disabilities. But most distinctly, what we might imagine them to be like is rarely ever the case – they are highly unlikely to bond with humans in the slightest, and aren’t going to make good companions, do tricks, or even exhibit any appealing personality. They belong in the wild, and that should be your only goal.
Now, if the demands of rehabilitation are too much to contemplate, you can always volunteer with a local organization, and do rehabilitation on a rotation as your schedule permits. This helps prevent burnout and lets you have vacations and family emergencies. This also allows you to get involved without necessarily requiring the permits, because you can operate under the aegis of the organization and its own permits (which is how I worked with raptors, since my apartment would not fit the 15-meter flight cages required.) Still, expect to be dedicated to the job, even when it’s unsavory – cleaning cages and wounds, and even euthanizing injured animals, is a requisite part of it all. Not to mention how many species expect live or fresh food. If you’re thinking of cuddling fluffy bunnies, you’re not ready; rehab requires lots of ugly stuff, and very little bonding – they’re not pets, but wildlife, and need to be wild.
Or, simply donate money or materials. That works too, and is just as necessary – the nice thing about the subject is how nearly everyone can find a niche (provided they accept the reasonable expectations.) Despite such things as Wildlife Resource Commissions and the US Fish & Wildlife Service, there really isn’t money being put into wildlife rehab, especially not from a state or federal level. The vast majority of organizations run solely on donations and grants, and often even have to have veterinary services donated. Experienced workers are great, but donors are just as important, if not more so. Even people who can promote greater donations are important. Just about everything is grass-roots level, all of the time – the few exceptions are great, and demonstrations of what can be done, but not what you can expect throughout the field. Your help, whatever it is, will be appreciated.
A final note: find out, now, how to contact your local wildlife people. Before you find yourself with an injured owl on your hands. In some areas, it’s not self-evident or easy to find, and if it’s not a registered organization, you can forget about searching any telephone listings. Local animal control usually knows, and the 24-hour emergency vets. Often, 911 operators do not, and even local law enforcement may be stumped. A few minutes to get prepared can save a lot of hassle later on, and as I said, we’re entering baby season.
Hope this helps!


 Pondering this led to another thought, and a brief experiment shown here. Tweaking the brightness curves almost off the scale in Photoshop revealed yet another reflection staggered further right (you will note I did not remove the mirror spots in this image.) The light had dropped too faint to make it easily discernible, but the digital sensor still captured it. Sometimes there are subtle traces captured in digital images that can be brought out with editing, and I’ve used this to evaluate several ‘ghost’ and ‘UFO’ photos (which is not often appreciated.)
 Now for some more photographic reflection trivia. This next pic is a portion of a frame taken while living in Florida, a time-exposure at night on black & white film. An effect called “halation” is plainly visible, the halos around the bright lights of the streetlamps. Also visible are starburst patterns, occasionally seen in star photographs, which is an artifact of using a small aperture – I’m leaving this for a later post, because I’m still doing research on how exactly this occurs. So for now, I’ll stick with the halos because I can tell you precisely how this happens.
 Now the fun. The emulsion of film is not perfectly opaque, and can let a little bit of light shine through it. So even when a bright light source is perfectly focused on the emulsion, which sits on the front surface of the backing acetate of film, some light goes through, re-diverging into another cone. This light can bounce off of the back of the film, or the pressure plate in the camera which holds the film flat, and reverses direction to contact the emulsion layer again from the back side. Now it’s out-of-focus, however – even that tiny bit of additional distance is enough to defocus noticeably in the scale of a 35mm film frame – and what results is a halo around the light source. If you go back up and look at the B&W image again, you’ll see the halos are all the same size, regardless of the apparent brightness of the lights; in some cases it’s almost overwhelmed by the flare.
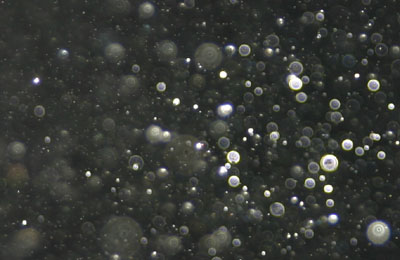 It is worth noting that both flare, and the circles caused by unfocused point light sources, are often mistaken for UFOs and ghosts and other paranormal things. These effects can occur anytime, and often do, but because they involve diffuse light they’re usually overwhelmed by the sharper, more intense light from the focused parts of the image, and are most noticeable only when small bright points of light exist against a dark background where no other light interferes. Many intrepid ghost hunters with no knowledge of simple optics capture ‘orbs’ when their strobes illuminate airborne dust too close to the camera to be focused, visible because the rest of the frame is dark. It’s a very easy effect to duplicate; the image seen here was created with corn starch blown into the air. Either that or my apartment was haunted out the ass…


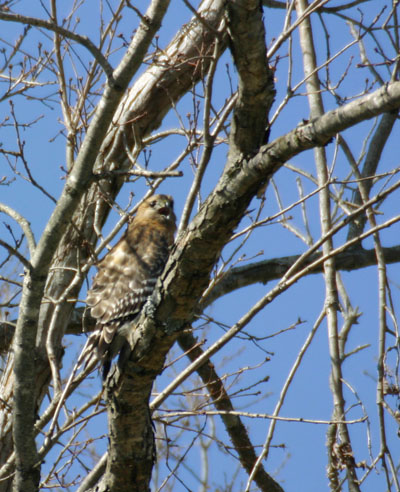 They make the red-shouldered hawks (Buteo lineatus) go into courting mode. The hawks are easy to spot because they’re anything but quiet about it, as indicated by the open mouths.