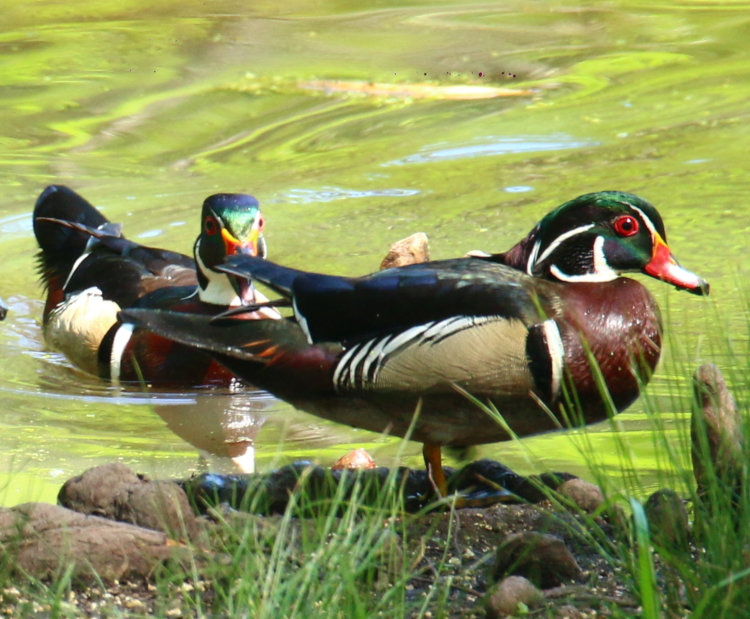
These are just a few recent images that demonstrate one of those factors I struggle with, in this case, trying for ‘that portrait’ of a wood duck. And I’m doing this because, while I just now got a video clip of some other species entirely to feature, I also have background noise that will prevent doing the voiceover for a while. So we have this instead.
Anyway, the wood duck (or one of them, anyway) that likes to claim territory and harass the others:
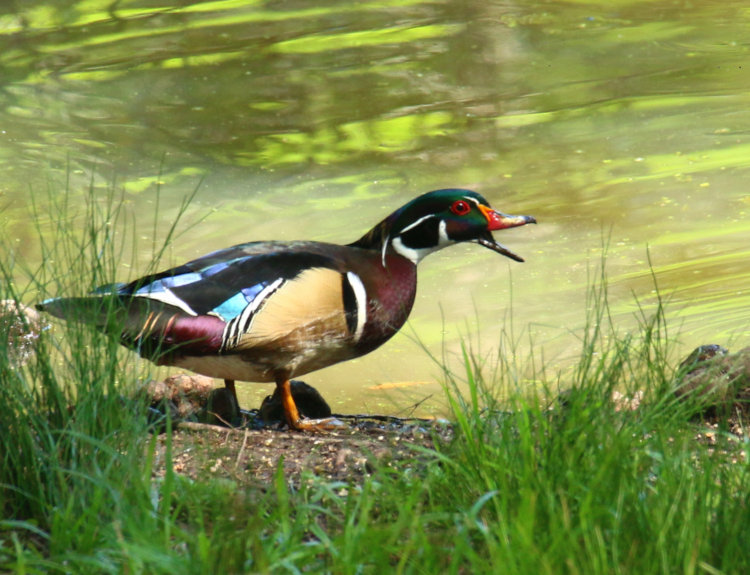
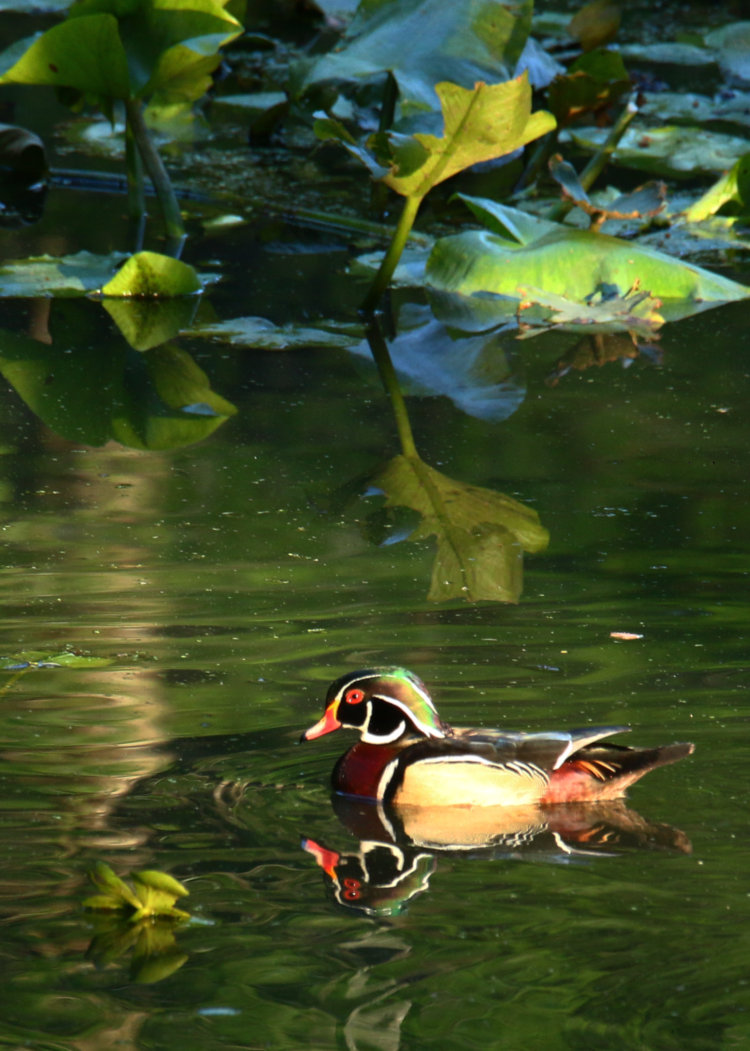
This particular position really brought out the iridescence of the wing feathers, a pretty rare thing in my observations, and this is probably intentional (for a completely misleading interpretation of ‘intent.’) First off, it only happens in bright sunlight, which the ducks tend to avoid, and those blue feathers are most often obscured under the others. They are, likely, both a display for mating and an indication of what species they are when they’re flying, leading the others in a flock away to safety (rather than, for instance, having them follow the hawk that just dove in to try and snag one for a meal.) However, attracting the attention of predators is a bad thing, so the feathers become notably muted and drab when in shadow, and wood ducks are good about remaining in shadow. Meanwhile, the head itself, so often a display of its own iridescence, isn’t catching the light correctly to show it at this angle.
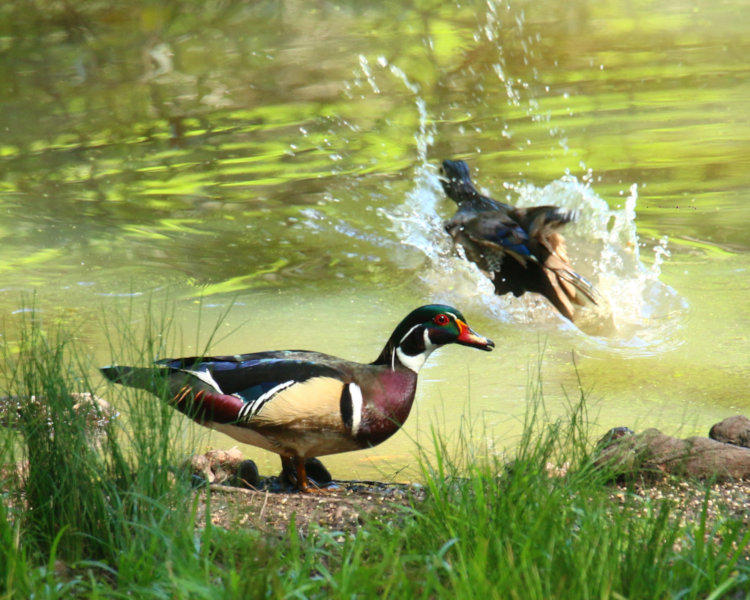
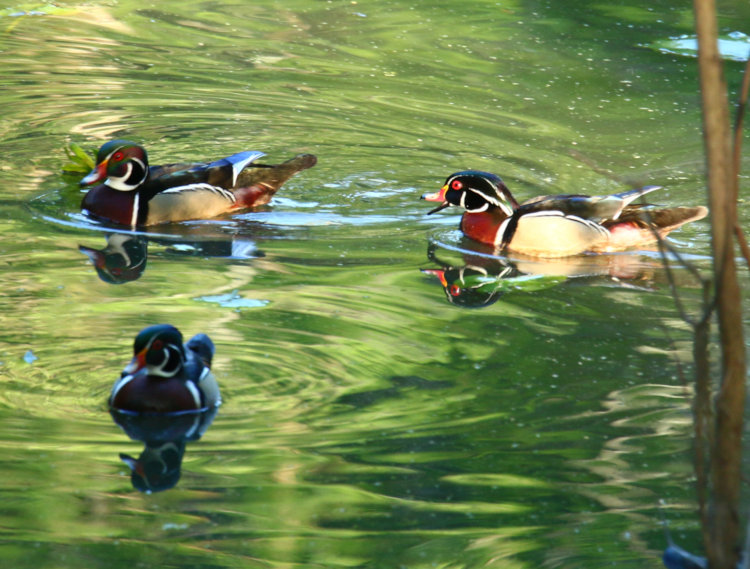
Now we jump a mere second later, as the female that was being chased off by this one splashes into the water:
The male is in largely the same position, just turned ever-so-slightly, but the gleam from those blue feathers has now about vanished. They’re not covered, just at the wrong angle to diffract the light in the previous manner. And still no glow from the head.
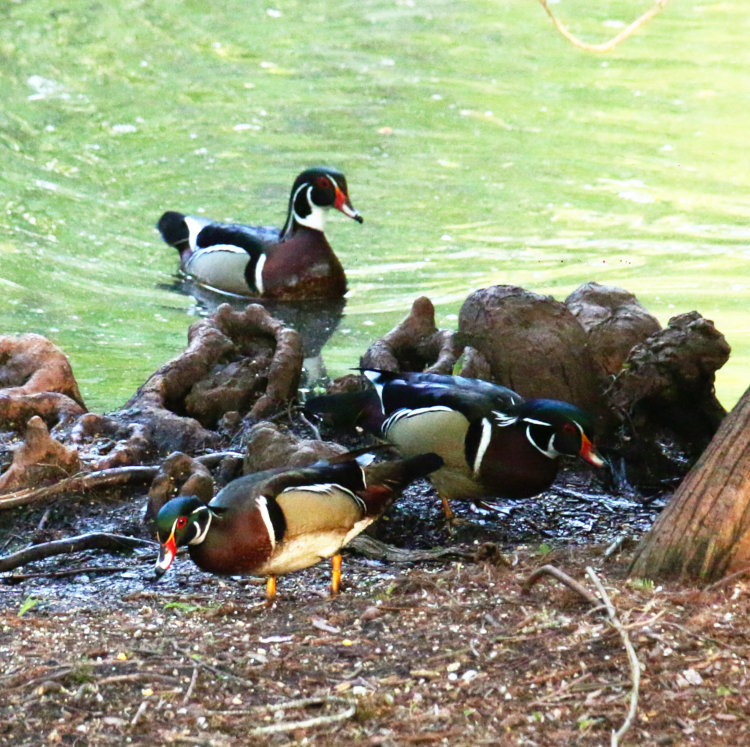
Now, I wasn’t keeping track of who was who at the time, because it’s actually pretty hard when they’re nigh identical and keep dodging back and forth as wood ducks do, but the next pic is only 30 seconds earlier, and I think it shows the same territorial male coming up from the water towards a different male onshore:
If you look closely, you can see that the beak is open on the one in the back. No nice blue wing feathers, but the iridescence on the head of the rearmost one is now showing a bit, indicating that only minor changes in angle can radically change how these ducks appear.
Which is why I’ve been pursuing ‘that portrait’ for a while now. Not only does it take bright sunlight, which the ducks appear within only briefly, but just the right angle to bring out the best colors, and this occurs so fleetingly that it can vanish before I’ve tripped the shutter. To say nothing of having a decent setting, background, position of the ducks, and of course sharp focus. In a species that I have to work quite remotely from because they don’t tolerate human presence at all. Excuses, excuses, yeah I know, but these are one of the more challenging subjects that I’ve tackled, and a lot of it has to do with, they only look really good when they’re just so…
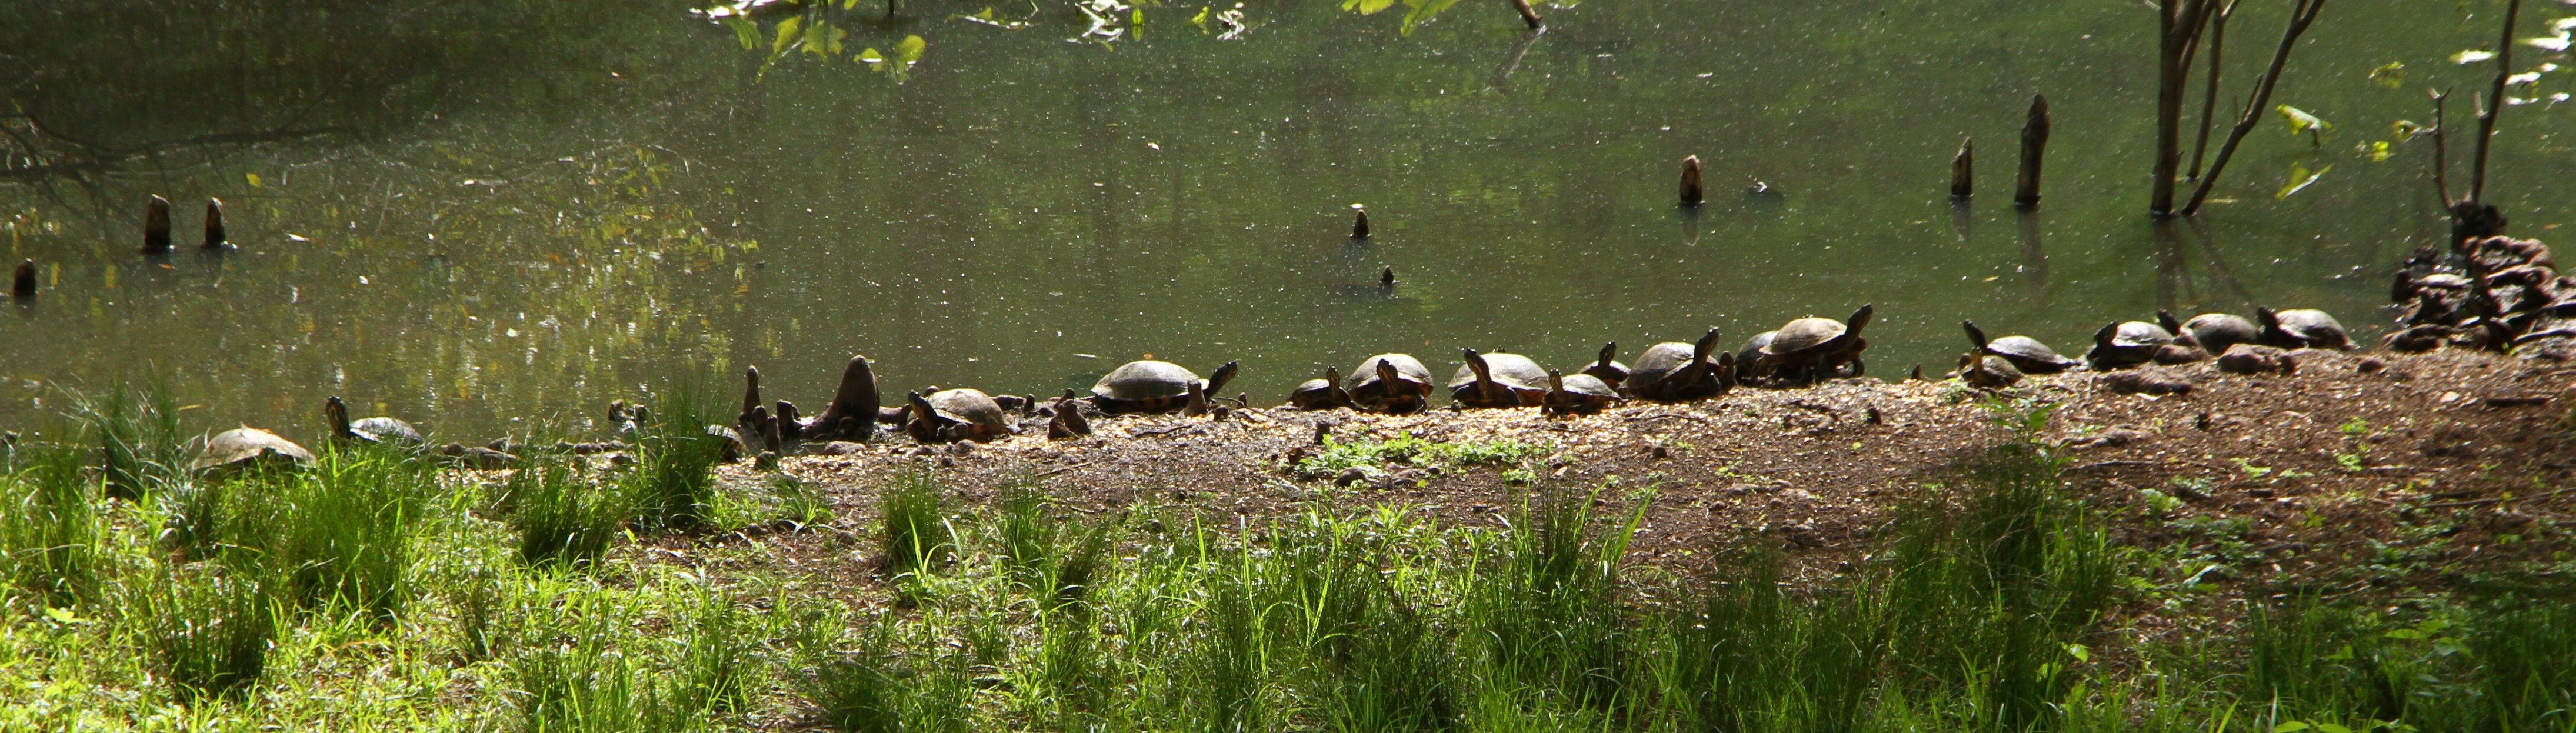
Another holiday is upon us, which should be an easy one to celebrate because, you know, we’ve all been there. Today is Laugh At What You Were Proud Of In Your Youth, the day when we all look back on our accomplishments or finds of the past and say to ourselves, “You naïve, ignorant fool!” In the case that I’m showcasing here, Younger Me was, um, just four days younger, when I posted about a pic of the pond edge that showed up to twenty turtles basking. What a maroon! This is what we were seeing this morning:
Just to blow the previous record out of the water (heh!) there are forty-four turtles in this image. Don’t believe me? Like before, clicking on the image above will take you to a full-resolution version so you can see for yourself, and if that isn’t enough, this link takes you to an annotated one: green for confirmed turtle heads, orange where only their backs were visible, and blue for those in the water. And in case you think I was fudging things a little to drive the count up, these were all confirmed by comparisons to other images – there are no cypress roots being mistaken for turtles in there.
Don’t miss the nutria bebbehs in there either, eating together alongside the favored taller cypress knee that we now call the Matterhorn, again, simply to have an easy reference when we’re spotting all the wildlife with binoculars.
There is something sobering about such a large cadré of, it must be noted, armored residents massing on our shores, and while we can’t imagine what possessions of ours they could possibly want, The Girlfriend and I are gathering a collection of empty turtle shells in case of a charge, to tiddly-wink them back into the water as needed*. It’s not like we have to be ever-vigilant – if we see the invasion beginning, we could probably still finish lunch…**
* I suspect a lot of people won’t get that reference
A quick reminder that the Lyrids meteor shower is set to peak on the evening of the 21st-22nd, even though it’s technically going on right now – this is apparently a shower with a long period but a very distinct and sharp peak, so your best bet is early morning on the 22nd. The thin crescent moon will have set by roughly midnight while the peak is somewhere around 4 AM EDT, so give it a shot. What do you have to lose but sleep? And perhaps your patience. Your lack of a stiff neck. And your lens cap in the dark.
[We now have folding lounge chairs that will allow us to lean back with a better sky view, so perhaps we can avoid the neck thing, though I imagine I’ll be pursuing these on my own.]
Don’t stay up all night, because you’ll need to be well-rested for all of the elaborate celebrations of Earth Day on the 22nd. Still, keep it mum, because we’re aiming for it to be a surprise. Did you really think Artemis II went around the back side of the moon for no good reason?
And on the 24th, the Hubble Space Telescope turns 36 years old, still going strong despite the various advanced ‘scopes that followed. That’s a Friday, so no worries about partying too hard. Let’s see, what was I doing at 36? Come to think of it, let’s not go there…
[I did, idly, wonder how my photographic output compared to Hubble’s, realizing that a) I didn’t even have a serious camera until well after it launched, and b) it’s been in near-constant operation from the start, with high demands on its time. So while I can lay claim to something near 110,000 digital images, 5,800 slides, and dog knows how many negative images, this probably doesn’t hold a candle to Hubble’s output. Except, a pretty good number of its images are extremely long exposures, like hours or days at a time. And do stacked images count? How about the fact that nearly every image it produces is a combination of several, since the sensors are not RGB or color in any way, and rely on the filters used in front of the sensor and post-processing? This is a rabbit hole I’m already regretting…]
But anyway, do something for April.
Done right now, just for this post – nothing to see though
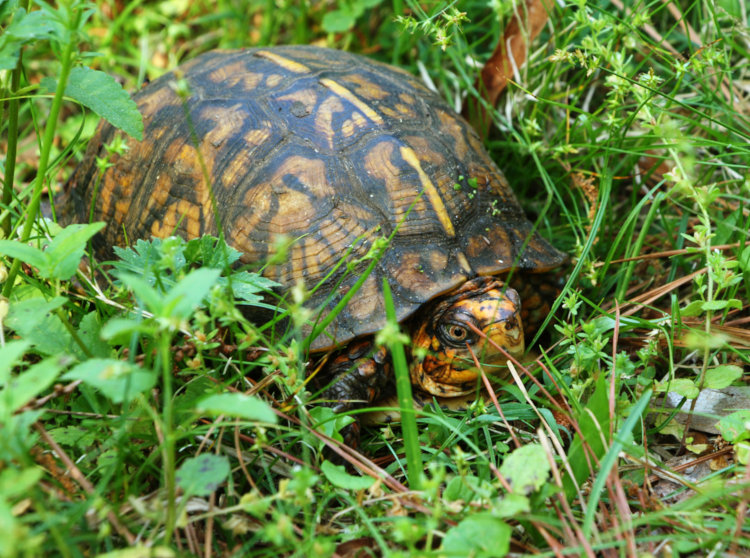
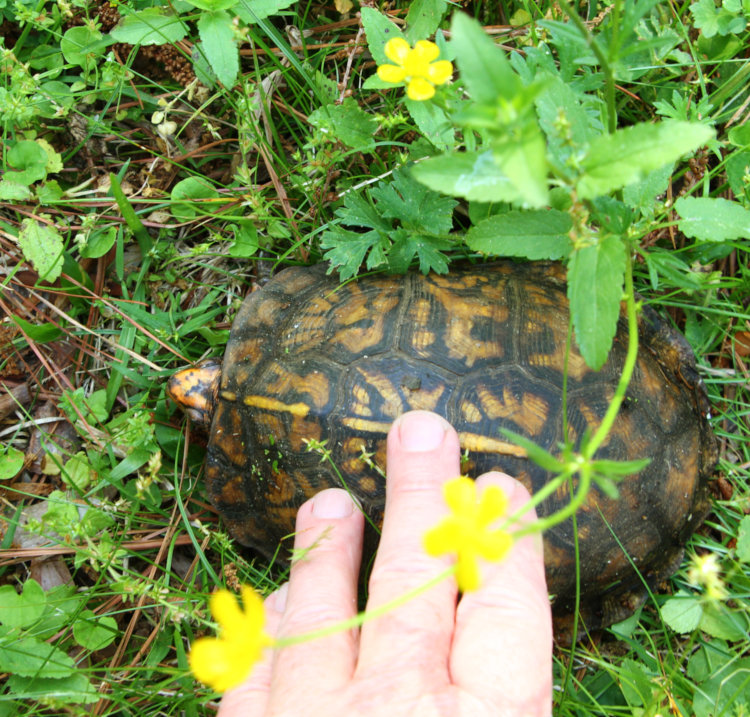
Looked out through the screen door to Walkabout Studios this morning (did I mention that I have a screen door now? I’m very pleased with it,) and spotted something sticking up from the grass right in my line of sight, not six meters away. It looked more obvious than this, because once it saw me opening the screen door (did I mention?) it ducked down a little.
Pretty subtle, right? That was the idea of course. The head was raised much higher when I first spotted it, and if you asked me to sketch or describe the head shape of this particular species, I probably wouldn’t get it right, but the moment I saw it, I said, “That’s a box turtle,” and of course (did you doubt it?) was absolutely correct.
To be more specific, a largish female eastern box turtle (Terrapene carolina carolina,) which was great to see since this is the first I’ve found on the property, or indeed anyplace in North Carolina since 2023, southeast of here. They’re strictly a land species, and tend to like more wooded areas while we’re borderline swampy, but apparently she was fine with it. The curious location and facing direction had me wondering if she’d placed a nest someplace near my back door. I’ll keep my eyes open – we haven’t seen any obvious nesting behavior from anyone yet, despite the multitudes of turtles in the pond.
The brown eyes denote this as likely a female, by the way, but I didn’t pick her up to examine the plastron, which is another hint: the males have a distinct indentation, a concavity in the center, while the females are largely flat – I’ll let you puzzle out the reason why. She was a decent-sized specimen, too:
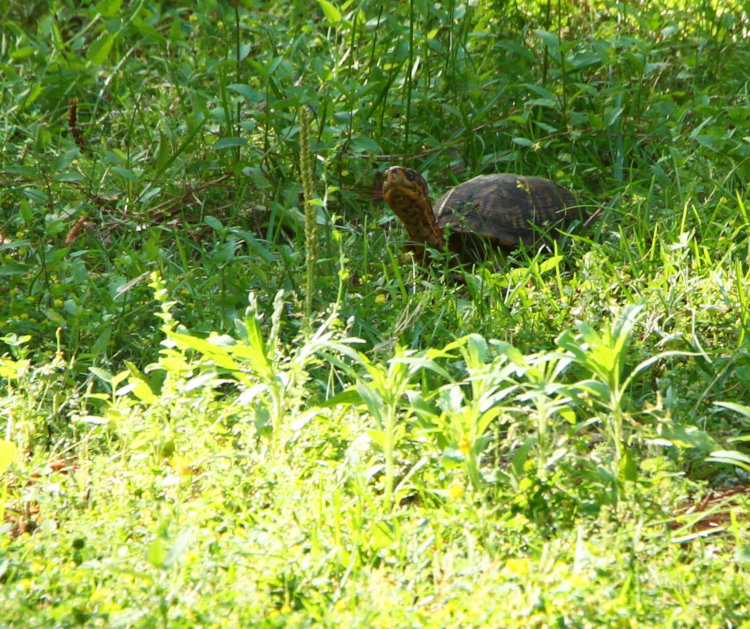
There’s something else that only shows vaguely here, while other frames show in more detail, and that’s the ridges of the carapace scutes, the ‘scales’ or shell sections. It’s hard to tell since the most recent ones are indistinct, but they develop a new ridge every year, so she appears to be from ten to fourteen years old. Her inner ones, the early years, are quite broad, meaning she was growing quite well for the first nine or so years of her life, but there are a bunch of very fine ones at the outside edges, the recent growth years, so it appears she’d slowed down – which might be perfectly normal, since she’s about as big as they can typically get.
I let her be for a short while, and checked up a little later on – she saw me approaching from a distance and was craning her neck to see better, though she’d withdraw almost entirely once I got closer. A few minutes later, I saw her plowing determinedly through the grass and weeds (we let the backyard go, because we don’t need a huge lawn and the critters greatly appreciate it,) and about a half-hour later, there was no sign of her anyplace, having either made good time getting out of the yard or finding a spot that concealed her from me – but that would be impossible, you know that.
As intimated, I’ve been deeply involved in numerous projects here, keeping me away from blogging and not a lot of photography, either. So let’s catch up a little with pics from the past week or so.
We’ll start with an update on the bebbehs, the latest crop of nutria (Myocastor coypus) young, which have now expanded to five.
It’s rare to see them all at once, and even rarer to have a nice clean view – I think I have a couple of video clips, but quite often, as soon as I’m getting them all together, one or another decides to scamper off someplace else and at the very least remain out of the frame. So this isn’t great, but they’re there. And in case it isn’t clear enough at this resolution, I have an annotated version:
There – see them all now? We observe them often enough that we can slightly distinguish them now by behavior, though not by appearance. There’s a runt, which we can tell when compared to the others, as well as being slightly shyer and more hesitant, and a supremely bold one that seems to be bothered by almost nothing. Then two others seem to like playing together. That’s about it right now, until we microchip them and get them into the satellite network…
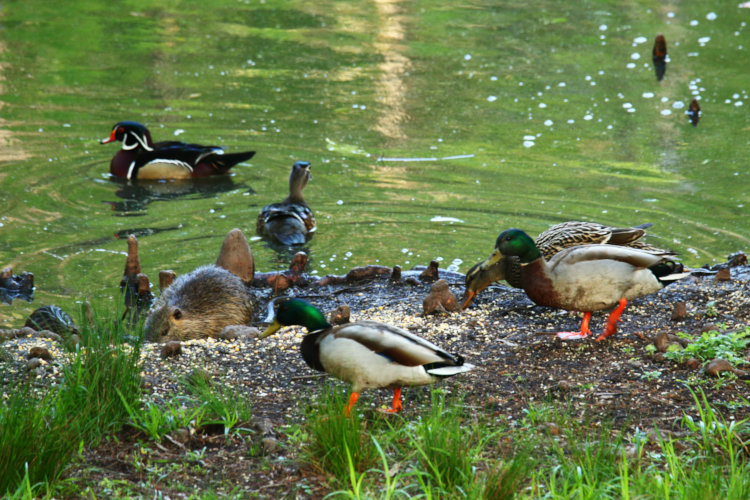
With the rise of water levels due to the beaver dam, Turtle Island and several other basking spots have been reduced or vanished altogether, so the numerous turtles in the pond are making do as they can (at least until I find a way to make them a new basking spot someplace.) This means the apron where we spread the corn becomes a crowded beach in the mornings when the sun gets high enough.
This is trimmed down to a panoramic to fit within the blog parameters, but clicking on it will take you to a full resolution version so you can see in detail. There are at least 20 turtles lined up here, primarily yellow-bellied sliders (Trachemys scripta scripta) with a few eastern painted turtles (Chrysemys picta picta) sprinkled in there for seasoning. When you go to the big version, note that the third one from the left is hiding behind a tuft of grass, but you can see the shell and a head peeking out. Also look at the eighth, which has something appearing above the dome of its shell – that’s possibly the head of one hiding behind, though I didn’t count that one. The last one on the right, nestled in among the cypress knees and roots at far right, is pretty blurry, I’m supposing from the aspherical nature of the lens used, but I did confirm that this shiny spot is indeed another turtle. And this doesn’t include the ones that were still using Turtle Island, as well as others in spots of opportunity. They’s a lotta tortles in the pond, is what I’m saying.
And now, the ducks. The other evening we’d been prevented from distributing more corn because the ducks were out there all day long, possibly because they were waiting for us to distribute more corn, but it seems self-defeating to scare them away to do it. So this resulted in a lot of activity as they scavenged for what little they could find.
It might sound like we’re starving the poor things, and at times The Girlfriend frets about this, but they have a varied diet that the pond provides all on its own, so this is more a bonus dessert to them – they’ll cope. Here, three male wood ducks (Aix sponsa) are examining The Point, the same place we just saw the nutria bebbehs, for leftover morsels.
The males are appearing without females fairly often now, almost certainly because the females are on the nest or leading their progeny around – it was about this time last year that we first started seeing ducklings. But for some reason, the males seem more territorial now than before, and squabbles and chases are a routine occurrence.
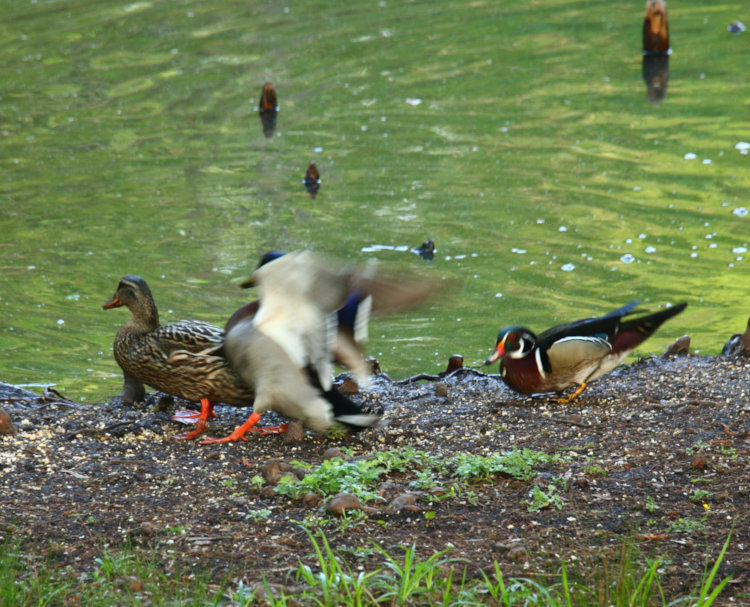
Yes, the one on the right is chasing off the other ahead of it. This rarely lasts more than a few seconds and a few meters of chasing, though occasionally it gets more energetic. They can’t hold a candle to the Canada geese, though, which will frequently chase one another around in circles or take flight to continue the pursuit down through The Bayou. I’ll feature them a little later on.
While the light was good, I fired off a few more portraits.
Still trying for the really slick portraits with the fetching background – they don’t congregate in good light very often or for very long, and I always have to be shooting from a significant distance (usually the upstairs bathroom, like here,) so it’s an ongoing quest. But I get a few keeprs here and there.
The yellow cow lilies (Nuphar lutea) seen in the background here are rapidly taking over the open water, though the activities of the nutrias and beavers seem to be keeping them down slightly. Meanwhile, I really want a portrait with a nice clear reflection, but the ducks are usually swimming through the patches of bright light and so the ripples are always present, doing things like doubling up the eyes.
For the past several weeks, we’ve been seeing just one pair of mallards (Anas platyrhynchos) hanging around at times, a little more complacent than the wood ducks so they’ll faintly tolerate us in the yard if we’re far enough off. Then the other evening, they were joined by another male, hanging around in close proximity like part of the family.
This illusion wasn’t quite complete, because every once in a while the male of the pair would chase the other male, but only for a meter or two, and otherwise they would be foraging together. And occasionally, with others as well.
That’s the mallard trio, with a wood duck pair in the water, and last year’s juvenile with this year’s bebbeh nutrias all foraging together (the dark hump at far right is the bebbeh.) They’re largely quite tolerant of each other, only needing a little bit of personal space and otherwise not caring at all – even when the corn is scarce. The wood ducks tend to give the largest adult nutrias some space, waiting for them to finish and leave before descending on the shores themselves, but not always – I have a video clip to feature at some point.
I also snagged a rare moment, as a male wood duck goosed the larger male mallard to get out of the way.
This was actually surprising – wood ducks are timid around the other species on the pond and virtually never dispute anything with the mallards, while the mallards won’t hesitate to chase off the wood ducks to a safe distance (again, about a meter – it’s not antagonistic at all.) I’m sorry I wasn’t shooting video at the time, The mallard didn’t turn around to retaliate, either.
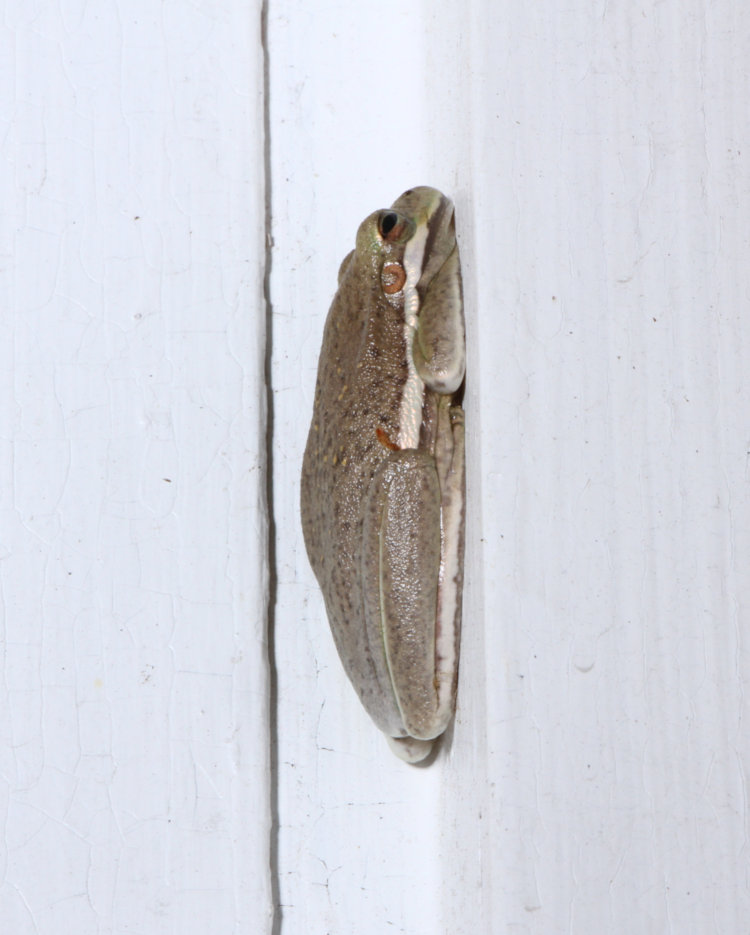
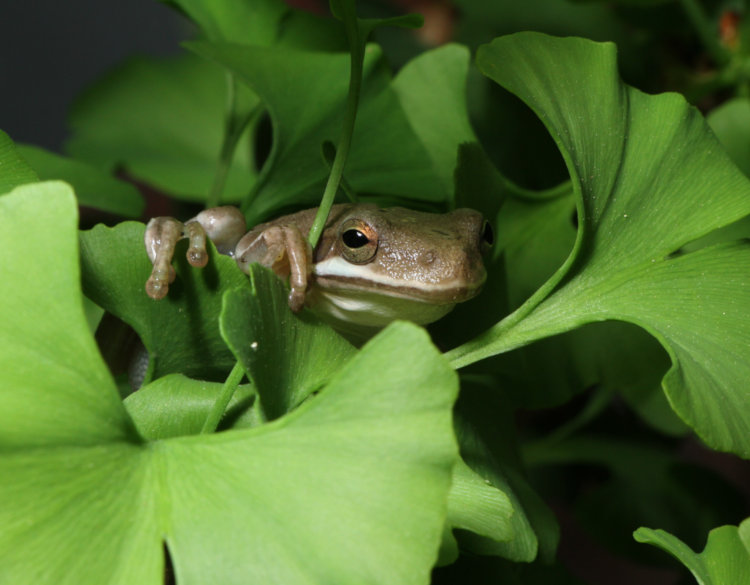
Last subject, but in reverse order because I want to close with the portrait. While The Girlfriend was preparing a standing planter for new herbs yesterday, we discovered a large green treefrog (Dryophytes cinerea) had gotten inside, and we’d suspected it had trapped itself. I moved it to a ginkgo and got some pics, but by early evening it had made its way back to the planter. And by today, it had chosen a spot right alongside the back door to hole up for the day.
See that dark vertical line behind the frog? That’s the edge of the back door itself, a scant few millimeters from contacting its back, that I had already passed through several times before spotting the frog there. Yet it remained, totally unconcerned with the activity, sporting its nice little bronze color that’s an uncommon (but not too) variant in their coloration.
The portrait was much better, though.
The frog hadn’t liked being handled and tried to squirt out of my hands several times, so it was with some effort that I got it to the ginkgo, a safe place with shelter from the sun. The pose here is all its own though, as it regarded me with some enmity for displacing it from its nice quiet little planter home. Or maybe not. But I like the portrait anyway, and yes, this particular ginkgo (we think it’s a dwarf variety) really is this thick.
Zoo, aquarium, and animal park photography can be exceptionally frustrating if you’re trying to make your images look like they weren’t shot at such place, meaning, keeping all evidence of enclosures and fencing and all that out of the pic. While I never recommend trying to misrepresent your photos and claim that they were shot “in the wild,” there can still be times when you want nice images of exotic or rare species without the distractions and implications of the enclosures. Here are a few tips in that regard.
Wear black. For the simple reason that this is less likely to show up as a reflection in any glass that you’re attempting to shoot through. Additionally, a small, lightweight black cloth can help by being thrown over or held in front of anything else that might be generating reflections.
Have a friend. To hold said black cloths, or an external flash, or even to attract the attention of any critter who is disinclined to look up for the portrait. They, of course, should be wearing black too (the friend, not the critter – you might have a hard time with the latter.)
Other soft cloths. Specifically to wipe away the smudges and grunge from the side of the glass you can reach – don’t use your black cloth for this.
Rubber lenshoods, preferably the collapsible kind. These can be held right against glass or fencing to cut those stray reflections from the near side, which might even include your own flash.
Off-camera flash sync cord. Another place where your friend can come in handy. This is to allow you to position the flash to illuminate your subject best. Lacking the friend, you can often get by with a flexible bracket that allows you to position the flash as you see fit. Bear in mind that you may be trying to see under overhangs, but also that you want to avoid flash reflections and glare from the back side of any enclosure, which direct flash is very prone too.
The zoom lens is your friend. For flexibility in framing, of course, but also to help fuzz out the fencing that is visible, that you might even be shooting through. Having a variety of lenses is best, and know that the longer the focal length (or the greater the magnification,) the more you can blur out foreground and background elements with a short depth-of-field.
Now some general shooting tips.
Above all, follow the rules. Don’t use a flash where it’s prohibited, don’t go climbing on things that aren’t intended for such, don’t try to coax an animal with food or any other objects. Not just to avoid getting kicked out, much less injuring yourself or an animal, but to set a good example. People may be seeing us as experienced and/or knowledgeable (dog knows why,) and are generally inclined to mimic what they see others doing. It’s better that we show that something is not worth doing “just to get the shot,” rather than behaving like an ass.
Be respectful of other people. They’re all there to see the same things you are, so don’t hog the best perspective, and don’t take up space with a tripod where it might trip or block people. Let the kids hurtle around as they are wont to do – if you want silence and privacy and all that, there’s a great big world out there where your stalking and patience skills can be put to use.
Personally, I sometimes set up my tripod purposefully lower so that anyone that wants to take a peek can do so much easier, and have even detached my camera body to let someone else attach theirs to use my long lens. I also, when it seems warranted, offer insight into a species that I’m fairly knowledgeable about (I don’t interrupt people, but if they seem genuinely interested, I’ll offer a comment or two.) People that are also aware enough and apologize for their kids or even blocking a subject for too long are always treated graciously – again, set an example.
Curved glass – just forget about it. You’ll never get past the distortion and reflectionsShoot straight on through glass. Meaning, flat to the front of the camera, or parallel to the film/sensor plane, whatever. Glass bends all light coming through at an angle, so anything shot at an angle will be distorted, usually much worse than what our eyes see because the lens is much wider and receiving light from a broader perspective. This can be enormously tricky, since many subjects won’t be cooperative and within view when you’re aiming straight. Go ahead and get the oblique shot when you can – just never assume it’ll be a keeper, and exercise patience to get that straight-on view whenever you can.
Get right against the glass or fence whenever you can. This will minimize distortion, block reflections from dirty glass (you usually can’t clean the back side,) and fuzz out as much as possible through the shorter depth-of-field. This will also make it harder for your own flash to bounce back to you.
Shoot through the fencing openings. Well, duh, but what I mean here is, when you have to shoot through fencing, center your camera in the opening – the fence peeking in at the edges may be defocused enough not to attract attention, or more easily cropped out later. The longer the focal length, the more defocused this will be, and well as simply missing the fence altogether from the narrower field of view. If you have the choice, black fencing is better than the typical zinc-grey, though you usually don’t have the choice. But also look around carefully to find gaps you might exploit, for instance along the post or around a gate.
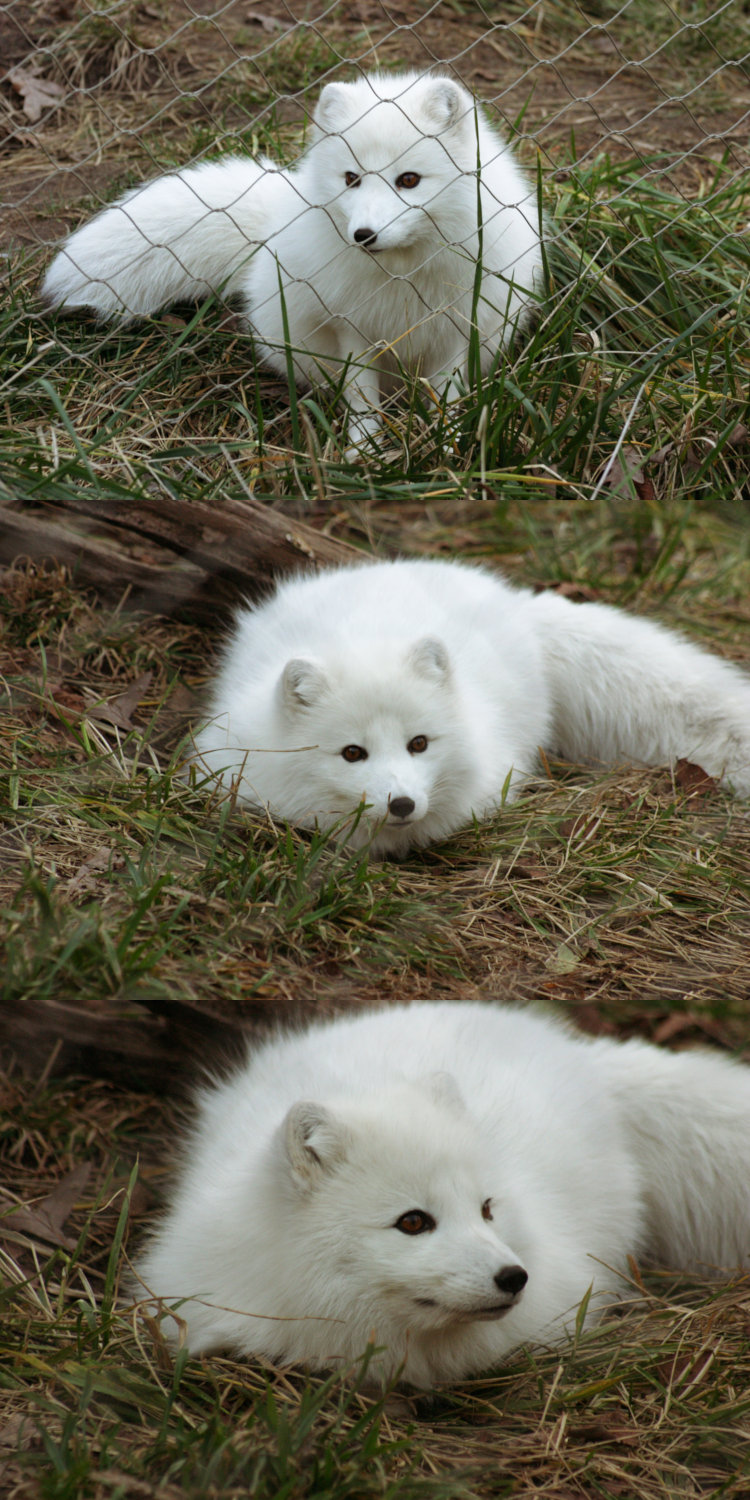
All three images shot through the fencing, but progressively closer with higher focal length. This is the winter coat of an arctic fox, by the way – the summer coat is dirty greyUse that articulated LCD to your advantage. If your camera has the ability to aim with the LCD and it can rotate and pivot and all that, use it; hold the camera up high above the fencing, or down low at ankle level for the direct portrait – whatever it takes. Don’t, however, put it into an enclosure. Also be aware that, as you’re trying for a specific angle, you’re holding the camera irregularly and perhaps don’t have the same security of grip.
Use depth-of-field to your advantage. As noted above, DOF drops with magnification, but also, it drops with difference between focal distance and foreground/background. In other words, to fuzz out the background, wait until your subject is closer to you than to the background, so your focus goes shorter. However, when trying to get an intervening fence out of focus, the subject being farther away works better. Naturally, a larger aperture (smaller f-number) helps significantly in shortening DOF.
Know that some background patterns, specifically brick walls and lighter-colored fencing, will remain recognizable no matter how short your depth is. Also, any highly contrasting items will show up as well – so, aim away from posts, bowls, and other such elements.
Experiment with that flash angle. You may not realize how badly it will reflect from other surfaces, or fail to properly illuminate your subject, until you see the results, so this is one of the few decent uses for chimping (looking at the LCD preview of the image afterwards.) Also, some species have iridescence that only shows up at specific light angles.
UrghWatch your background. This is especially true in aquariums that have glass backs to the tanks so they can be surrounded, but be aware of the other visitors with garish T-shirts that are back there (that may be illuminated even more by your flash.)
Creative angles. Most notably, a downward angle on your subject can eliminate the ugly background from the enclosure walls/sides, or you might even disguise such by shooting through gaps in foreground clutter. Tracking a moving subject until it gets against a complementary, or properly contrasting, background can improve things dramatically – you might even stack a few of the same species together and give an idea of a herd/flock/troop/parliament with only two or three individuals.
Watch for the abstracts. Two species together but facing in opposite directions, extreme closeups of eyes (especially through foliage – so dramatic,) the intricate details of feathers or hides – all much easier to achieve with captives, and easier to disguise or avoid the backgrounds too. Be creative and have fun.
Get there early. For two primary reasons. The first is, most animals are more active in the early hours, especially when the days get hot, so you’re more likely to capture something interesting. The second is, you’re more likely to beat the crowds. After a while, you won’t even be able to get close to the popular subjects. Have patience, though – crowds often happen in cycles, and with the right timing, you can rotate around opposite their presence.
However,
Light angle can make a huge difference. This is where knowledge of the layout of outdoor enclosures can be handy, because certain times of the day may produce deep shadows right where the critters congregate, while others may suddenly give you that excellent portrait lighting. If you’re only after a couple of subjects, you can sometimes plan accordingly, though if you’re after a broad variety, you might be there all day and cycling around to use the light to advantage. When you get that lovely catchlight in the eye of the binturong, however, you’ll know your efforts were worth it.
Know your species. Overall, spring is the best time, because mating usually occurs then and the animals try to look their best, so breeding plumage is at peak. But also, the new warmth has more species active before the heat of the day, or the summer, hits. That said, species that change coats have different appearances in different seasons, and for a few of them, deep winter is best. Meanwhile, fall can be useful in the background foliage, or with species becoming more active after the heat of summer and before they tuck in for the colder months. No one day or season will work for every critter in any given park, so cycle your visits as needed.
People watching can be fun too. Capturing the various interactions, or attempts thereof, from the visitors can make a nice tableau, though of limited use unless you obtain permission. Often enough, it’s just entertaining to see the reactions and hear the comments, from both the kids and the adults – there are definitely times when I wished I’d had a recorder running. At the same time, some species do develop specific reactions to visitors, which you can capture if you’re ready for them. Be on your toes.
That should be enough of a start, anyway. When you go, go prepared, and make the most of your visits. And use them as learning opportunities for future visits as well.
I was going to title this post, “It’s something,” to reflect that I’m making the barest effort to have a little content here, but in looking at my list of previous post titles, I find that not only have I used it before, I have started way too many posts with, “It’s.” So I’m not. But I still didn’t have any good ideas for what to name it…
I’ve been ass-deep in projects for the past several days, and they’re continuing, so there hasn’t been a lot of time for photos, much less anything introspective or philosophical or whatnot. I have a handful of video clips that will eventually make it into semi-coherent form, but not until next week at least. And little bits of news, too. But right now, we have largely random schtuff.
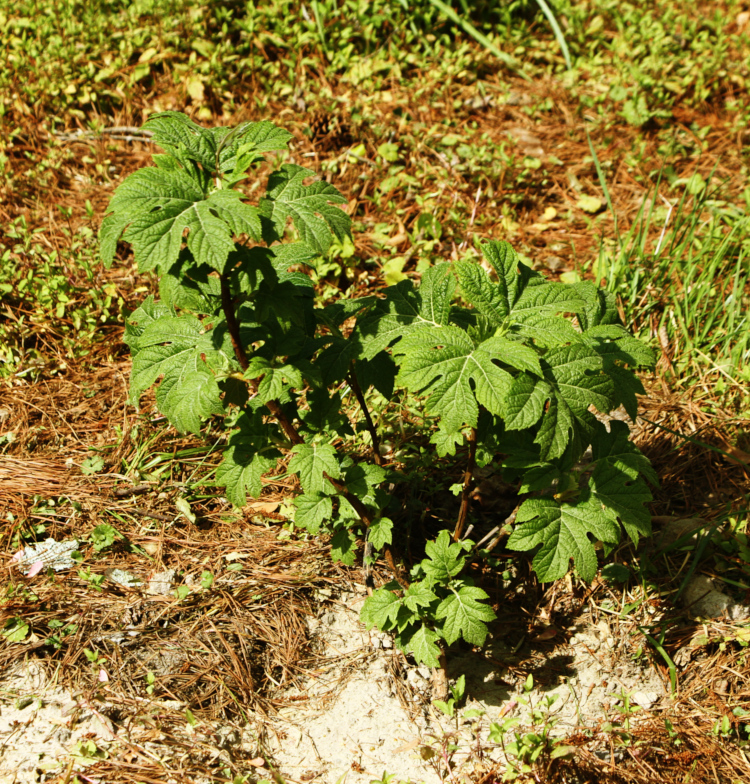
When we moved from the old place, we gathered a few cuttings of the oak-leaf hydrangeas (Hydrangea quercifolia) to propagate them here, but never got them to thrive – we got one to transplanting stage but it failed immediately after, don’t know why. So a few weeks back, we picked up one from a local nursery, and once it was stable and making progress, transplanted that. And we’re happy to say it’s been thriving, so we should have one of our favorite bushes going, with perhaps more to join it.
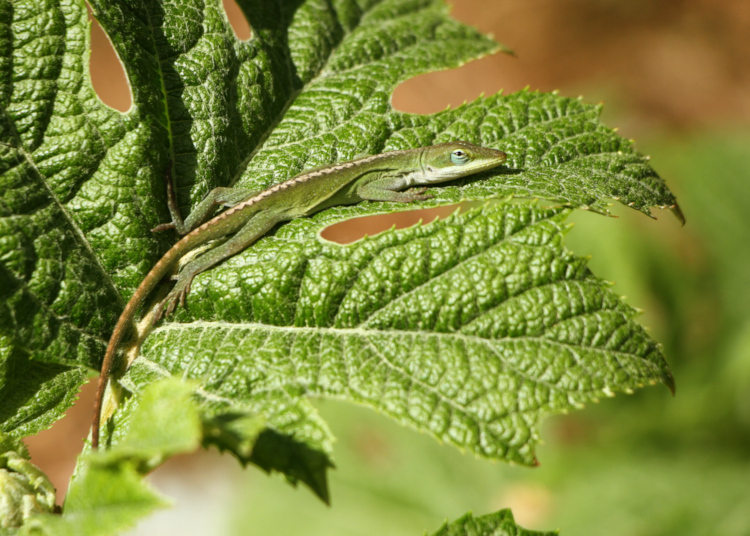
Yet, I noticed about a week or so after transplanting, it had attracted the attention of a new occupant.
The hydrangeas at the old place had been a favorite haunt of the Carolina anoles (Anolis carolinensis,) and so this one has now been christened. We’re still going through significant temperature drops at times overnight, and the anoles haven’t fully gotten into the swing of things and this one hasn’t reappeared while I’ve been around, but as the spring settles in, we expect to see more of them.
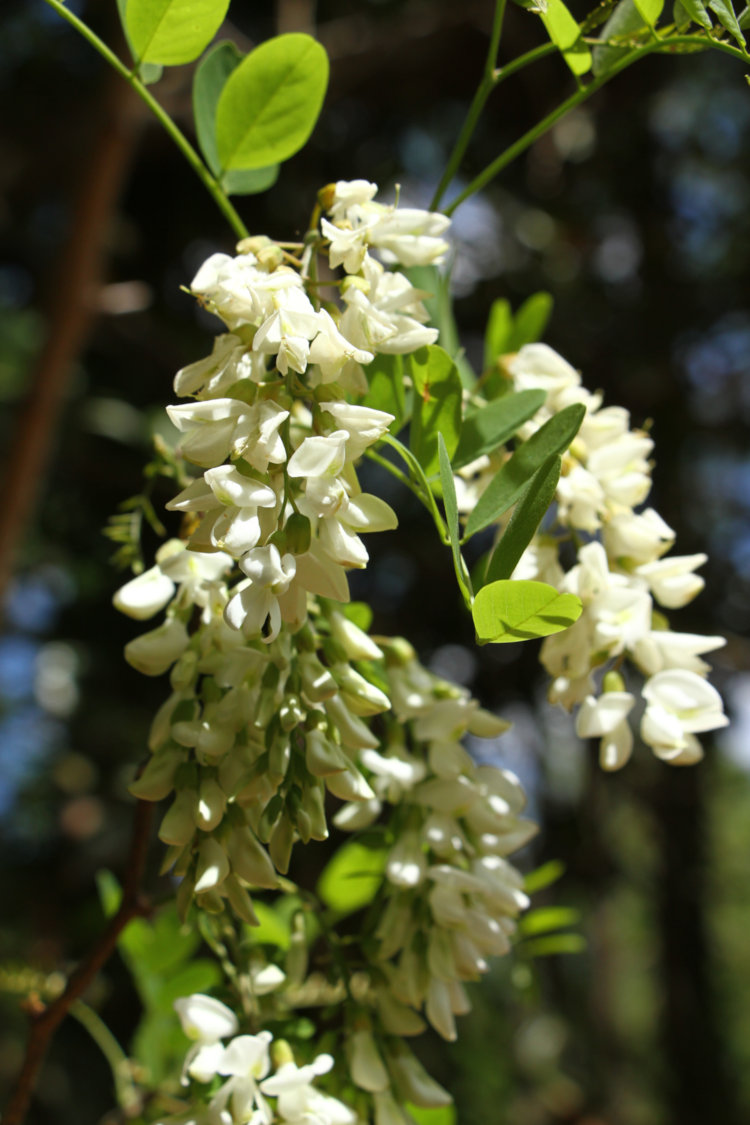
The black locust trees (Robinia pseudoacacia) have produced their blossoms, smelling fantastic as always.
We wouldn’t mind having more of these around the yard, just for the blossoms at this time of year, but perhaps that’s all. While the candy aroma of the flowers is great, the branches themselves have rather nasty thorns, and so it’s better that this sits at the very edge of the yard where I don’t have to mow or clean around them. What we discovered this year is that there are two trees: one produces all of its flowers way above our heads out of reach, and the other is actually a fallen trunk that retained its roots, so these flowers are from new branches that sprouted from that, down low enough to reach. It says something about the thicket that this resides within that we didn’t discover this until now.
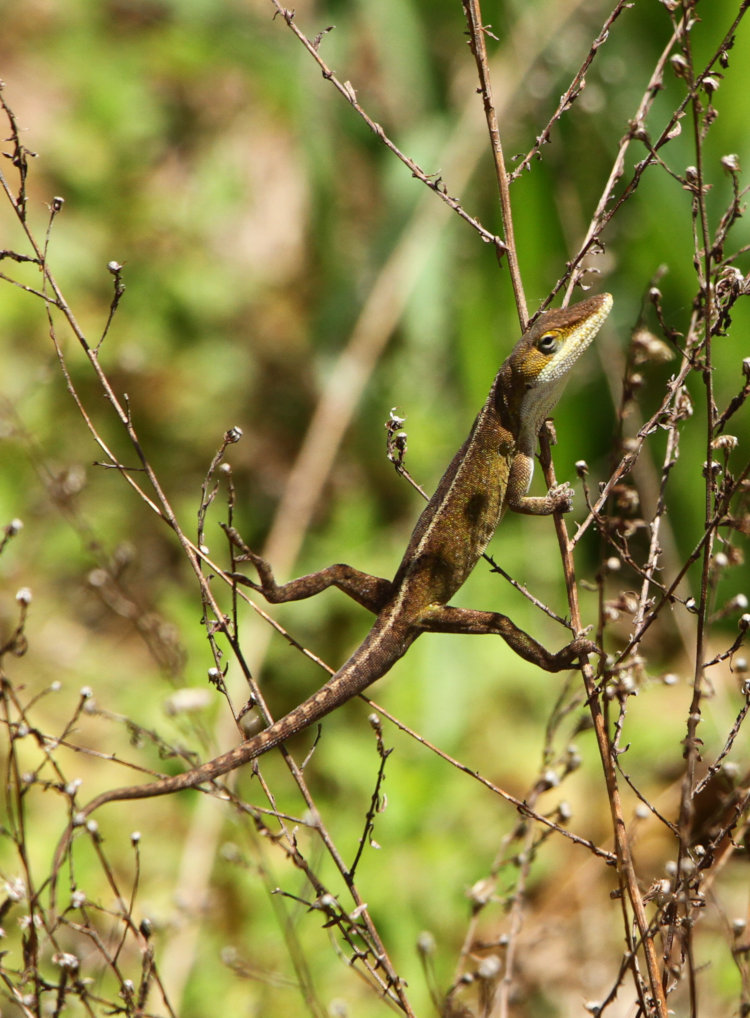
Another anole, this one exactly as found:
Credit to the anole for staying put while I got close enough to get the shot.
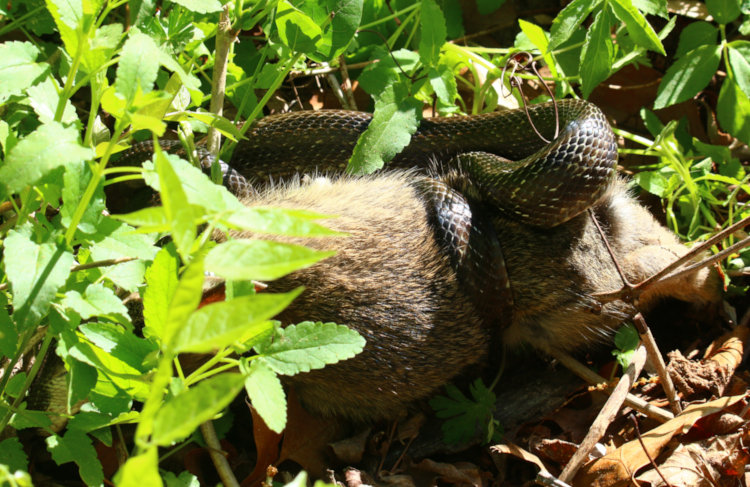
While out in the yard about a week ago, I heard a sustained squealing coming from down near the edge, another thicket, and recognizing it as likely the sound of some smaller mammal that had been caught, I quickly went in and got the camera and long lens. On returning, the cries were fading and coming farther apart, but it was enough to give me an an initial direction to go in. We’d been seeing the red-shouldered hawk hanging out in that approximate area, apparently trying to snag a rabbit that lived nearby, and I suspected it had finally succeeded. I crept up quietly, trying to watch everywhere and see the hawk before it saw me. Meanwhile, a couple of squirrels had started up their irritated barking alarm calls, helping to guide me in. They seemed to be centered in the thicket, which didn’t strike me as anyplace the hawk could strike, so I was starting to suspect a fox or something. As I was peering carefully through the branches and foliage, I heard a faint rustle almost behind me, and found I’d practically walked past the source of the noise, certainly not a hawk.
It seems like every time I feature this (these) species, it’s changed since last time; I can’t vouch for this being correct tomorrow. I was right about the prey, which is a juvenile eastern cottontail (Sylvilagus floridanus,) but not the predator, which it now seems is considered a central rat snake (Pantherophis alleghaniensis.) The last time I checked, the grey pattern that we see around here was considered a regional morph of the eastern rat snake (Pantherophis quadrivittatus) while the black color that I was most familiar with, like this one, was another morph of the same species – now they’re considered separate again. Seriously, I just covered this last year.
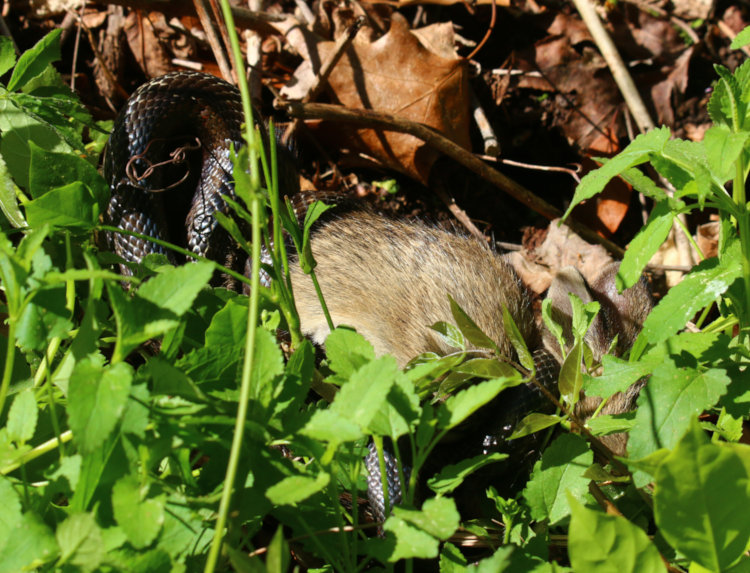
The rabbit had ceased squealing by this time, but was still struggling and kicking occasionally, and near as I could see, the snake did not have an adequate constrictive grip upon it. I couldn’t get a better view in the weeds even though it was right at my feet, and had to back off to even get these shots, since the long lens has a close focusing distance of 2.5 meters or so – you’re seeing the rabbit’s hind feet to the right.
The view from the other side – now the ears are faintly visible, though I never could spot where the snake’s head was. I also had to question whether the snake really was going to get this guy down – we’ve seen before that their judgment is not always accurate. However, I didn’t elect to stick around and watch the drama unfold, since I was still in the middle of projects.
But to offset those a little,
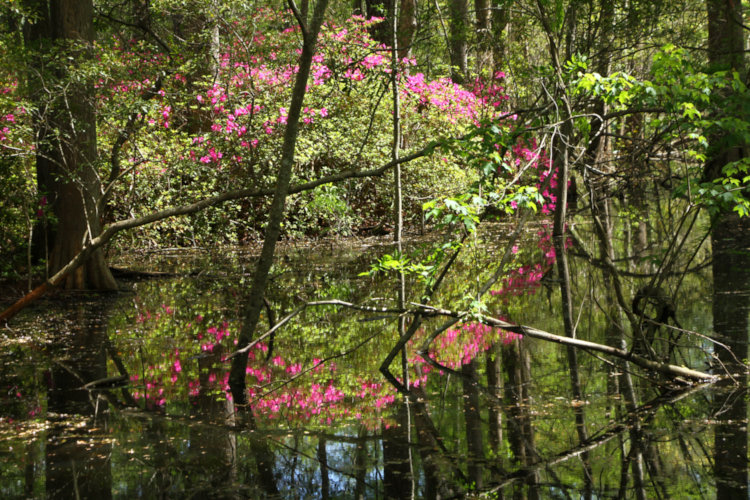
From certain areas of the yard we could see the hint of these azalea flowers through the foliage, knowing they were out on a small island bordering The Bay, but it’s nigh inaccessible. I finally tramped my way around to a semi-decent vantage point, though I could have done without the random branches, but at least I could use the reflection in the still water. A better view would only come from the kayak or by sloshing through the shallows, which we already know can get treacherously boggy. I’ll check it out the next time I have the kayak out, but the blooms will probably have faded by then.
That’s all for now, though more will be along as time permits.
In case you missed it, there was a post specific to moon photography last week, if you were looking to pursue that. This will deal with other kinds of night photography.
Note, too, that a significant amount of my macro work and even quite a few videos are all shot at night, mostly because that’s when certain subjects appear, but also because it’s easier to get close to those same subjects when my presence in lost in the glare of the headlamp. Instead, what we’ll deal with here are specific aspects of night sky, ambient light, and moonlight photography.
Again, a firm tripod and a remote release are almost an absolute necessity, mirror lock-up is recommended for exposure times between 1/10 second and ten seconds, and I’ll add in a headlamp or flashlight to assist in setting up. And another layer of clothes as the temperature drops at night. If the night is cold, a spare set of freshly-charged batteries is also helpful, since batteries lose their ooomph quickly in the cold (it bounces back once they warm up though.)
Now let’s look at some specifics.
Astrophotography, night sky, starfields and star trails. Let me get this out of the way early: A lot of the images that you might find showing the night sky, especially an extremely vivid Milky Way, are digitally enhanced at best, but far too often a composite image. This is especially true when you see a vivid starfield over a detailed landscape. The reason is, getting enough light from stars and the Milky Way, regardless of where you are or what camera you have, requires a long exposure – only the Earth keeps stubbornly turning, meaning the entire sky is moving east to west. You can do three things:a) deal with the movement and have stars that smear across the sky to varying degrees;b) have a tracking motor that moves the camera in time with the sky (which will then smear the landscape instead; or c) paste in a separate exposure of the landscape afterwards. The last option seems to be a common practice now, and it’s up to you to decide if you want to pursue that or not – I don’t, and I won’t tell you how to go about it, since there’s no skill in composite images. Just be aware that the drastic difference in the minimal amount of light from stars, much less nebulae and dust clouds, and just about any landscape you can find is far too great to capture in a single exposure, and even with a tracking motor, getting such stark detail from something like the Milky Way without residual noise and skyglow isn’t going to happen without specific image processing.
All that said, you can capture the Milky Way to a reasonable degree without tricks – in the right location, at the right time, and when the conditions allow it. Specifically, someplace with extremely dark skies, using a high ISO and, for preference, a fast lens (large maximum aperture such as f4, 2.8, or 1.8.) While the Milky Way can stretch across the entire sky, the really elaborate portion falls along the plane of the ecliptic in the summer months, meaning it sits close to the same arcing path that the sun and the moon take across the sky, a certain degree south of ‘straight up’ when viewed from the northern hemisphere (and vice versa.) Stellarium can help you plan things like this, tremendously. The stickler is, the plane of the ecliptic is also where the apparent movement across the sky is the greatest, so the sky will ‘smear’ there faster/more than anyplace else, thus your exposure times have to be the shortest to prevent this. Just as a rough guideline, f4, ISO 3200, 15 seconds. And this only applies to a fairly wide-angle lens, in this case 18mm; going longer means that the movement of the sky will be magnified more and start to show distinctive star trails and smearing.
This will produce nothing if the light pollution or humidity is too high, generating skyglow that might rival the Milky Way, or at least destroy the contrast that makes the details stand out. Get as far away from cities and towns as you possibly can, preferably to the south (if you’re in the northern hemisphere) to put that glow behind you.
The movement and smearing reduces the closer you aim towards the poles. These would be the celestial poles, such as Polaris/The North Star; there is no handy candidate for the southern hemisphere, but the Southern Cross asterism helps indicate the rough spot. The closer you aim towards these regions, the less apparent motion the stars show and the longer your exposures can go without noticeable streaks. This depends quite a bit on your focal length; if you’re really trying to zoom in on a small region, let’s say by using a 500mm lens, that motion will still show very quickly. You will likely need to experiment a lot.
Experiment a lot. There are too many variable to provide adequate guidelines, up to and including how well your camera handles high ISO settings. Do as many exposures as possible, changing settings by small increments, to try and ensure that you capture what you’re after.
Focus. This can be extremely difficult, since autofocus will virtually never snag stars, and even trusting lens markings is too imprecise to be useful. Best bet is to pick the brightest star (actually, planets are far brighter) you can find and focus manually on that, and do test exposures that you then examine under high magnification in the camera’s LCD – make sure you exposure time is short enough not to show star motion. Once you have the tightest focus possible, don’t touch that focus ring and use that setting thereafter. However, as we said last week, redo focus every ten minutes or so because changing temperatures can change the lens barrel and twitch your focus off.
I have also used a distant radio tower beacon light, well over a kilometer away – they’re brighter and easier to find in the viewfinder. I’ve noticed that the Tamron 150-600, even when focused on distant treetops, is somehow not at the ‘infinity’ focus necessary for stars, so be sure to pick a focusing target that’s at least several hundred meters away, the further the better.
Meteors. I’m really not the one to advise on this, given my execrable past history in capturing any, but I’ve also noticed that nearly every decent meteor that’s occurred while I was out shooting was outside the view of the lens. The wider your viewing angle (shorter focal lengths,) the greater the field of view – but also, the smaller any such streak will appear in the frame. Fix your view upon the radiant? Perhaps, but not in my experience, with the exception of just one storm in over twenty years; they might appear to emanate from the radiant, meaning the trail will point back in that direction, but the trails can still be all over the sky, including on the opposite side. My advice is to pick the darkest portion of the sky someplace not too far from the radiant, just to allow longer exposures without skyglow overwhelming the frame.
Meteors tend to show much better after midnight, since the rotation of the Earth now means your view is more into the debris stream that creates meteors. Many sources will list peak times, which are often fairly accurate, and predictions of the numbers, which rarely are in my experience.
Again, experiment. Meteors tend to be very brief and often only marginally brighter than stars, so set an exposure that allows as many stars as possible to show up in a two-second exposure, and then simply lengthen your shutter speeds until the glow starts to overwhelm the frame, and back off a little from that. Too much skyglow or too many/long star trails can obscure what you do capture, so go for shorter periods, more often. It will mean you blow through a lot of frames with nothing to show for it, but it’s digital – discard them.
First long exposure by night, on negative film, with a decent meteor to boot – never surpassed this shot yet, dammitDO NOT end your exposure as soon as you think you’ve captured a meteor – they look better with the context of stars and the landscape, so make sure you have enough of an exposure to capture these too, regardless of how quickly the meteor might have appeared.
A quick tip: If you suspect you might have snagged one, the very next frame should be either extremely short or done with the lens covered. That way, any frame ahead of a black one should be examined carefully when back home for evidence of that meteor.
We all want to capture that spectacular fireball, the bolide that flares brilliantly and perhaps breaks up into separate chunks – I’ve seen them a few times, but never captured one. However, if it does happen to you, shoot several frames of the same section of sky (even if you never captured the fireball,) because residual glow and particles can actually show for minutes afterward, even being blown across the sky by high altitude winds.
Don’t be fooled by satellites, of which there are far too many anymore. Typically, if you see a faint streak in an image, examine the frames on either side of that one, in the same general vicinity, to see if there’s a matching streak, which would indicate you captured a much slower satellite rather than a meteor. Stellarium can also help pinpoint some of the satellites up there, but with more getting added every day, it won’t be a guarantee. However, most satellites only show when they’re reflecting the sunlight around the edge of the Earth, so often within an hour or two of sunset or sunrise. Around midnight, virtually none of them will show.
Satellites as a subject. Certainly possible, though in the majority of cases all you’ll get is a streak like a meteor. The major exceptions are the International Space Station and China’s Tiangong space station, since they’re big enough and close enough to actually resolve to more than a speck – not much more, but possible. Stellarium can plot the major satellites, and this site can plot when the space stations will pass in front of the moon (and the sun, though that doesn’t count for this post) for your location.
Long exposure noise reduction. Some cameras have this, and I’ve tried it exactly once. It froze the camera for the same length of time that the exposure itself had been while it processed the frame, meaning I couldn’t capture anything while that was happening, and thus would only get half as many frames as I would have without it. I say skip it – you can clean things up in post-processing, but you have to actually capture it first.
Star Trails. Depending on your view, you can aim for very long exposures, from ten minutes to a few hours, letting the stars streak across your frame. If you’re aiming at or near the celestial poles, you’ll get circles around these points, while aiming near the plane of the ecliptic will produce much straighter streaks – a wide angle lens centered on the ecliptic plane will produce trails that are straight (ish) in the middle and bow outwards the farther away they get. This is also a great way to see the different colors of the stars better, since they show in the streaks far more than in singular dots.
Lightning. Night is the best time to capture lightning images, since you can leave the shutter open for extended periods while waiting on a strike. Ensure that you are a safe distance from the storm, not directly under trees but with some perhaps twenty meters away (the lightning is more likely to ground to them and not you,) and pay attention to the movement of the storm. If thunder follows a visible strike within 6-10 seconds, pack it up and get inside, or at least in the car.
Try to pick a decent landscape as a setting, and water to reflect a bolt within is excellent. Set exposure to get a decent view of the landscape so you have a nice setting, and as with meteors, don’t close the shutter until you have the exposure for the landscape pinned down, regardless of when a strike occurred – if you caught it, you caught it, and no reaction after the fact will change anything.
Best is to have a fixed exposure time, for instance 20 seconds, and simply let it happen. However, lightning really does follow a faint pattern at times, and strikes may occur almost routinely. Counting to yourself every time you see a strike will help you establish this pattern, and then you can open the shutter 5-10 seconds ahead of when a strike is ‘due,’ increasing your chances of capturing it. As the storm moves, this timing will alter, but you may have 10-20 minutes of semi-predictable strikes.
Have rain gear, for yourself and the camera, and be ready to don it immediately. If you do get wet, make sure you get everything out of the bag as soon as possible, and dry both the equipment and your bag thoroughly before recombining – a wet bag can drive moisture into cameras and lenses easily.
Lightning trackers can be very handy to know when a storm is approaching and from where, but in my experience, their strike location plotting is wildly variable (and will rarely tell you when cloud-to-cloud bolts occur.) And getting those bolts that light up the clouds without even showing themselves can be very dynamic too, sometimes much richer than just a white streak against the sky.
Red Sprites/Blue Jets. These are very rare, hard to capture phenomena that happen occasionally, emanating from the tops of the storm clouds. They are very brief and very dim, so your exposure has to be in the range of capturing dim stars, but the nice thing is, you don’t have to worry about them streaking like stars do. I have yet to see one (confirmed, anyway,) but to all accounts, they occur very high above the thundercell, so your best bet is a wide-open view of the advancing or retreating storm from a great distance – like, mountaintop or out to sea, without obscuring clouds.
Car Light Trails. If you have a decent view of a road, especially one that curves across the frame in an interesting manner, you might try a long exposure as cars pass, producing white, red, or orange streaks across your frame. It’s best if you start and end the exposure while the cars are out of sight, so you don’t have trails that abruptly stop in midair, but you can be creative with that. Two things to avoid: getting too much of a direct line with approaching headlights, which will overwhelm the frame with glare, and getting too many cars in the frame – usually a couple is enough. Highway overpasses afford a great view sometimes, but be aware of traffic on the road you’re standing next to – a reflective vest is highly recommended. Doing this under a bright moon can help light up the landscape too.
Other night photography. Such as, using the ambient light nearby or the light of the moon. No real guidelines for this exist because the variables are too great, so experiment freely. With a long enough exposure by moonlight, the image can appear to be in daylight, perhaps only betrayed by star trails in the sky. Know that your exposure times may run from a full minute to twenty or more, depending on what you’re after, and all you’re doing is killing time while this happens; resist the urge to look around with your headlamp or flashlight, because even residual light getting into the frame may make things look weird, and of course you don’t want direct light in there. Or maybe you do – some experiments produce great results.
Most times, you’ll want to try and keep lights (street lights et al) from shining directly into the lens, since at longer exposures the glare will typically be overwhelming, but you can also go with a very small aperture to turn these into starbursts as you like – then your challenge is to balance that aperture with the other ambient light for a proper exposure. Meanwhile, these longer shutter speeds can produce blurs from moving water and plants blowing in the breeze, or drifting boats and even any wildlife that you might happen to capture. You can also get creative with a flash burst or, as hinted above, illuminating your subject or portions thereof with your headlamp/flashlight. It can take a lot of experimenting to determine how long to do this for, and as always, don’t trust the LCD preview on the camera to give an accurate impression, since the brightness will likely be deceiving – do several variations bracketing the exposure to get the one that will work.
Weather. Fog, rain, and mist can all lend a lot of character and mood to night shots, and it’s never a bad idea to have a couple of potential locations in mind for when the weather reports indicate that fog is likely. With these, light direction can make or break the shot, so work around the light and check different directions and positions to see what works best. A full moon and fog? Better get your ass out there to shoot something, since such conditions are rare – I missed an opportunity nearly forty years ago and have been kicking myself ever since.
Okay, that’s enough to get you started and give you some ideas at least – I’m sure I missed something I could have included, but this is plenty long as it is. Next week I gotta do a short one…
I just ran across an offhand comment somewhere that slammed into me with a bit of perspective, a simple one with a lot of baggage: Next year will be the 50th anniversary of Star Wars.
Fifty years ago. Half a fucking century. Why did that little datum suddenly register so specifically? I mean, it’s always been there, waiting to be found, and I’ve been hearing things about our country’s semiquincentennial (or bisesquicentennial) off and on for months. I’ve been seeing the original actors age and, in too many cases, pass away. So what is it about this?
I’ve written before that Star Wars was a turning point in my youth, and it’s hard to describe exactly how, but until that time, the future presented by the science fiction that I’d been exposed to (primarily Star Trek) was a bit too sterile and lackluster, not really holding my interest. Star Wars was gritty, active, little talky-talky and more zoomy-blasty, just right for my age at the time (which I’m not actually revealing, so go squat.) Not to mention that the video and audio effects were outstanding, and set a new precedent for movies that followed.
Now, a small sideline. 2001: A Space Odyssey had been released eight years earlier and had simply the best special effects done until that time, and for years afterward. It still holds up amazingly well in that department, and does indeed beat Star Wars because it has seamless realism for what to expect from space travel – you could easily believe that much of 2001 was actually filmed in space. I had not seen it at the time, and would not have liked it if I had, since it also remains incredibly poorly-paced and sadly lacking in both a captivating storyline and any characters to identify with. But Star Wars had what we wanted to see in space. Or at least, what [blank]-year-old me wanted to see in space…
I’ve mentioned before that I used to be heavily into building plastic model kits, and still tackle it from time to time – not anywhere near as much as I did, but then again, I’m now more into intricate and accurate detailing than I had been. What this means is, I have a stack of kits awaiting my attention, and among those is a Millennium Falcon, which I’ve now decided I will get done within the next year to observe this horrendous anniversary.
[Do NOT make me explain what a Millennium Falcon is. Don’t even contemplate it.]
Notably, this will be my third such kit. George Lucas was smart enough to not only secure the merchandising rights from the studio, he exercised them aggressively, so as soon as the film grew in popularity, figures and model kits were appearing on the shelves. I don’t think the Falcon showed up until the second movie was on the horizon, not sure, but I did receive it as an xmas gift then, and really didn’t do a bad job of it even for my age at the time, adding further lights with fiber-optics (it came with a couple of lights for the engines and cockpit, something unheard of at the time, and I piped more through the body for running lights,) as well as blaster damage and weathering. The exact fate of that kit is unknown, but some number of years later, I got it again and constructed it with my expanded skills, eventually giving this away to a friend when I moved to North Carolina. Yet I still have a picture of it. Kinda.
This was sitting in the background of a self-portrait done back in the late 1980s, among many model kits on display. It was on negative film that aged poorly, shot with my trusty (no) Wittnauer Challenger rangefinder with the 50mm lens, from halfway across the room and thus taking up only a small portion of the frame. So hush – at least you’re not seeing me in the pic. But even here, you can see that I was enthusiastically into the detailing.
The kit that remains waiting in the box right now was purchased some years ago, and I’d decided I’d do it pretty elaborately, so only a short time later I obtained a couple of strips of LEDs to do the lighting much better than the first time – maybe not as elaborately as this, but some of those at least.
[A note on the drastic changes that have occurred over the years. Back in the late 1970s when the first kit was produced, and through into the early 2000s I believe, the only options for model lighting were tiny little incandescent ‘grain of wheat’ bulbs, typically 3 volts and anemic as hell – they looked like shit for the engine lighting, to say the least. LEDs certainly existed, but only in deep red, yellow, or green. They also, being diodes, couldn’t just be wired in straight to a battery, but needed additional circuitry. Now, of course, we have multicolored LED strips readily available that only need to be connected to a power source, as well as a huge range of rechargeable batteries to choose from, so my 2027 kit will not only have the blue-ish engine lights more evenly glowing from the rear, but will be rechargeable through a hidden USB power port.]
So I have my goal, and a decent workspace to do it within, which wasn’t always available before, and now it only remains to see how long it’s going to take me to get started, as well as follow through. But at least this post is here to embarrass me…
And. it’s just, “Star Wars.” That “Episode IV: A New Hope” bullshit was retconned in by Lucas later on, and using it just pegs you as a nerf-herder…
And now, another little bit of trivia from that same cruddy negative. One of the other model kits visible in that image was this one, though the dark background did a lot to obscure some details:
Helicopter kits in the scales that I preferred (in this case 1/24) barely existed, and so I scratch-built this one, my own design – there was no helicopter resembling this in existence. The rotor head, turbine, tailboom, and skids were all cribbed from a ‘Special’ helicopter model from the film Blue Thunder, the interior from a Renault 5 Turbo I believe, and the rest of the body and glass and what-have-you was designed and built entirely by me; the curving glass was carefully cut from a specifically curved portion of a 2-liter soda bottle, and the doors both opened and removed. This was built in the late ’80s. Funny thing is, the Eurocopter EC-120 Colibri wasn’t introduced until 1997, and it looked like this:
By Huhu Uet (Frank Schwichtenberg) – Own work, Creative Commons 3.0 Surprisingly close, isn’t it? Not too surprising in a way, because that distinctive ‘Fenestron’ tail rotor first appeared on the Sud-Aérospatiale 341 Gazelle, upon which the Blue Thunder ‘Special’ was built. Aérospatiale later merged into Eurocopter, and their four-seat single turbine AS-350 Écureuil was updated into the EC-120 Colibri using that same tail-rotor design. But the similarity in body and cockpit shape makes me a little stupidly proud at least – mine is admittedly sleeker.
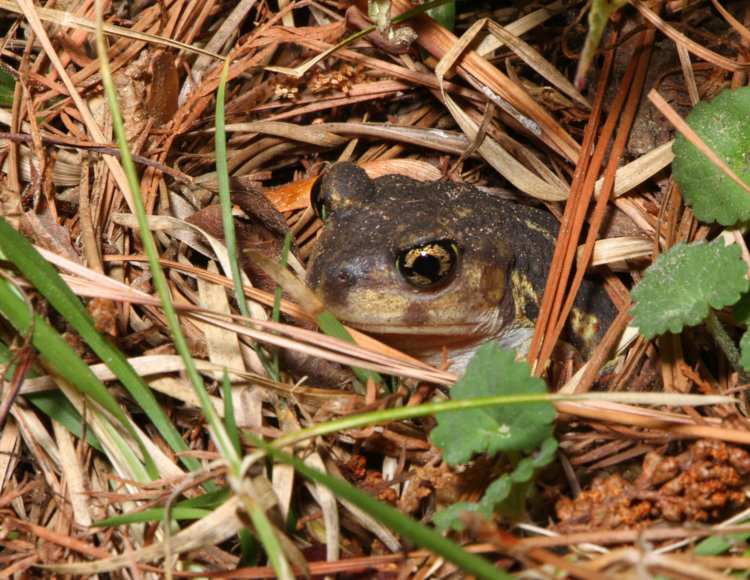
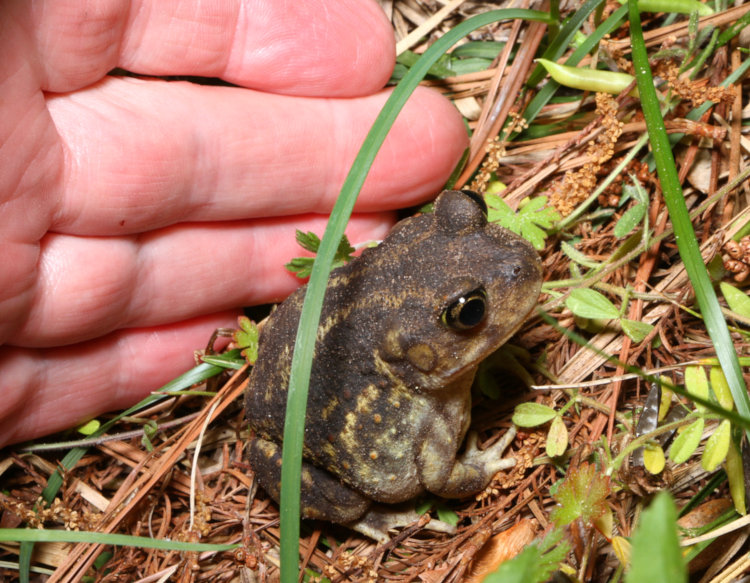
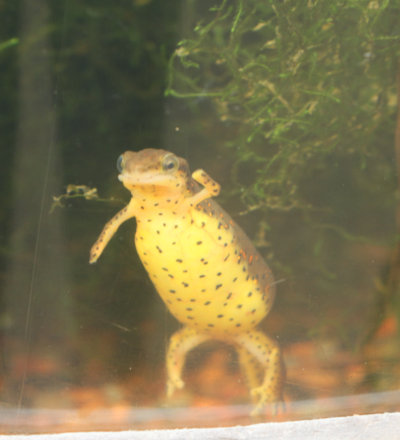
Poking around tonight, I spotted the first eastern spadefoot (Scaphiopus holbrookii) of the season, and so commemorated this event, naturally.
This one is partially backed into its burrow, which is where they often sit, simply waiting for food like crickets to walk by. It’s amusing (honestly, a little frustrating) that this actually works; I’ve sat outside for hours on many occasions and haven’t yet had a plate of barbecued beef ribs happen along, or even a simple quesadilla. Seriously.
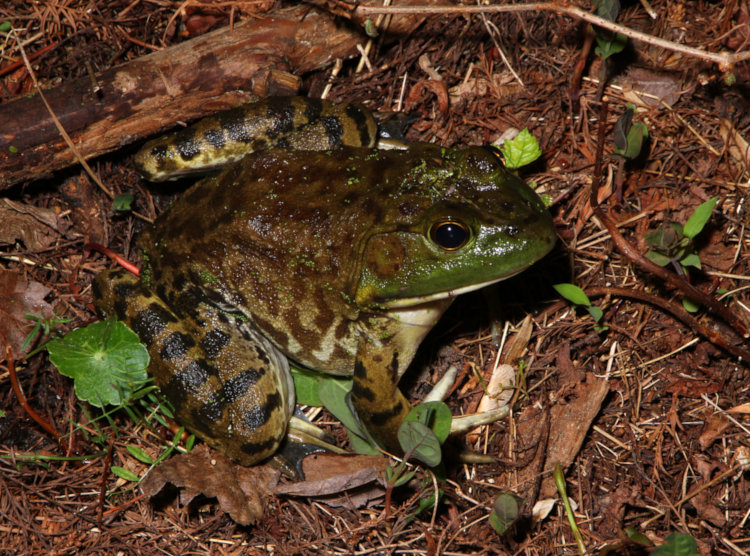
I also got a few other nocturnal amphibian images, like an American bullfrog (Lithobates catesbeianus)…
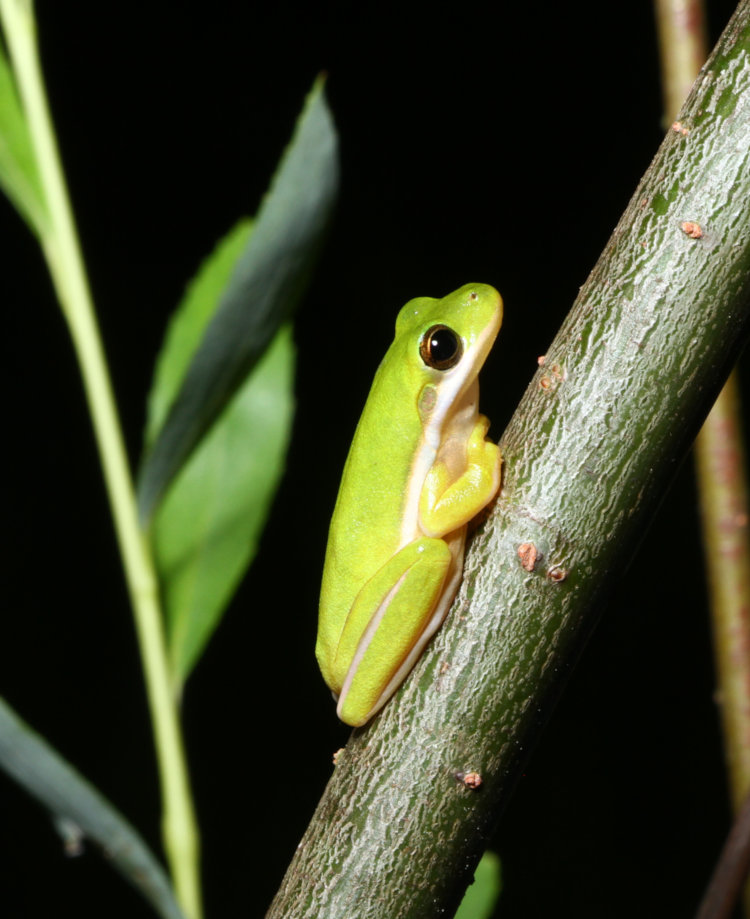
… and even a small green treefrog (Dryophytes cinereus,) one of many that stake out the weeping willow (Salix babylonica) by day and hunts the tree and surrounding area at night:
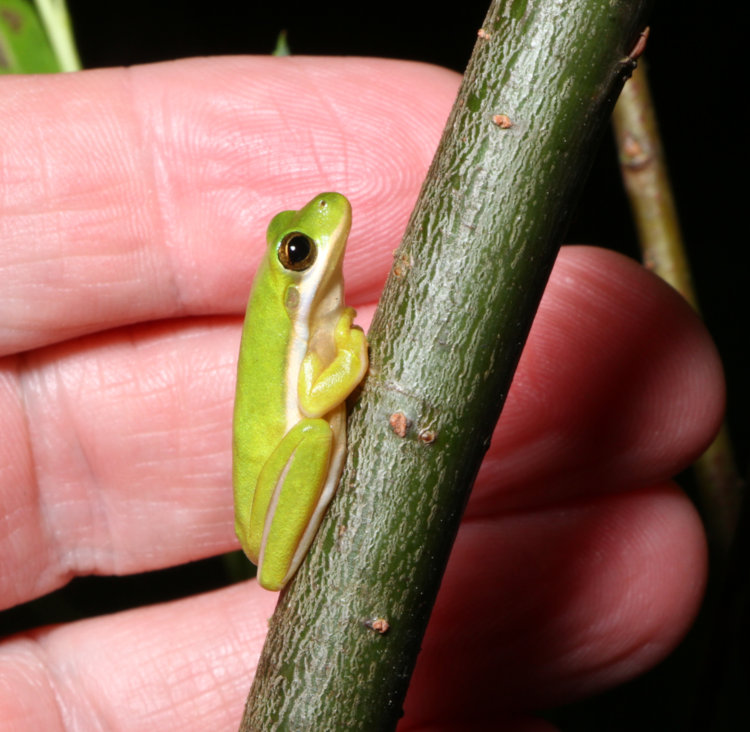
This one was less than half of adult size, as are all of those that sleep on or near the tree, such as on the posts of the protective fencing around it until it gets big enough to fend for itself (beavers adore willows, and deer are known the strip the ends off of branches, so it’s shielded in its vulnerable sapling stage.) The count of green treefrogs sleeping around the tree by day has been as high as nine, by the way. Yet it occurred to be that I had quite a range of sizes for the one night, but could I show scale decently? Turns out, by going out and trying to find the same subjects again, that I could. The green treefrog first:
It’s a shame I couldn’t locate the smallest one that hangs out here, probably about the size of my thumbnail, but this suffices, and treefrogs can be fairly complacent at times – it’s usually worse if you disturb what they’re perched upon.
So okay, how about the spadefoot?
Not too hard to locate again – in fact, I found two – and also quite complacent, so no sweat here.
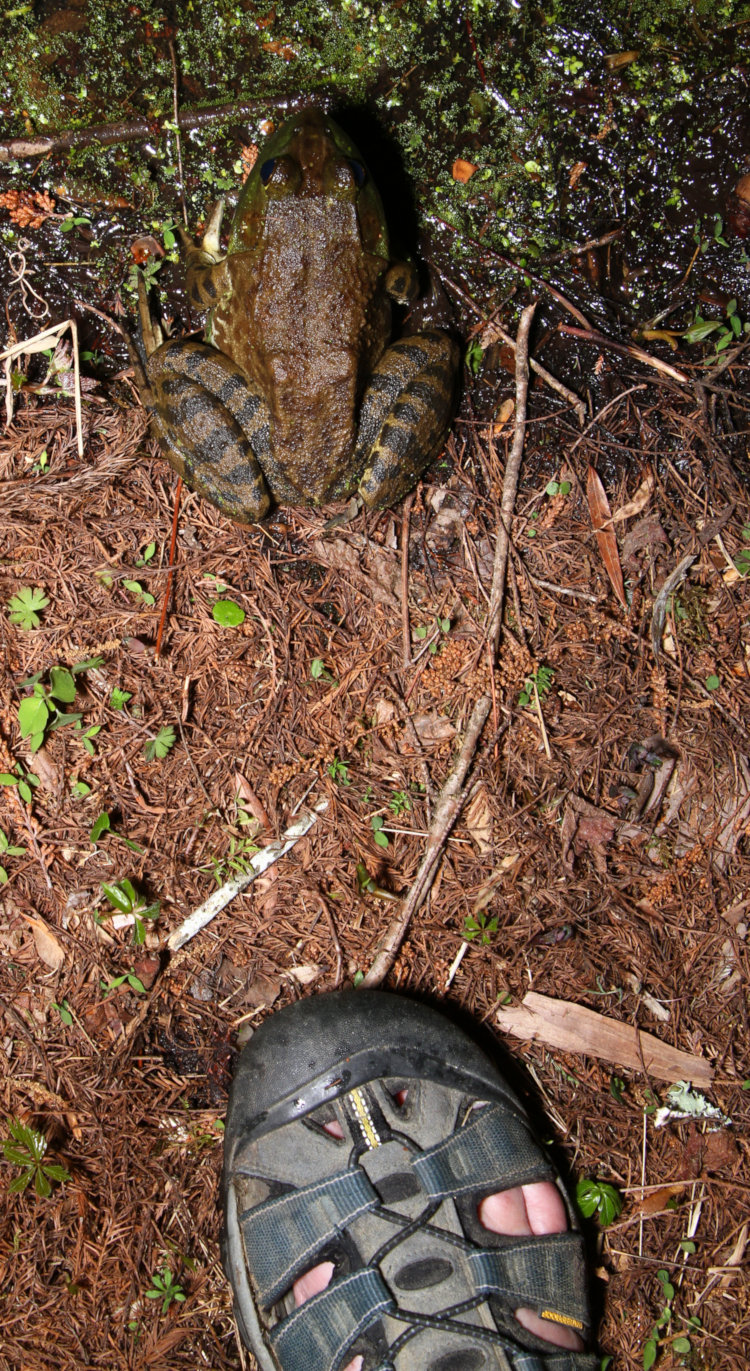
But, now the bullfrog. They’re notoriously spooky, able to be photographed as long as you keep the headlamp on them, but quick to vault into the water the moment something becomes visible in the beam, or even if the noises sound too suspicious, and my original photo subject had indeed made its escape earlier, with a leap of well over a meter in length and close to half that in height as it fled to safety (leaving a trail of urine in the air momentarily, it must be said.) It had been over an hour, though, and thus there was a chance it had returned to the shore. But even if I found it, could I somehow get something close enough to it for scale without sending it off again?
Turns out, I was extraordinarily lucky tonight. Yes, there it was on shore again, and I managed to approach quietly enough. Then, when directly behind it, I tilted the headlamp up so it shone on the frog, just barely, but left shadow behind it, and gently slid my foot forward. It was sufficient for a couple of frames.
This was a monster, about the largest that I’ve seen, far more than a handful. Just for the sake of it, I extended my hand close enough to confirm that the head was three fingers wide, but in doing so I revealed my presence and once again sent it sailing off into the water. Still, I had my scale shot, so I was pleased, and could illustrate the range of amphibian sizes visible right here, on one night. It can be even more extreme, but that might wait for another night.


 Lightning trackers can be very handy to know when a storm is approaching and from where, but in my experience, their strike location plotting is wildly variable (and will rarely tell you when cloud-to-cloud bolts occur.) And getting those bolts that light up the clouds without even showing themselves can be very dynamic too, sometimes much richer than just a white streak against the sky.


_03.jpg)