I know that you’re as aware as I am of what today actually is, and in recognition of this holiday, I almost didn’t post anything at all; what better way to celebrate National Teaser Day than to not post anything for all the people coming here throughout the day to check and see how I was celebrating it. But if I simply carried that for the whole day, people might think that I’d forgotten or wasn’t actually recognizing the holiday, perish forbid! So I’m doing double-duty and waiting until just about the last minute, and then posting an actual teaser – get as much mileage out of the holiday as possible, right? And so we have this image, which certainly should indicate that others will be along, and true to form, I’m not telling you when.
Back in the early nineties, a couple of years after moving into North Carolina, I took my first trip alone out to the Outer Banks – I’d been once before with my cousin, a weekend camping trip, but this time around I was intent on doing some ‘serious’ photography, which at that time was still being done with an Olympus OM-10 and a variety of second-hand lenses. My workhorse was a 75-260mm zoom, which represented a long reach for me at the time – the purchase of my first modern camera, a Canon Elan IIe, was still a couple of years away, but at this point I was in the process of deciding that I’d like to pursue photography as a career (mind you, it’s still not a ‘career’ now, in most senses of the word since it’s not paying all the bills, but I can’t call it a hobby either. Some day, someone will come up with an appropriate term.)
One particular draw was all the different species that inhabit only the seaside areas. For the first seven years of my life, my exposure to the ocean had been Atlantic City, NJ, back before the casinos moved in – think Coney Island, kind of deal. Then for nearly twenty years in central NY, I had no access to the beach or ocean at all. So the Outer Banks represented this almost-exotic region to me, and among the subjects that I was pursuing were the brown pelicans (Pelecanus occidentalis.) Huge and yet leisurely, often seen gliding along effortlessly in their multi-toned plumage, I wanted some nice detail shots, which despite the wonderful reach of the 75-260 (snort,) I wasn’t getting at the distances I was normally seeing them from. I would spot them crossing the road as I was driving along Route 12, the single road that runs the length of the greater part of the Outer Banks, and find a place to stop the car and try to spot where they’d been heading, hoping they might have landed near the water’s edge or something. Generally, I saw no sign of them when I crossed the primary dune – in the time it took me to get out there, they’d moved on, likely following the air currents over the wave tops and cruising along the beach, as is their typical habit. On occasion, I saw them well offshore, sometimes floating in small groups, sometimes diving into the water after a choice meal. It was frustrating, but I never expected it to be easy, and if it was easy, what would be the charm in the resulting images?
And then, I spotted the entrance to the Hatteras Marina, and decided to check it out and see what kind of photographic opportunities it held – perhaps I’d get some picturesque shrimp netting boats alongside the dock, or maybe just a nice scenic bay area. I wasn’t thinking pelicans, really, because I expected them to be shy, avoiding the people that would be therein. So it came as a little bit of culture shock to find that pelicans were not only plentiful there, they were considered almost as vermin – they were attracted by the live bait, and the subsequent catches and post-subsequent fish entrails, that accompanied a harbor catering to fishing trips. I could practically walk up to them, and it wasn’t too difficult to find various vantages that showed them off, including this one. Shot on print film (probably Kodak Gold 400,) with the so-so Olympus lenses, it lacked the qualities that I would later demand from my slides and, further off, digital images, but it still decorated my walls for a few years.
A few weeks back, the short-weeked Mr Bugg and I did a photo outing, a little early in the season when things weren’t quite up to speed, that nevertheless netted a handful of useful images, and I simply haven’t sat down to write up a post featuring them yet. Now, with a much-more successful outing just past, I’m going to put these up to allow the young whippersnapper a chance to post his own before I blow him out of the water, just for how snarky he tends to be. Respect; kids these days don’t know what it means.
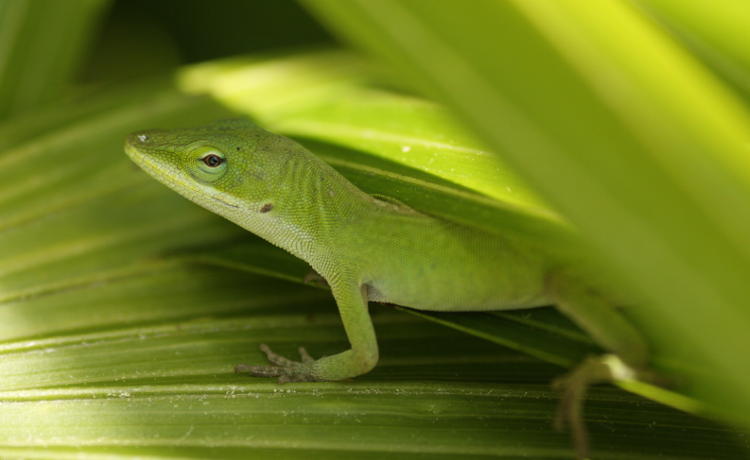
At the NC Botanical Gardens, which were still thinly-populated with plants at that time, I made it a point to try and spot my old friends the Carolina anoles (Anolis carolinensis,) which I was eventually successful at, partially because I made the special effort, and partially because I know their habits and haunts. Shot handheld in the shade under the palmetto leaf, I’m pretty pleased with how the image above came out. A few minutes later as we passed the spot again, this one had made itself scarce and was nowhere to be found.
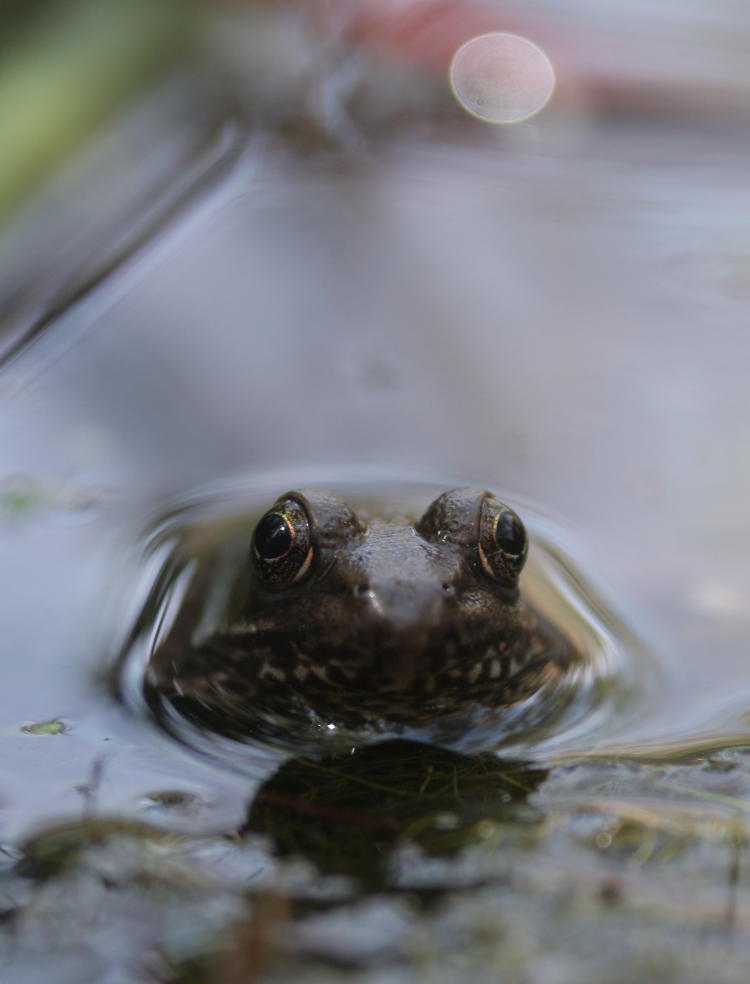
Further away in a small pond liner, a couple of green frogs (Rana clamitans, formerly Lithobates clamitans) peeped stoically from the water, and a stealthy manner allowed quite a close approach. Being my usual self, this meant I spent the remainder of the visit with mud and grit on my knees and elbows from having gotten down as far as possible without actually slapping my belly into the marshy conditions, but I’ve never been good-looking even when cleaned up so it wasn’t particularly noticeable anyway.
Prior to that, we’d taken a pass through Mason Farm Biological Reserve, one of the few times we could access it between the rainy periods that have existed for the past few months; the little concrete causeway that spans the creek, forming the entrance to the region, would flood out too far with the runoff from the area and prevent access. As it was, we plowed through almost half a meter of water to get in, but this meant we had the place to ourselves for hours. I prefer this, because others tend to spook off some of the animals that we’re likely to see, especially since the loop is a favorite of joggers. But despite this advantage, the day was still abnormally quiet as far as wildlife was concerned, curious because mating season was beginning and the day was quite pleasant. I think most of the species knew that we still had a couple of rather cold nights ahead of us.
But the evidence was there, if we paid attention. The alarm calls of a pair of American crows (Corvus brachyrhynchos) overhead drew our attention, and indicated that nesting season was indeed upon us.
I doubt that I need to point out what a crow looks like, so the other is a red-tailed hawk (Buteo jamaicensis) that was simply riding the weak thermals of the day in lazy circles – or trying to. The fact that it was in the vicinity of a crow’s nest earned it the enmity of the pair, which were repeatedly diving at it. Red-tailed hawks are heavy and flying is energy intensive for them, so they tend to glide when the air currents permit, while crows are more agile, so the performance played out with the crows circling around from a higher position to dive in and attack the hawk from above and behind, desperately avoiding those talons, while the hawk occasionally wheeled or dodged, for the most part appearing to ignore its harassers.
These were shot from a considerable distance with the Canon 100-300 L and cropped significantly, so the first image here was clearly the best, while others suffered from bad focus tracking on my part – I was shooting in manual mode because of intervening trees and the likelihood that I’d fail to keep the autofocus point precisely on the birds, causing the AF to start winding in and out in an attempt to find the subject; when that occurs you can easily lose sight of the birds. While I don’t expect this issue to be remedied entirely, there should be some improvements in this regard shortly. For now this is what we have.
It’s a shame that I wasn’t maintaining best focus, because this is just what I was following their actions for: a better shot of actual near-contact, with the hawk momentarily making an evasive move. Should the crows have dipped down just a hair too far, the tables may have been turned, because the hawk wouldn’t hesitate to snag one of them with its superior strength, and red-tails have a pretty broad diet – the reason the crows were concerned in the first place, even if eggs weren’t actually on the nest (which seems likely because both crows were involved.) The drama played out for several minutes until the hawk, riding the air currents, had moved on sufficiently from the region for the crows to feel safe and/or vindicated.
This reminds me of another drama that I witnessed several years back, when I did not have the camera in hand. Once again hearing the alarm calls of crows, I looked up to see a turkey vulture cruising through the area, followed closely by two upset crows. Vultures are much heavier than hawks, so even less evading was taking place, and I honestly feel the vulture was just passing by when its path took it too close to a crow’s nest. They passed out of sight and I went back to what I was doing – for only a few moments. In no time at all, the crows reappeared, this time hell bent for leather in the opposite direction, closely pursued by some angry grackles; in their harassment of the vulture they had passed too close to the grackles’ nest and earned the exact same response in return. Grackles are as much smaller than crows as the crows were from the vulture, while at the same time much more agile, and it’s amusing to see larger birds fleeing in apparent fear from a smaller adversary. Size might help at times, but it’s not the key factor in altercations, at least among birds.
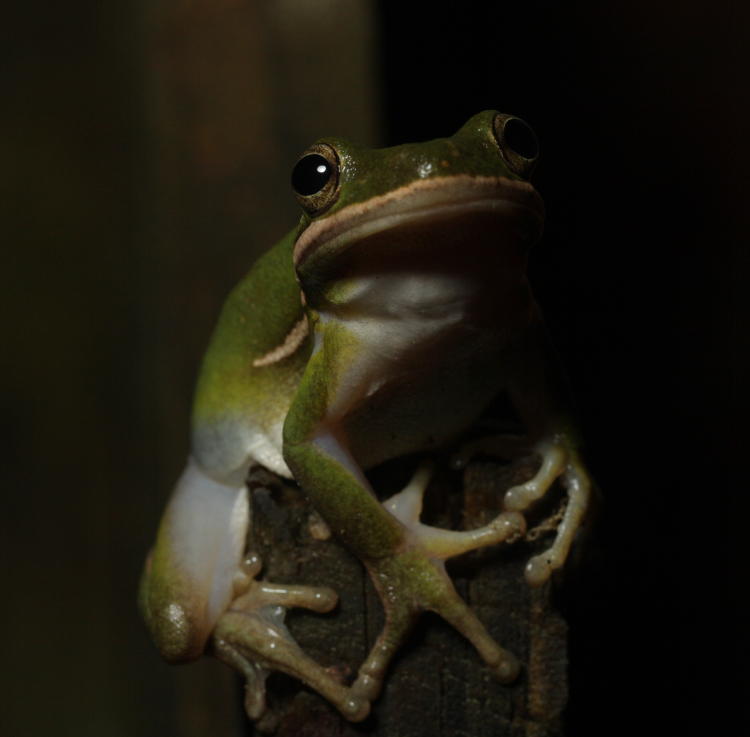
And I close with another shot obtained later on once I came back home, after night fell. One of my resident green treefrogs (Hyla cinerea) had ventured out and provided a fetching pose atop the gate in the backyard, and while the flash was a little inadequate for this frame, it seems to have added a more mysterious air to the whole image. I can live with it.
As I promised/threatened/cursed in the previous Because It’s A Blog entry, we’re going to go a lot more current than my normal eighties music fare this time around and feature some Coldplay. No, I’m feeling just fine, thanks for your concern. And I will readily admit, I am your classic grumpy old man in that I find nearly all current music to fall somewhere between “meh” and horrid talent-free pap, but honestly, I was/am that way about a good portion of eighties music too – every hair band was terrible, and Whitney Houston was a pox on anyone with ears. I could attempt to explain/rationalize this, but I’ll simply go with the idea that you’re most attuned to the stuff that you were hearing during adolescence and puberty and all that, which seems to be the favored sociological explanation.
Coldplay, however, is a band I’ll happily make an exception for, or perhaps offer some observation that they capture more of the salient properties of my preferred musical tastes. I’m not actually going to try to deconstruct it too much, because I haven’t put that much thought into it; right now, I’m simply going to introduce you to a few songs on the odd chance that you’ll get something out of them. Given that Coldplay is enjoying plenty of current popularity, it’s not that odd a chance, really.
My first introduction to them came from a TV commercial, of all things – quite strange because I never watch TV. But one of their songs was featured on an iTunes ad, I think, and I was intrigued by it. A little later on I caught it again on the radio (which receives as much attention from me as TV does,) and was hooked. That song, I eventually discovered, was “Viva La Vida,” and I want you to pay particular attention to the lyrics.
Viva La Vida – Coldplay
Interpreting the meaning of a song is generally a fool’s game, because it’s almost never correct, and on top of that I’ve actually read about it direct from the source – who were admittedly pretty vague despite the distinct religious references (more specifically, the christian bible.) Nonetheless, I tend to view it as the rise and fall of the holy roman empire and the influence of the catholic church, at one time executing their enemies with the power of their authority, and now struggling to maintain relevance while dismissing the frequent accusations of sexual impropriety and ethical misconduct. The lyrics are undeniably clever, especially
And I discovered that my castles stand
Upon pillars of salt, pillars of sand.
“Pillars of salt” being a clear reference to the fate of lot’s wife as they fled sodom and gomorrah, while “pillars of sand” being slightly less direct in calling back a lecture within the gospel of matthew – more than a little tongue-in-cheek too, since that passage makes the claim that following jesus is building a house upon the rock (strong) and not the sand, while any religion is based solely and entirely on hearsay, with virtually no application to the physical, demonstrable world; a house on sand, indeed.
All that aside, musically it’s a radical departure from drum machines and spoken or chanted lyrics, and The Girlfriend and I have spent some time puzzling out what’s actually within the string arrangement that forms most of the instrumentation. Meanwhile, Chris Martin’s vocals are dynamic and rich, a far cry from the narrow range of many artists now and past, and he uses his voice well against the instruments. A lot of attention was paid to the composition and studio mixing, and it shows.
That song was enough to intrigue me, but I’ve been burned before on thinking that a single song was enough to validate a band or album (haven’t we all?) and didn’t really pursue it in the normal way, like seeking out other songs by the act to see if they compare; instead I just kind of kept it in the back of my head. Some time later, I came across the next in a haphazard way: I think a clip of it, or something trying to sound like it, was included on my new flip-phone as a ringtone, which I assigned to The Girlfriend’s number, eventually hearing it at random as the song itself. Soon afterward, a friend of mine (hearing the ringtone) remarked at it being a favorite of his, partially because of its own merits, and partially because his daughter played lead on the song when her school band did a recital. I guess I should have warned you how sordid this tale was going to get. But here’s “Clocks” anyway…
Clocks – Coldplay
No, I’m not even trying to interpret those lyrics, and in fact, I’ll only attempt to sing them when no one else can hear (the podcasting is bad enough.) Martin’s voice seems a little strained for this set, and makes me wonder when the studio recording fell (like, during a tour, or maybe after a drive through a construction zone on an interstate,) but again, the range works well, and the song plays out like a drama, building intensity and dropping off, not relying on a riff or much of a formula. Occasionally, an act comes out that demonstrates that cookie-cutter musical trends are not what listeners are really fond of, breaking genre and becoming immensely popular, and Coldplay seems to fit into that category. On top of that, they seem to like experimenting with different sounds and mixing in lots of varied instruments, which isn’t hard, really; the hard part is doing it so well and so seamlessly.
Convinced now, I started seeking out more songs by the band, and pretty soon settled on the next as my favorite – wonderfully rich, energetic, and dramatic. The trend, starting in the nineties, towards lyrics that were little more than spoken rankled me – I’m motivated by people who can vocalize, and can get behind a singer with great tone even if I can’t understand what they’re saying, which is exemplified by the bridge herein (the lyrics can be found here if you’d prefer to know.)
Every Teardrop is a Waterfall – Coldplay
By the way, if you’re already familiar with the song, then perhaps you should check out this version for a change of pace (which is quite likely to lead down a rabbit hole all its own.)
As an interesting (or not) bit of trivia, I now associate this song (Coldplay’s version, mind you) with the film Guardians of the Galaxy, not because it was in the soundtrack or even close – the soundtrack was largely hits from the seventies – but because it began playing on the car stereo as I was on my way to the theater, ending just as I arrived, and seemed to set the mood. Since it was an MP3 file, I hit it to repeat and play on my way home too.
Now, I said above that it was my favorite, and this lasted for a while until that aforementioned friend pointed me towards another that I’d somehow missed, which didn’t immediately strike me as strongly but grew quickly, and has now supplanted ‘Every Teardrop.’
[You might want to drop the volume a little for this one – the version I uploaded is a bit high.]
Charlie Brown – Coldplay
I think it’s safe to say that we’ve departed from the standard rock instrumental lineup with this one as well, and if you can interpret what’s actually being used in there, more power to you. As I was writing this post, it struck me that Coldplay almost seems to compose at least some of their music more like screenplays, with ‘acts’ that change the mood and tempo, while still remaining in the classic structure (lyrics, chorus, lyrics, chorus, bridge, chorus) of popular music, the songs becoming more eclectic and varied while not departing the genre, and this might prove to be a great formula, at least until it becomes overused. Or maybe I’m wrong, but whatever – I approve.
More useless trivia: I had been interpreting the final line incorrectly for some time, until I saw the lyrics feeding automatically through my Linux MP3 player. It is normal to believe that by this time, I had settled in on my version so well that I disliked the actual lyric, but there’s more to it than that: mine was actually much better. So I wrote to Chris Martin and told him about it and, remarkably, he agreed, and is incorporating my own into all concert performances from this point on. However, only if they’re not recorded, so I don’t have to be paid any royalties at all for this contribution. Understandably, I have mixed feelings about this.*
Don’t get the impression that I’m disregarding other songs that have perhaps charted better, like, “A Sky Full of Stars,” or their duet with The Chainsmokers, “Something Just Like This,” which are also powerful songs; I’m featuring this lineup both because they’re my favorites, and because not everyone has necessarily been exposed to them. But yes, a little bit of current (more or less) music sneaks into my playlists, as long as it works pretty well – yet listening to any radio station for longer than a few minutes manages to piss me off significantly. So I’m still maintaining my curmudgeonly status.
Next up, most likely, we’re going to go even further back to the seventies with a soundtrack. I know you’re excited about that.
* This is not true at all. Actually, he told me to fuck off diagonally and never contact him again.**
** Also not true – I never contacted him in any way. But I should, now that I’m prepared for all consequences.***
*** Now this is getting a bit confusing. After typing all that above, I found a link (actually, several) that showed the lyrics exactly as I had them in my mind – and one completely different version. I actually have no idea what source my player uses for the lyrics, but there’s an ‘Edit Lyrics’ function built into the console, which fills me full of confidence. So, you know? Use whatever you like – I’m not counting anything as ‘official.’
It is, naturally, Earth Day today, though you didn’t need me to tell you that – you should have been able to feel it in your bones. Many times past I have commented on this, provided suggestions, and so on, so you know the drill. Get out and do something, you know, earthy.
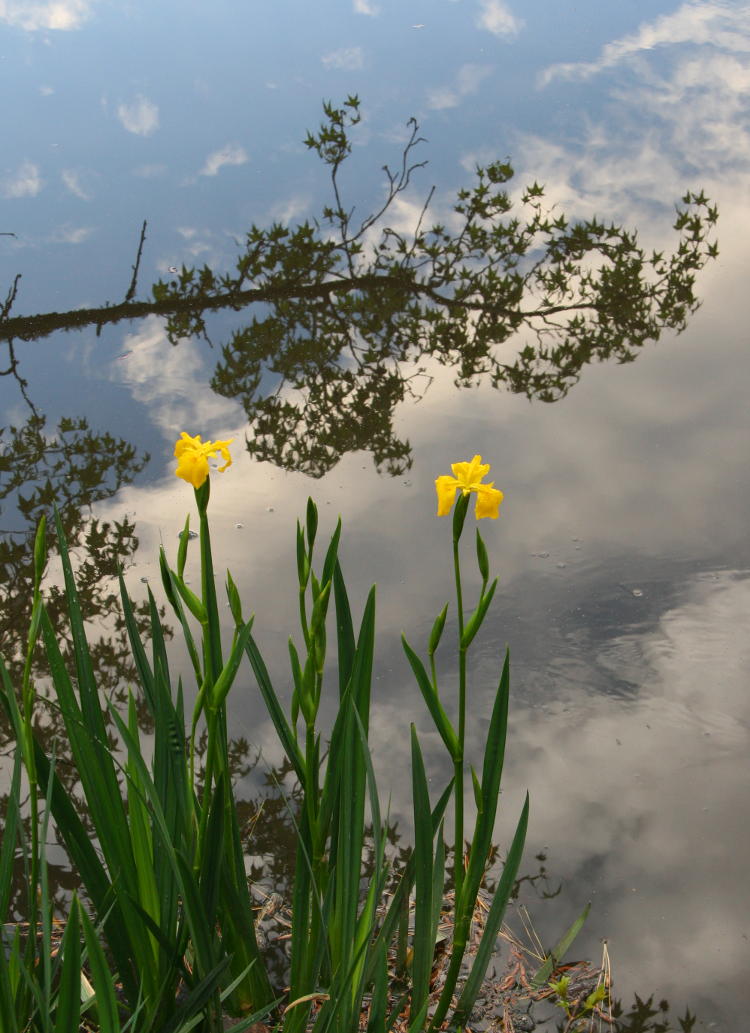
I have tentative plans, but they’ll depend on weather and other things that I need to get done, so we’ll see what might appear here later on. For now, I leave you with these yellow flag irises, or water irises, or whatever other name someone might know them by (while the scientific and botanical communities – you know, over on the other side of town – know them as Iris pseudacorus, because they like to do everything differently,) against the reflection of the sky in the nearby pond, taken the other evening while waiting for the sunset not to pan out. Sometimes, success in nature photography is all about your expectations. I now go out seeking a really boring or unimpressive sunset, and am rarely disappointed.
Meanwhile, I have to point out that the position of the blossoms and the reflection of the tree branch were not accidental, but purposefully framed to fall together yet not touching in this way. Tiny little shifts in shooting position can make a significant difference, so pay attention.
So, to the undoubtedly-voluminous number of readers who come in first thing in the morning on Fridays to find the Storytime posts, I apologize – I am quite late today, mostly due to having a really shitty week. But partially due to my subject here, and so this is going to be the most current Storytime post to date, since these images were taken only minutes ago.
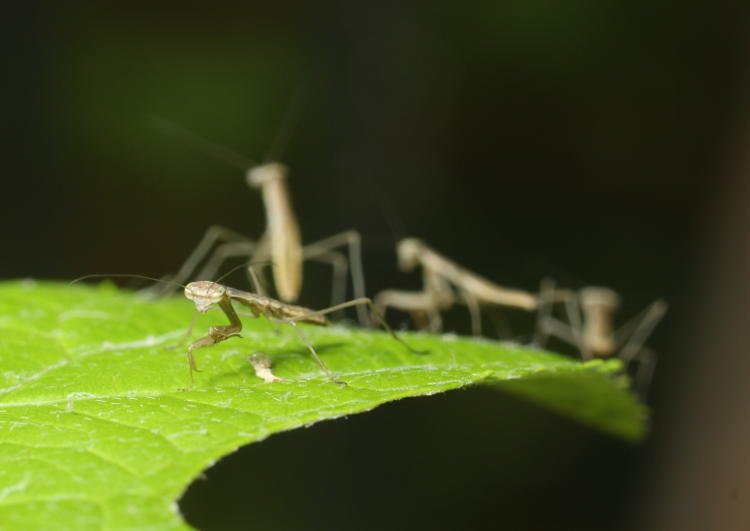
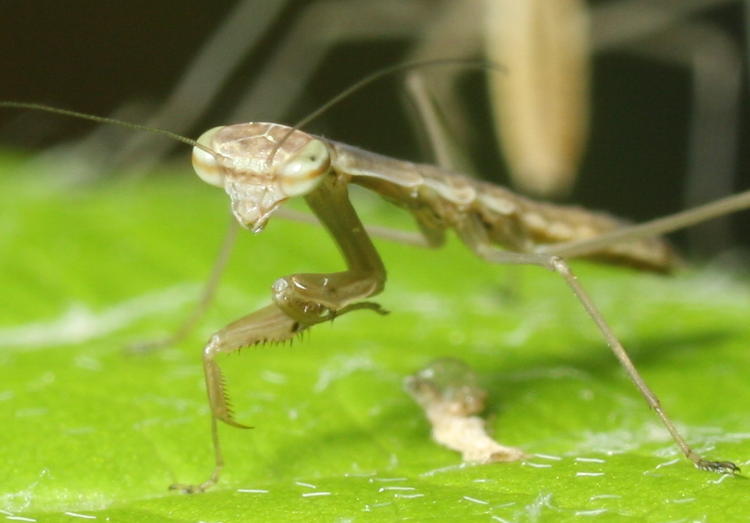
I mentioned earlier about finding some Chinese mantis (Tenodera sinensis) egg cases, or oothecas, to distribute in ideal locations around the yard and hopefully get some photos or video of the moment of emergence, something I have yet to capture. Unfortunately, I did not find the time to properly place them in the yard, and a day or so ago two of them hatched out. Thankfully, this was on the screened porch and not, for instance, in the office (I’m not that stupid,) but it still meant that I had to capture several dozen/hundred 10mm long buggers to bring them outside. This isn’t too awful hard – they tend to drop at the first sign of danger, so for the most part all I had to to was hold a container underneath them and touch them gently with an index card – but the sheer number of them, and the hiding places available on the porch, means that this will be an ongoing pursuit for a couple of days. So in between mantis rodeo sessions, I not only mounted and distributed the remaining egg cases, I did a few photos of the ones I’d already released. These in particular had been relocated to the oak-leaf hydrangea (Hydrangea quercifolia) plant, the same one that appeared here. But here’s a closer look of the same foreground mantis – remember, overall length is 10mm.
They were being shy and darting away every time I leaned close, but this one held its ground and, for one decent frame anyway, I managed to nail focus. I’ve said this before, but it’s as much a matter of luck and timing as it is skill – effective focus range is measured in millimeters or less, and I wasn’t bracing against anything. You try to hold perfectly still at a precise distance from something.
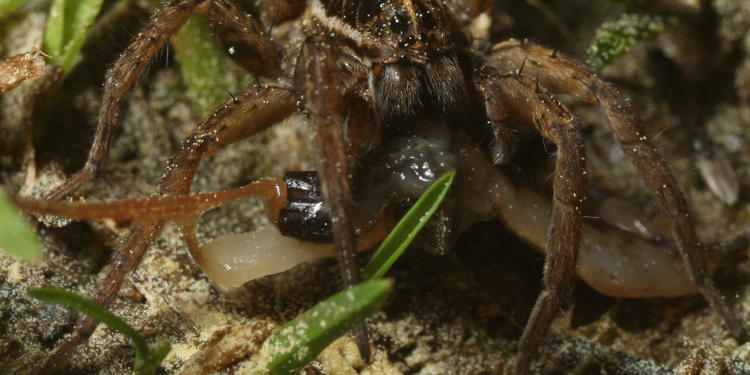
At the time that I first spotted them, a jumping spider had already discovered one by itself – quite likely the same spider seen in the previous post. I had to leave for work shortly afterward and couldn’t even begin to corral the mantids outdoors, but I figured the spider’s capture would hold it for a day or so.
While it’s tempting to lament such a fate, it likely will hold true for countless of the mantids – dozens emerge from an egg sac, but only a few will reach adulthood; this is one of the few where I’ve actually witnessed its demise, while I suspect that cannibalism may be a factor at times. Seems barbaric to us, but evolution only sees to it that a set of genes passes along, and if just one survives to reproduce, even at the expense of others from the same brood, that’s still a genetic win (as opposed to none of them making it, of course.) But I’m aware of this too, and the newborns were distributed across a broad expanse of the property, much broader than they would have achieved on their own at this stage – the equivalent of several smaller egg cases rather than one large one. Is this an advantage or not? We might just have to see.
No, not a world record, or even a personal one – indeed, no kind of superlative at all; just about the opposite. I’m referring instead to something that will soon disappear from our vocabulary, the idea of a skipping vinyl LP playing the same damn bit over and over. Because the posts are yet/still thinner than I’d like, and than I intend, but I haven’t been able to do anything about it recently, even though I have a handful of images to put up, and topics to talk about. I’ve just had too much of my time taken up with other things.
Partially, this is good, because I’m/we’re getting things done around the house (including evicting some grey squirrels from an attempted nest in the eaves of the house.) And then some of it is stuff that I’d really rather not have to do, but such is life, right? And I’m whining again.
So for now, a jumping spider, probably the common-as-muck Platycryptus undatus, with its capture on the screen yesterday. Curiously, it remained in the general vicinity of the middle of the screen for quite a while, but on looking out there today I found the dead fly abandoned on the sill right underneath where they’d been. I have no good explanation for this, but I’ll make up something cool-sounding if you like.
I have a few more recent photos to post – this one was unrelated to the others plus I don’t want you thinking I’d moved away from creepy things – which will come at another time. Not to mention a couple of photographic projects that, if successful, should be fodder for some really slick posts. So, “soon.”
As you undoubtedly recall, today is the 58th anniversary of mankind’s venturing into space, being the day that Yuri Gagarin orbited in Vostok 1 back in 1961. Since it also fell on a Friday this year, I had planned to have an appropriate image shot especially for the Storytime posts, but it didn’t work as intended. I was out Wednesday night trying to capture a visible pass of one of the boosters remaining in orbit, but the humidity conditions weren’t allowing anything but the brightest of stars to shine through; the next evening was even worse. So we’re resorting to a much older, not-exactly-thematic but still space-related image for Storytime this week.
This image was a product of careful planning and staging, in response to an idle challenge, and yet still didn’t come out as I’d intended. But it wasn’t my fault (this time.)
The backstory: For a few years in the early 2000s, a bunch of us on a particular newsgroup participated in a regularly-scheduled challenge, one that had rotating themes, and the theme for this period’s challenge was, “Entrances and Exits.” This fit in with an idea that I’d had some time in the past, and more importantly, fit in with the precise time of the month when I could accomplish it. I was shooting film then, which was even more challenging for this kind of thing, because it required a series of multiple exposures – actually, spread out over two days and many hours. In essence, due to the rotation of the Earth, the moon (and the sun) move their own width across the sky in 150 seconds, two and a half minutes, and so, if you fire an exposure every 150 seconds, you can produce a series of moons touching themselves like a line of beads. More or less; as seen here, the moon actually varies in its distance from Earth and thus its apparent size, so when it’s further it moves its own width in a little less time.
Of course, it rises and sets in roughly opposite directions, but more importantly, the full moon in summer rises and sets in twilight, its appearance at the horizons taking place right at the very edges of night, so the sky is a little too bright to pull this off – even though only a couple of exposures will be during twilight, they’re enough to expose the frame and make it “not night.” Worse, that sky light will wash out the moons that were recorded either subsequently (for moonrise) or previously (for moonset.) Do you get the picture? Each frame will show the full sky, but only if the sky is dark will the moon be more-or-less properly exposed, because there will be no light bleeding through from another exposure. Yet the moon is staggered with the sun, which is what produces the phases in the first place, and so the day before full moon it sets in near-total darkness, being about an hour before sunrise, and the day after full it rises about an hour after sunset. The difference in phase is trivial at those points, especially for a wider-angle shot.
I also knew that the moon would come in and out at somewhat opposing angles, and since I was doing this on just one frame of film, I had to plan accordingly to ensure that I did not overlap the images (though this might have had its own cool effect.) So at moonset, the morning before the moon was to be full, I was facing out westerly over the lake, with nice clear skies and an excellent series of frames. Those are the line on the left, and you can see where a few thin clouds near the horizon made an appearance. You can also see an accidental double-exposure on one of the them, the one that washes out too bright.
A quick note here. The Canon Elan IIe body had a multiple-exposure function built in which doesn’t advance the film after the shutter closes, which is great, because on earlier film bodies you had to release the film sprocket gear manually to recock the shutter curtains, and it always let the film shift a bit under its own tension – I know because I tried similar shots years before with Olympus cameras, with pretty crappy results. Also, the exposure to capture nice detail in a full moon is brief, which helps keep the sky dark. Now, the Elan IIe only allows up to nine exposures on a frame – unless you reset it sometime in the middle, allowing you to extend the number indefinitely (at least as long as the batteries held out.)
Which leads to part two. I wasn’t going to be back and do the moonrise exposures for two days, which meant at the very least ending the exposure and advancing the film a frame – in this case, it likely meant that I’d be wanting to do other shots in that time period (and my only backup camera was one of those aforementioned older Olympus models.) But Canon’s film advance system was pretty slick and accurate; you could take note of the frame that you were on, rewind the film (as long as your Custom Functions were set to leave the film leader out, which they were,) and reload it later, advancing it to the same frame, and be perfectly aligned. In fact, I did this routinely, because different films had different strengths, so I would unload and reload as needed to match the film to the situation. The only thing you had to ensure was that, you couldn’t just advance the film, you had to actually fire the shutter, so for the preceding frames, as not to double-expose them, you had to set manually for a very brief exposure and fire the shutter with the lens cap on, essentially doing a double-exposure but one of them was pure black.
The rot set in for moonrise, two days later. Now facing east out across the Indian River Lagoon, I had my timing and framing down (this included estimating where I’d placed the horizon in the previous frame,) and was all set for the appearance of the moon. Except, the clouds didn’t cooperate, and the moon remained hidden. Counting on the possibility that things still might change, I dutifully fired off each exposure at the appropriate time, hoping that a little later on as the moon became more visible I’d still have that nice beaded line, but as you can see (this time it’s the line to the right of the frame,) it just didn’t pan out. Not one frame had an unobscured moon in it. So much for Florida’s clear skies.
By the way, all or nearly all of the horizon lights came from this second set of exposures; there were no lights visible at the far side of the lake for the first set, except for maybe radio towers. And if you were sharp eyed you might have noticed that the angles of moonrise and moonset seem different, which doesn’t make sense – it’s the same axial tilt for both, so they should match. Unless I was aiming out over a lake with no discernible horizon in the view finder for one of them – I probably had the camera tilted a little without realizing it, not having brought a level with me to ensure the body position of the camera. Okay, I meticulously planned most of it…
I’ve always intended to tackle this again sometime later, but the switch to digital pretty much put the kibosh on that, since most digital bodies don’t do multiple-exposures, figuring that you’ll simply ‘Photoshop’ the same effect. Which plenty of people do, but what’s the charm or effort in that? One frame, 30 to 40 exposures, spread over two separate nights;that’s a challenge. Pasting in a moon repeatedly? Pssshhhffft.
Okay, like, it’s spring, right? The end of the slow season, so stuff to photograph, yes? So the, you know, nature photographer blog posts are supposed to be increasing in number and quality. Stands to reason.
Well, yes, but I still have other things going on, unrelated to nature photography, so what’s been happening has been grabbing a few shots here and there (and, as yet, things haven’t started really popping,) but then not having enough time to do anything with them. I now have a little time, so we’re finally getting a post. And just because of that snark, I’m starting off with the spiders.
One spider. I shot a couple, but there’s only one I’m featuring here, for curiosity’s sake – and you know what they say about curiosity. Yet my razor-sharp naturalist wits tell me this isn’t really a cat. I just don’t know what it is.
Under the revealing reflections of the LED headlamp, I homed in on this medium-small wolf spider (genus Lycosidae,) and noticed that it seemed to have a meal, so I knelt down on the damp ground and got a reasonable closeup, but I don’t think it helped.
First off, that yellow stuff is pine pollen that’s all over every damn thing right now – in two days it accumulates enough that I can’t even tell what color my car is. But besides that, I’ve been looking at what the spider is chowing down upon and have yet to figure it out. You’re welcome to try, and to that end, I provide a little bit closer look.
That shape, and the details that can be seen, fit absolutely nothing that I can bring to mind. I’m aware that the spider might have had this for some time and has been gnawing away at all of the outer structure, but even given that, the bits don’t seem to add up, especially that joined whatsit to the left, reddish-brown. You know, emerging from the hoof. If it helps, the width of the entire meal is probably in the 6-8mm range. I’d be happy to hear what you think, but in the meantime we’ll move on to things slightly more photogenic – we’re building up slow.
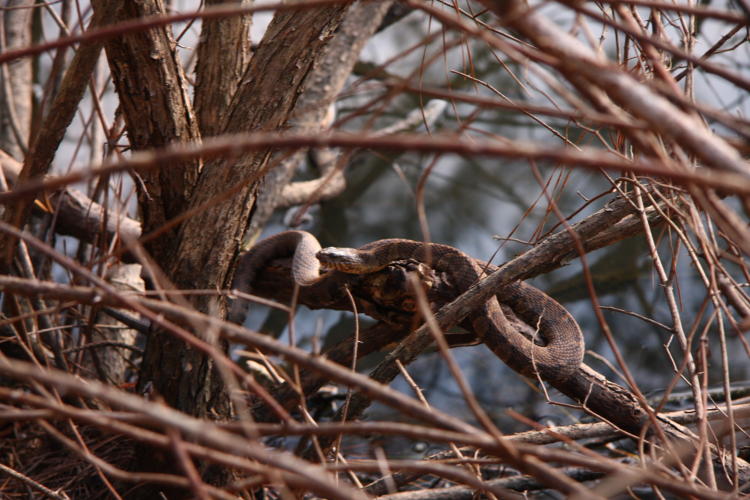
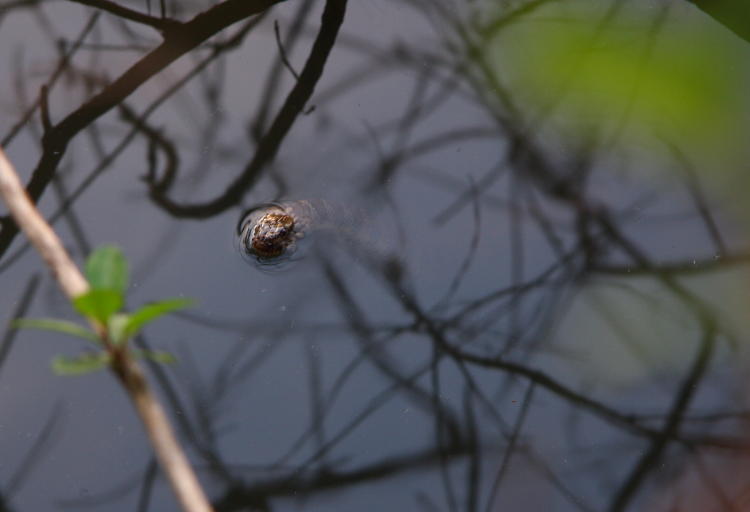
On the same evening that I shot the month-end abstract for March, I spotted a northern water snake (Nerodia sipedon sipedon) basking on a branch at the water’s edge. The light was quite low at this point and I wasn’t carrying a flash, so I did a quick couple of frames, knowing that I was toying with camera-shake from the shutter speed dropping too low, and managed to get enough of an illustrating shot, provided that you don’t get too close. Unfortunately, old habits die hard, and while I’ve been shooting with a camera body whose pop-up flash hasn’t worked for years, I forgot that I wasn’t using that body, but another that I’ve been rebuilding, one whose flash works just ducky – I could have gotten a better pic, had I been thinking. Anyway, as I went in for a closer shot, I was too incautious (or the snake overly cautious – I like that one better) and it shot into the water without hesitation. Then, as The Girlfriend pointed out, it popped up again almost immediately and sat there watching us.
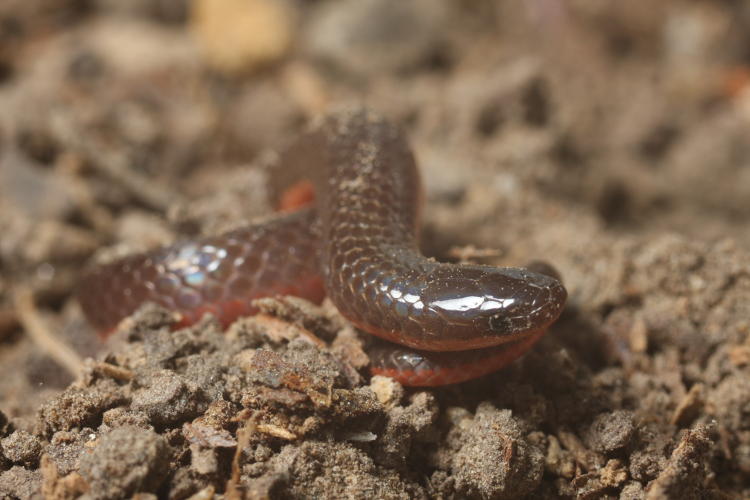
I’ve been by the same spot a few times since, but it’s been mostly at night, and so far I haven’t spotted the snake again. We’re still at a point where the evenings can get a mite chilly and it’s been hindering the movement of the snakes, at least. During the warmer daylight hours, there’s likely more activity. That was at least in evidence the other day when I was doing yard work and stirred up a tiny example.
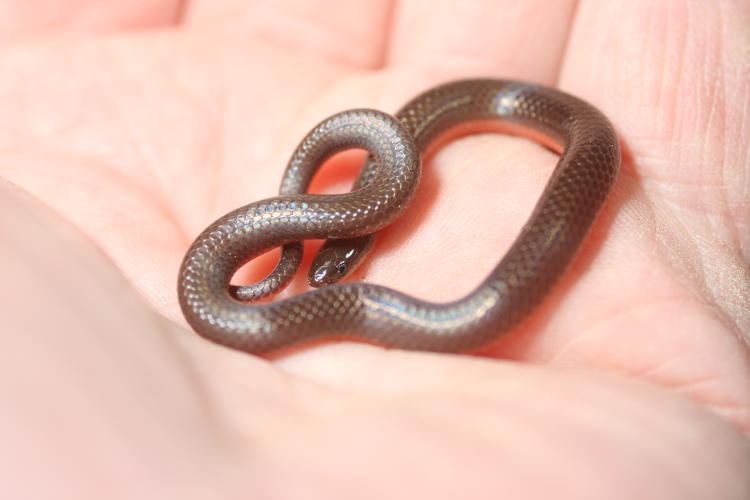
True to its namesake, this worm snake (Carphophis amoenus) is perhaps slightly larger than the average earthworm and a little more brightly colored, but otherwise it’s easy to mistake for one, at least if you’re not used to them – if you are, however, they move entirely wrong and are visibly not sticky, so when I turned it up in leaf litter I had it in hand before two seconds had passed. Then after I finished with the yard work for the day, I attempted a little photo session, which is a lot more challenging than it might sound. Provide enough of a natural-looking setting, and they’ll do exactly as their habits dictate, which is to disappear under it, and I spent a few minutes alternating between unearthing it from the litter and snagging it as it shot out of the shallow baking dish that I was using as a ‘studio’ and hurtling off across the table on the back porch. Eventually, it paused long enough to do a couple of portraits, and then I needed a scale shot.
As usual, I was shooting alone, though in this diminutive case I could probably have convinced The Girlfriend to do the holding, despite her dislike of snakes in general – even she finds these guys cute. Nonetheless, I carefully cradled my model in my left hand until it settled down faintly coiled, then juggled the camera one-handed (including removing the extension tube from the lens and resetting the flash power) to shoot the snake in my own palm. The manual lens from a medium-format camera doesn’t provide auto-aperture – I usually adjust this with my left hand – so this is shot wide open at f4 with the subsequent lack of depth. I might be making things harder on myself than they need to be sometimes…
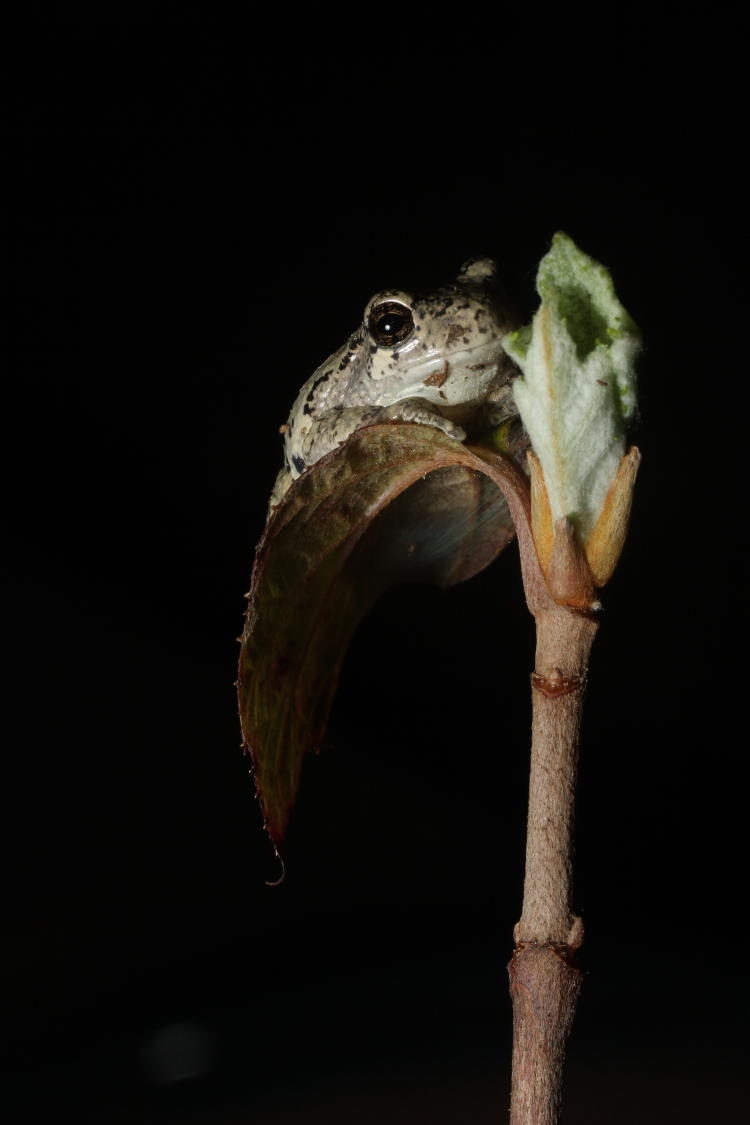
I have, time permitting, been checking on the amphibians in the backyard – I see the occasional green treefrog and less occasionally a Copes grey treefrog (Hyla chrysoscelis.) One evening, a recent emergent climbed the potted oak-leaf hydrangea sapling (Hydrangea quercifolia) and posed fetchingly on the new leaves thereon.
I’m still waiting to determine how many will be active in the yard this year. We had plenty of new hatchings last year, though a lot of the tadpoles and newly-emerged frogs went unidentified, but the odds were favoring the regular residents, which are these Copes greys, the green treefrogs, and the aquatic green frogs. We have several that live in the little backyard pond liner now and seem to be doing very well – they’re always the first to peek out, but also the hardest to photograph since they’re also primarily nocturnal but very spooky. I have been trying, so far unsuccessfully, to photograph one peeking out of the water, but the other evening I managed to creep up on one sitting on the bank instead.
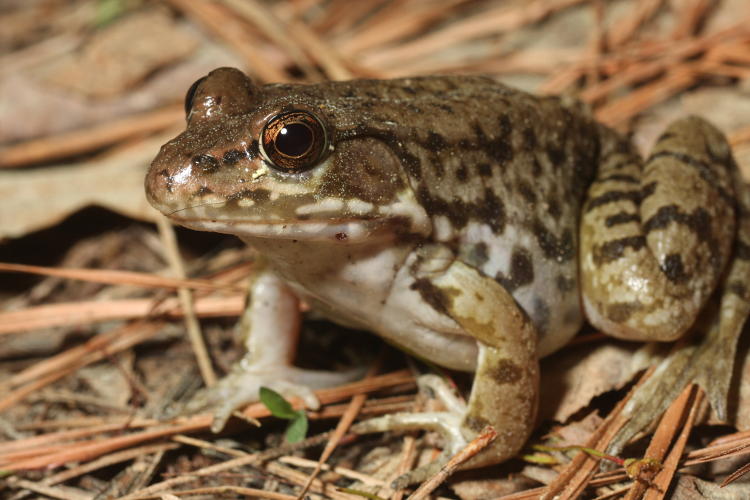
As I mentioned, this is a green frog (Lithobates clamitans,) extremely common in North Carolina, and we always have residents in the pond, though they appear capable of sharing the water with the treefrogs during tadpole season. Let’s go in tighter on that same shot for some eye detail.
I happen to like that little bronze filigree pattern, I have to admit. The overall length of this specimen was about 7-8cm, average for the species, but the size and coloration can vary a bit. As one example, I present another from the nearby, larger pond (where the water snake was) that had a solid 1-2cm in body length over the one above, sitting patiently on the grass since it likely knew that the water was a little too far away for a clean escape. However, the headlamp that I use also helps, since they’re dazzled by the bright light and thus hold still better.
I was seeing how much detail I could get from the eyes before it leapt away, and this was as close as I could get without the extension tube. But I caught a few other details as well, ones I wasn’t aware of until examining the photos on the computer back home. The scarring on the nose is obvious enough – not sure why I didn’t notice it then – and I couldn’t tell you what produced it, but it’s extensive, isn’t it? The other, much more subtle detail is atop the eye, where a small aquatic insect perched – I’m thinking it’s a form of springtail, but don’t have enough detail to be sure of that.
And one more thing, paying attention to the eyes again. The big white circle from the flash diffuser is clear enough, but then there are three points of light in there as well; these are from the headlamp, which I should probably remember to shut off when doing my shots. They’re subtle enough here, but might become distracting in other circumstances, and I have a focusing light embedded in the flash diffuser anyway. The lack of pollen across the skin of the frog tells me it wasn’t long out of the water, because, seriously, I can see the stuff passing through the beam of the headlamp like sleet.
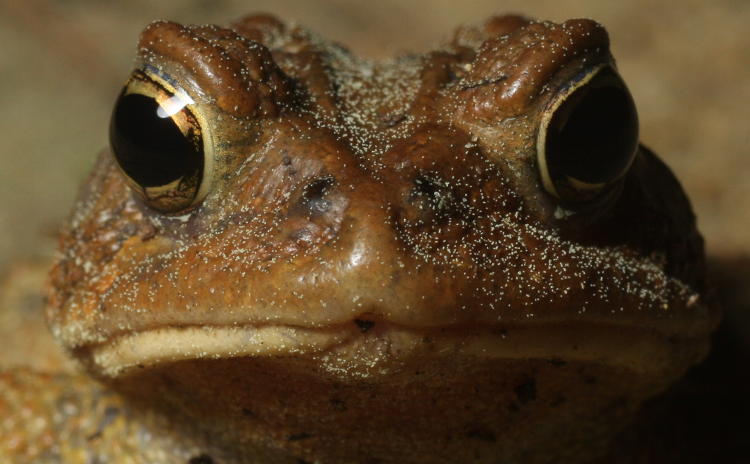
My last shot, from the same location but a few nights earlier, also demonstrates this pretty well. This is an American toad (Anaxyrus americanus,) stoically waiting for me to finish my shots and get the hell out of its face.
Actually, despite the dyspeptic visage, the toad wasn’t being patient at all; it was simply confused by the light, though I’d used better habits for this one and shut the headlamp off when the focusing light was on. Immediately upon my standing up and switching off the focusing light for a moment of total darkness, the toad leapt away – whether it was the sudden change of lighting, or that it could now see that I was right in front of it, it became aware of its danger and hopped a meter or so off in a flash, so abruptly that I was startled to find it missing after I switched the headlamp back on. But yeah, I do like my disturbingly close portraits, don’t I?
This week, we have, ‘the other side of the story.’ Or perhaps, ‘what it really looked like,’ except that it’s not because it’s in monochrome and I still have color vision. Maybe it should be just, ‘what a photographer might get up to when experimenting.’
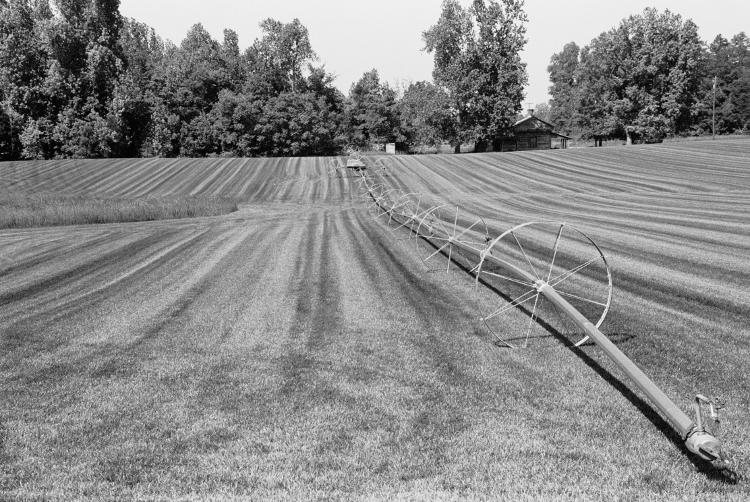
Thirteen years back, after discovering that my digital camera then could do infra-red shots with the sole addition of a filter, I’d taken a day to go out and do a bunch of shooting while the film camera was loaded with B&W film. I have only a vague recollection of where I was at the time, since I was touring around in the northern part of the county where I didn’t often go because, really, the only thing that’s up there is farmland, and it doesn’t even lie along the route to something else. Of course, now I’m going to have to pore over a map and try to determine exactly where I was…
Anyway, the reason I’m featuring this here is that it’s the counterpoint to this image, which was in infra-red. It demonstrates the significant difference between the two, an almost-but-not-quite negative inversion; this is because foliage reflects IR very well while a clear blue sky reflects/transmits practically none, and of course the sprinkler itself and the barn in the background got their own contrasting effects. Actually, I’m a little curious now as to why the barn shows so darkly in the other version, because most buildings have a mid-range, grey effect, but it might simply have been from the contrast alteration that I did for fart’s sake since the sky in the original wasn’t quite that dark either. And I have to admit that, since I was experimenting, I didn’t really think to shoot the same scene in color for the third perspective; I didn’t know how well the IR version would come out, and that it would become one of my gallery shots (though I now tend to favor the vertical crop of it more, I think.)
But I think it also shows that I was concentrating more on the IR version, because that one’s framing is much better than this – the trees were not cut off in that one as they were here. Perhaps I recognized that the contrast in simple monochrome really wasn’t significant enough to make the photo striking, but in infra-red it kicked it a lot better.
This, by the way, is a little foreshadowing of a project that I’m in the middle of. Hopefully, anyway. If it works out, you know you’ll see it here – well, not right here, but elsewhere on the same blog.


 Don’t get the impression that I’m disregarding other songs that have perhaps charted better, like, “A Sky Full of Stars,” or their duet with The Chainsmokers, “Something Just Like This,” which are also powerful songs; I’m featuring this lineup both because they’re my favorites, and because not everyone has necessarily been exposed to them. But yes, a little bit of current (more or less) music sneaks into my playlists, as long as it works pretty well – yet listening to any radio station for longer than a few minutes manages to piss me off significantly. So I’m still maintaining my curmudgeonly status.