


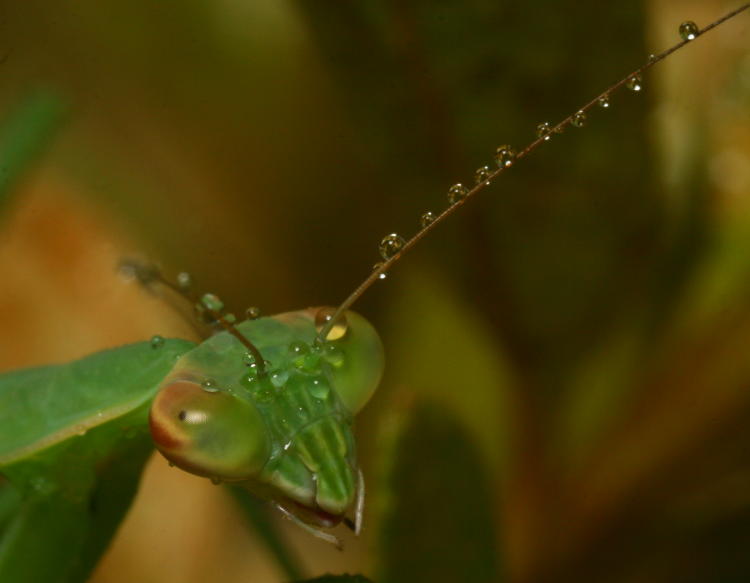
Having my fun with some very recent photos (like, within the past 90 minutes.) More will be along in a bit – I just wanted to throw out the (entirely incorrect) impressions I got from this Chinese mantis (Tenodera sinensis) after misting it tonight.
Why’s it so herony?

I went back to one of my old haunts a short time back, meeting with a student that lived nearby, and arrived a little early, so I poked around a bit because it’s very professional getting soaked in sweat when you’re about to meet with someone new, you know? Let them see you at your worst, and everything afterward will always be better. I usually don’t brush my teeth either.
 Anyway, I’ve been going to this place, off and on, for close to 20 years now, and am used to seeing a great blue heron (Ardea herodias) or two when I’m there. In fact, I think I still have a slide buried in the files of one taking off from a branch overhead, where its wings on the downstroke came and touched themselves in a circle underneath the bird. However, for reasons unknown, the place seemed to be overrun with them this particular day. I was seeing them everywhere I looked, often in multiples. It would be easy to believe I was seeing a nest or three of newly-fledged youngsters, this year’s broods still hanging out and being fed by their folks, but none of them looked like young ones, and none of them were displaying any form of begging behavior, or notably close proximity (save for one pair, below.) I think I stumbled onto a convention, or perhaps a plot.
By the way, I couldn’t resist framing this one alongside some abstract fecal splashes – herons can defecate out some serious loads, and such stains can often be found on favorite perches in the area.
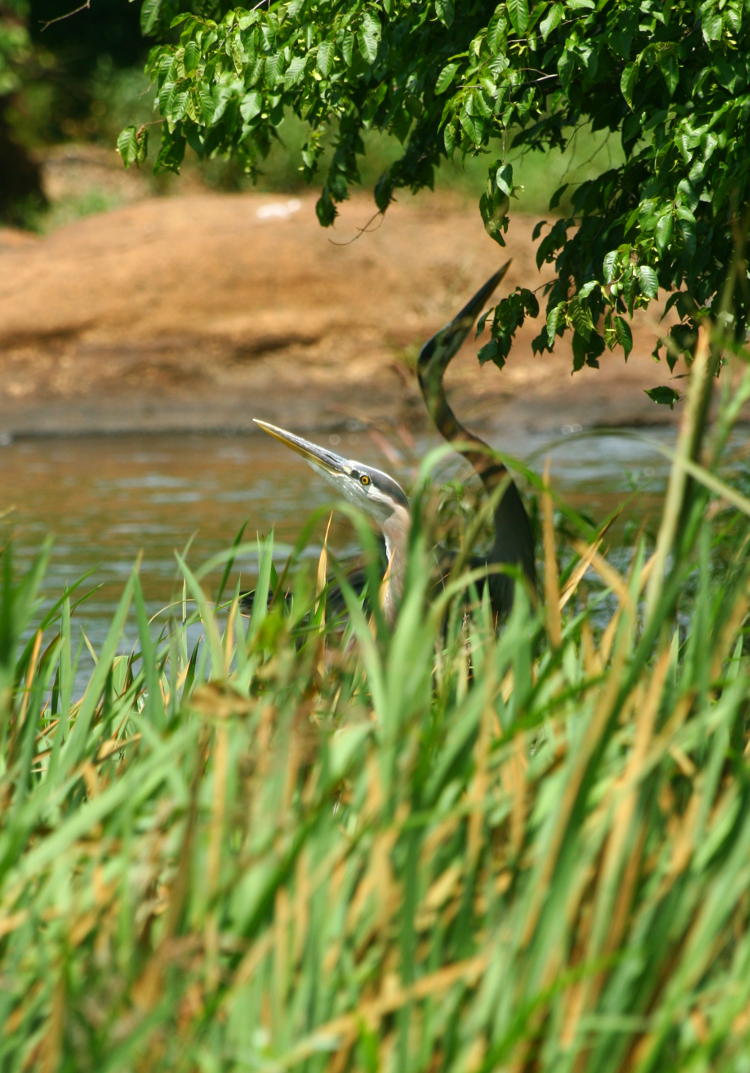
I’ve also seen herons hanging out in popular fishing areas, since they can learn to steal live bait, but I’ve only observed this in Florida, plus the fact that it was a slow day with only two fishing folk visible, and none of the herons being conspicuously close to them. Like usual, they were maintaining a circumspect distance from people; I even spooked one from an overhanging tree when I ventured down onto some rocks in the river for a shot. I can’t speculate on why the numbers were so high this day, is what I’m trying to say. And you should know by now, if I can’t figure it out, no one else is going to have the answer either. In all humility, of course – it’s just facts.
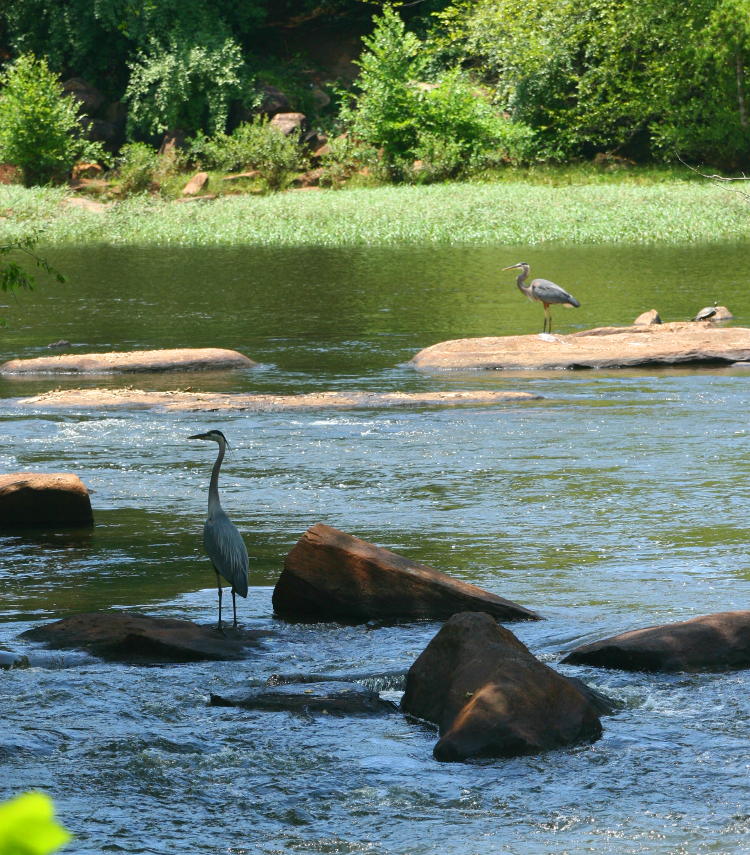
I paid attention to the news for a few days afterward, wondering if there were going to be stories of some kind of incident down at the river, perhaps an alert for everyone to stay in their homes and avoid being seen with fish sandwiches, but nothing ever came of it. It’s entirely possible, I admit, that my presence with the camera, getting recognizable photos of the ringleaders, thwarted something dastardly that would have gone down otherwise. And had I not been such a well-known and easily-missed public figure in this region, I might have disappeared myself that day for the very same reason. You never know.
Or, they may have been forced to keep their distance due to the reek of body odor. Have to consider all of the plausible scenarios.
Per the ancient lore, part 17

This week we’re back in the Beach folder, but what we’re doing here and how we might escape, no one can tell. What can be told is where this was taken, because like damn near the rest of the Ancient Lore pics so far, it was taken at my wading area on the Indian River Lagoon (hey, don’t give me shit – an awful lot of my arthropod photos in the past ten years have been taken in my yards, because I finds my subjects where I finds them, and we don’t need no steenkin’ passports!)
I suppose I could look through the weather reports for that time period in Florida, to see what the weather had been like immediately preceding this – I suspect we’d had at least some fierce wind activity, which drove the normally placid waters up against the shore in waves to erode away the sand there and leave these cliffs, which stand perhaps 20cm high or so. Come to think of it, this might have been the result of conditions like this, which was taken twelve days before about a kilometer south. What I find most interesting is the striations of course, mostly because there’s only two distinct colors despite countless layers being deposited – what are the main compositions, and where do they come from? I’m slightly inclined to consider them seasonal, aspects of bacterial growth between colder and warmer months, but it might also be evidence of local winds driving, for instance, silt from a freshwater inlet either north or south of this point, and not found in a very broad section of the river. [Sigh] Okay, fine. Go ahead and secure the funding, and I’ll drop down there and get samples to analyze, because yes, this is a question that should be answered.
And while I’m at it, I’ll take a few more images at tighter framing, leaving out everything that betrays scale and providing a few more month-end abstracts. But they’re not going to be worth converting to monochrome, which may be obvious – I tweaked the colors in this frame to eradicate the tendency towards blue from the open shade conditions, and observed that each of the color channels was practically identical in their individual histograms, a nice rounded peak almost perfectly centered in the graph. There are not very many images that I take that even come close to such, so, enjoy this geometric marvel today.
How to become way too self-conscious
I am going to disappoint legions of people doing a websearch on that topic, hoping to develop their neurotic tendencies better, because this is going to apply only to a specific subset of people, but then again so does everything I post here.
I had mentioned earlier both my weird-ass schedule and the fact that the backyard pond was hosting several hatchings of tadpoles, and one of my regrets is that, on two separate occasions, I was unable to photograph the eggs I found deposited therein, especially as they neared hatching, because of free time. However, as at least one group of tadpoles nears emergence from the pond, I was able to get a few useful pics.
It all began a few days ago, as I was misting the Japanese maple out front for the benefit of the praying mantis living there and noticed a teeny juvenile treefrog hopping across the phlox leaves below; I didn’t have the camera handy, but it prompted me to go out a little later on at night and look around with the headlamp. Spotting another on a weed in the backyard, I fired up the macro rig and came back out to chase photos. Knowing where to find the one, I left it alone for the time being and went slowly over to the pond to see what was happening there.
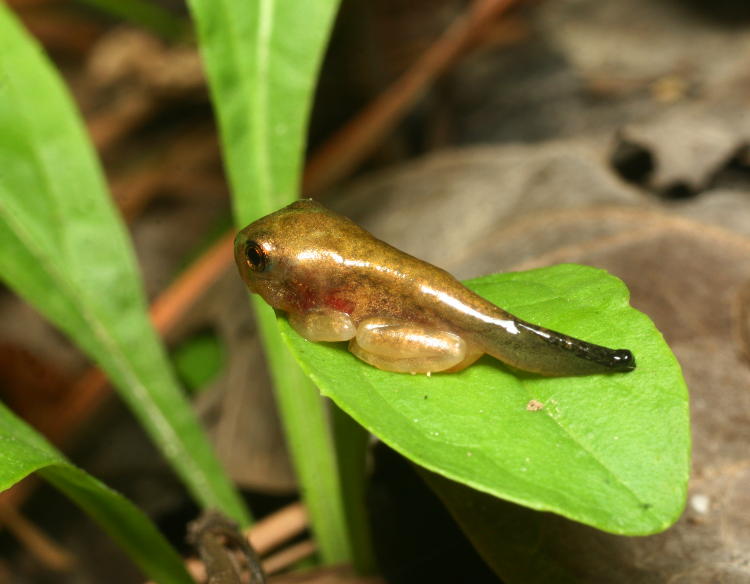
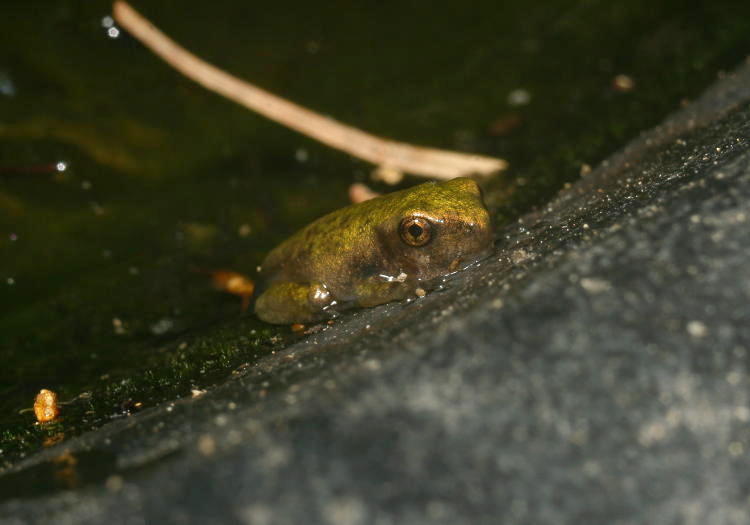
Now, I walk carefully, but the yard is littered with leaves and pine needles in that area because it’s nigh impossible to keep them cleared away for very long (and if I don’t have time to shoot cool things, you think I have time to rake?,) and things can camouflage easily against such a backdrop. Almost right at my feet, centimeters away from the pond edge itself, I found a tadpole sitting forlornly on the ground, mostly visible in its reflective dampness rather than its coloration. As I went in closer, however, I could see that it was more developed than it initially appeared, having emerged from the pond as a legged juvenile, just sporting a still-lengthy tail.

I ask that you excuse the images that seem a little washed out; some of the photos were taken with the flash manually set a stop low, since the power setting sits underneath the flash where I don’t see it readily and I stupidly forgot to check it, so the images have been bumped up a bit in editing.
The leaf should be providing a good idea of scale, but just to be more accurate, this one measured roughly 20mm in overall length. However, we’ll have some more visual scale displays coming up soon.
After shooting this guy while sprawled on the ground, I put out my hand to get up, glanced to the side, and found another perched on a small weed, far closer to my hand than I really liked. [Confession time: After unloading the memory card and finding that I’d underexposed the shots, I went back out to chase the same subjects with the proper settings – and yes, I was occasionally glancing at the LCD screen on the back of the camera, though I don’t do this routinely, and the images looked fine therein, especially at night when the screen glows relatively brighter to dark-sensitive eyes. You just can’t trust the LCD to tell you much at all.] Suddenly realizing that, with the huge number of tadpoles visible in the pond itself, there could be emerging froglets everywhere, I became extremely self-conscious of where I was stepping and how hard it would be to spot everybody. Walking around, end even shifting position while belly-down and macroing, became a very cautious affair.
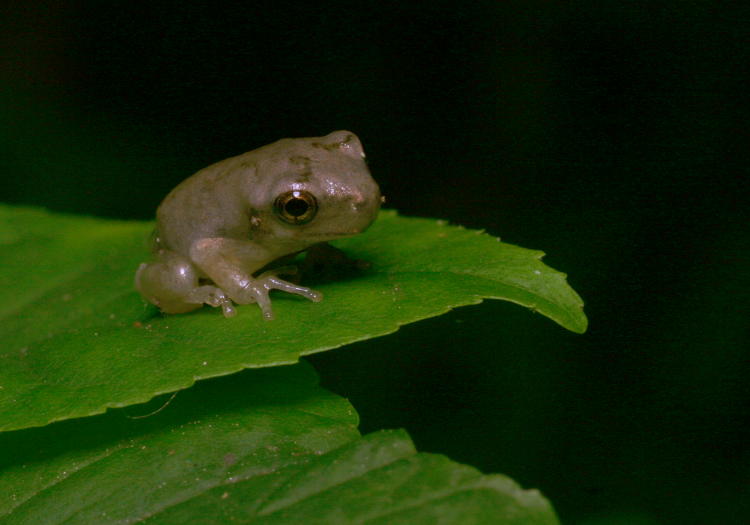
With proper exposure now, the iridescence of the skin becomes much more noticeable, but from even a short distance they can appear fairly dark, and of course while in the water they appear, from the surface at least, to be nearly black. Based on size, and the fact that I’ve mainly seen Copes grey treefrogs (Hyla chrysoscelis) in the area this year, I’m going to tentatively identify these as such, but that’s with a low level of confidence; we also have resident green frogs (Lithobates clamitans) and quite possibly some varieties of chorus frogs, and none of them bear much in the way of identifying characteristics at this size.

However, looking at the toe pads, I’m pretty confident there are at least some variety of treefrog and not the green frogs, which I also suspect would be bigger upon emergence from the water. This one showed awareness of my presence by being slightly antsy and changing position a little, but I’m quite sure all of them knew I was there, and primarily relied on the (fairly effective) camouflage method of ‘holding perfectly still.’ At their size, believe me, they’re supremely easy to miss, and it’s only because I’m looking for such things, nearly every waking moment, that I can find them so often. As I’ve said before, it also helps to be aware of what ‘doesn’t fit,’ the break in expected colors, patterns, or shapes that tells you, “Hey, that’s not just a bit of yard debris.” And for the second shooting session, I added the extension tube to the Mamiya 80mm macro lens for even higher magnification, because we all need a frogpole portrait.

That little mouth is very cute, a cartoonish single line that seems to express resignation or ambivalence. While, if the frog possessed any analog of human emotions, it was most likely feeling anxiety over my presence, but this is hard to define in any useful way, as we’ll find out shortly – because I was a) hidden mostly by the glare of the lights I was using to spot and frame these, and b) not displaying the traits of the typical predators, this potential anxiety might have been less than we imagine. On this second session, the one I’d spotted initially had disappeared, but I soon found it half a meter away on the questing tendrils of Virginia creeper extending towards the pond; it was heading out into the Big Wide World, but of course doing so into an area that would make it even harder to spot while not actually getting out from underfoot. I can’t deal with this kind of stress.
You remember, of course, that these were the second find, and I returned (in the initial shooting session) to photograph the first one I’d spotted, perched on some leaves near the edge of the old garden. While roughly the same size, this one was much duller putty grey in color and showed no signs of a tail anymore. Same species? Ya got me, pilgrim.
But at least you can see the beginnings of markings on the head, though the telltale white patch that sits under the eye on the grey treefrogs isn’t visible – yet? If I thought I could keep it fed and happy, I’d consider enclosing one in a terrarium as it grew into adulthood, just so I could photograph the entire development while being sure that I was seeing the same specimen, but I try to avoid captivity of that nature, so for now we’ll just have wild guesses as I find examples that may or may not be related to ones I’ve seen before.
Meanwhile, as I was stalking the first, another was spotted very close by, and provided a more dynamic pose.
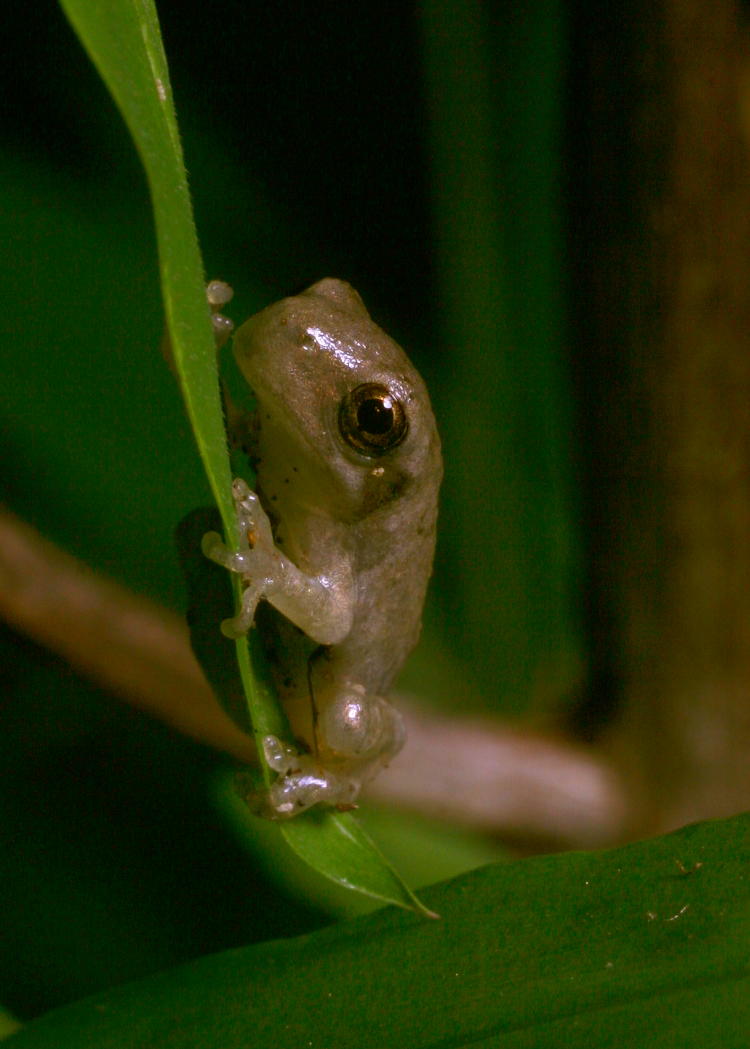
That might be the first hint of the white patch under the eye – or it might simply be a trick of the light. But look at those little toes wrapping around the leaf edge.
So I mentioned both better scale and a refutation of the anxiety of my proximity, and thus I now present both in the same photo.

While I had to capture the frog to achieve this shot, it remained here with no visible reluctance, and in fact, the first one pictured at top climbed onto my finger quickly as I gently nudged it to see if it was indeed a tadpole that had managed to strand itself on land somehow. Treefrogs seem, in my experience, to rely on their ability to leap away if things seem unkosher, and are often blasé about contact – though I’ve also found them eager to get off when I’ve scooped them up gently too. But dangerously stressed out about human contact? Not to most appearances that I’ve observed. They stress me out more just by being so hard to spot and possibly where I’m walking.
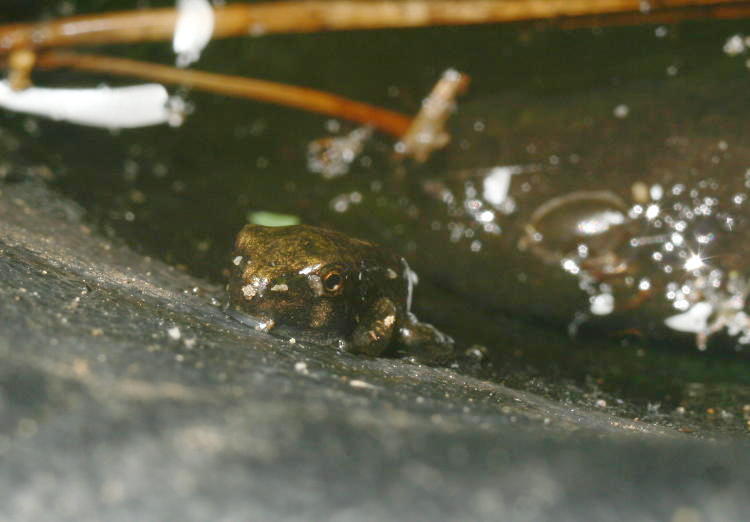
The following day in bright sunlight, I went back to the pond to see what could be found, and not only saw another emergent on the ground near the pond (with virtually no tail to be found,) I also spotted two clinging to the walls of the pond liner, like a youth who has learned to swim but remains right at the edge of the deep section of the pool. And while they might have been facing the aspect of dry land with some trepidation (again, who can say?) they certainly allowed me to loom in close with the camera to capture them for posterity.
Oh, not close enough, you say? You know better than to be disparaging of me like that.

I could have aligned these differently here I suppose, but I’m frequently at an odd angle in order to capture my subjects; in this case, I was aiming almost straight down along the near-vertical surface of the pond liner, while the frog literally sat on the line between wet and dry. Given that, it’s now easy to imagine that extended foot tentatively testing the dry area to see how skeery it is. Nonsense, of course, but I still enjoy introducing impressions from my pics.
Meanwhile, the second one was in a trickier location, and this is as close as I could get. The pond was placed with the idea (almost laughable now) that I would create a waterfall torrent feeding into it, and so this was the upslope side, as well as being largely shielded by the lizard’s tail plants that are trying to hide the water surface completely. Curiously, many hours after this pic, this little guy was in the same position, though by the next day it was gone.
But while getting those, I swept the small net through the water, pulling up a score of tiny tadpoles, the most recent hatchings, and a pair of older models. This one is perhaps a tad larger than the ones you’ve been seeing in this post, but the tail was noticeably larger and more tadpolelike, so there’s speculation that it’s a different species, but who knows? It could just be a normal variation in size or development. The toes still look treefrogish (spellcheck still valiantly, though vainly, reminds me that I’m creating new words.)

This one was still aquatic, but didn’t seem uncomfortable perching on my finger, even when the water surface was just a few centimeters below it and escape would have been effortless. It actually clung to my finger for an extra moment or two after I got this photo and submerged my hand to return it to the pond, so again, we don’t seem to be talking undue stress here.
Now, that was all a few days back. As I began this draft, it was early evening July 4, The Boogs’ birthday (they’re seven now,) and numerous kind but clueless people were celebrating their birthday by setting off fireworks, which kept Kaylee under the bed effectively (a condition initiated by the violent thunderstorm just a short while earlier.) I was getting the grill prepped, and glanced over at the deck railing to see a small shape on one support. Thinking it was a larger jumping spider, I leaned in close, only to find that it was another minuscule friend – or perhaps one of the ones I’d spotted earlier. Great. Now I have to be careful of everything I do on the deck now.
 Just to let you know, it’s perched on the upright columns of the railing, which are 2x2s – so, 20mm or so in width. From the coloration, I suspect this is a different specimen than any I photographed earlier, but who knows how fast the color patterns develop? Not I. If anyone has a decent way of tagging teeny little frogs so I can tell them on sight as they grow up, let me know. I’m thinking a tiny little branding iron…
The grill sits under a cover, and I discovered (no pun intended) sometime previously that the treefrogs like sheltering underneath it at times, so I usually scope the whole thing over before I light it up. Now, after finding this fingernail-sized specimen up on the deck, I became even more paranoid and carefully checked out the entire thing with a flashlight – flushing out an adult Copes grey treefrog from a spot that definitely would have gotten a bit uncomfortable.
I may be crowding the text a little alongside this image, depending on your browser and monitor layout, but there’s a reason for this, one that might still be thwarted by, um, your browser or monitor layout. Because I moved the adult away from the grill and deposited it onto the cover I’d set aside, then did a couple of portraits of it as it sat there semi-patiently. Both of these images were shot at the exact same magnification, and are full-frame, not cropped at all. So what you see here is (likely) a direct scale comparison between the two specimens.
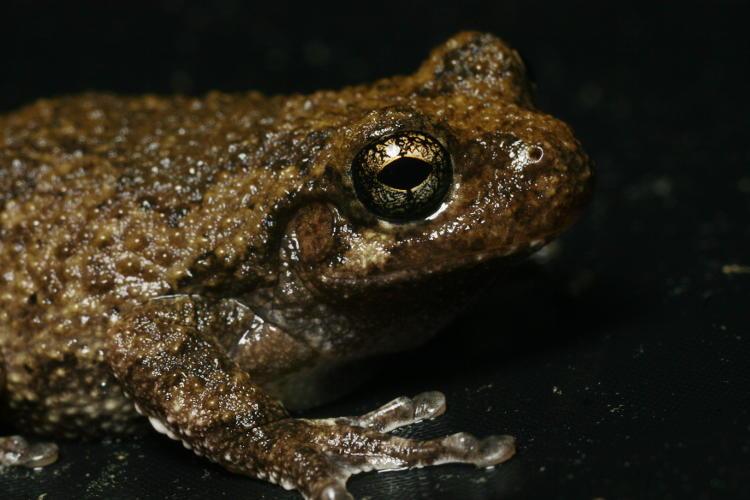
I have to point out that this wasn’t the largest example of grey treefrog that I’ve seen, and even so grey treefrogs are fairly small, smaller than common toads – maybe a hair smaller than a chicken nugget. But it’s not like I haven’t illustrated scale enough here anyway.
I’ll close with one more image of the one from the railing, as it repositioned itself while I was getting food ready a short distance away. I can’t resist the portraits – you know that by now. Bit better magnification this time around.

It’s not coming together yet
I have finally gotten a veritable buttload of pics to post, but unfortunately, cannot do so just yet. Between work and student schedules, various tasks around the house and in the office, and sinuses that are wreaking havoc, I can’t sit down long enough to do a post justice, much less a couple or three of them.
I know what you’re saying: “Jeez, Al, work from a schedule! Set aside key times during the week devoted to maintaining your website and such commitments, and stick to it! Duryay!” Fine – easy for you to say. But my schedule bounces around from week to week, plus of course I can’t dictate when my sinuses will decide to lock my head down in a vise, and all that, so put a sock in it. The bouncing schedule, at least, will be taken care of soon enough, one way or another.
In the meantime, I will slam out some quickie posts just to show I’m not dead – unless of course I’ve written an artificial intelligence program to automate my postings, with access to the stock photo folders, and have at some time in the past died from a decongestant overdose. But you know that hasn’t happened, because no robot could write anything with this much panache – as cool and sexy as robots are. Man, robots could make our lives so much better, if only we’d let them.
Anyway, here’s a mantis from yesterday. While none of the egg cases I got this year seemed to have hatched, nonetheless there are several mantids in the immediate area. I find it interesting that, in this ridiculously hot and dry weather, I can summon them with a misting bottle: hit key areas with a heavy coating, and if there’s a mantis around, it’ll come up to the upper leaves to get a drink. This one was quite pleased with my actions, and thus posed readily with a nice string of droplets along its antennae, and I was able to get them and the eyes in the same plane of focus.
More will be along before too long, I promise. And if you can’t trust the word of a sentient computer program, what can you trust?
On the heels of June
… comes an abstract, of course.
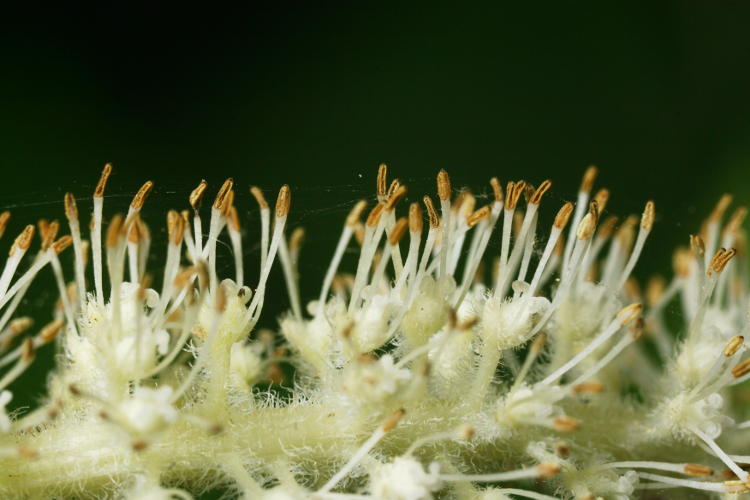
June was a pretty lean month for me, photo-wise, and my choice for abstracts was minimal. What we’re seeing here is the first flower blossoms from one of my pond plants, known as a lizard’s tail (Saururus cernuus.) The plants had gone in a couple of years ago and always did well, but this year they surpassed themselves, making a desperate attempt to get out of the pot and take over the entire pond – most of the water is shaded by their large leaves right now. This doesn’t seem like a bad thing, because the frogs are quite happy with this and I’ve had at least two separate broods of tadpoles rear themselves within – I’ll probably have a few photos of them coming along shortly.
Those webs that can be seen stretched across so many of the blossoms, if you look close, are quite small, and I couldn’t tell you what made them – I may not have even been able to see the culprit had it been right in front of me, since the entire spike of flowers was perhaps 16cm in length and not 2 wide. But that’s not really a good way to express the scale, so here’s a photo that works much better:
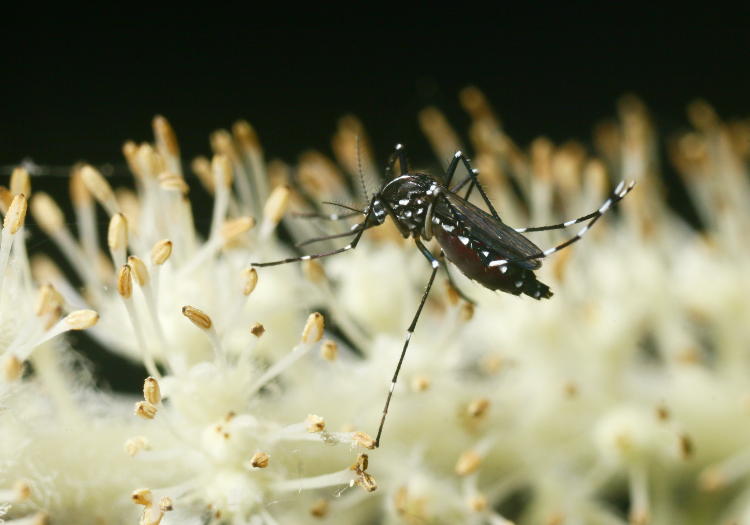
Yes, that’s a mosquito, and it’s even possible that you’re seeing my blood swelling that abdomen. We do treat the pond (and rainbarrels) with mosquito bombs to halt the growth of larva, but that doesn’t prevent the adults from finding the water sources and attempting to lay eggs anyway.
Per the ancient lore, part 16

As I type this first draft, I have just submitted this image to BugGuide.net for identification, since my initial searches turned up nothing; I have the stopwatch going on my desk right now to see how long it takes before someone replies.
This is, naturally, from the Arthropods folder – actually, the first of six (so far,) because I limit the contents of the folders to around 4,000 images to prevent thumbnail programs from taking forever to open them. Which says nothing of the slide pages in the filing cabinet alongside me. Yeah, I gots a few bug pics…
This trilobite-looking cuss was diddybopping across the sand in my usual haunt on the Indian River Lagoon, back in 2004, and I managed to get a couple of frames that were acceptably sharp – I don’t recall for sure, but I’m imagining that this wasn’t the easiest thing to do, since insects of this nature don’t tend to be lethargic and contemplative; I’ve had more than a few sessions where I did strange contortions while kneeling or splayed on the ground, trying desperately to keep the little bastard in the frame, much less in focus. The old jingling-the-keys trick, which works pretty well to get dogs and kids to pause for a moment and look at you curiously, doesn’t have any effect on arthropods for some reason…
It took me ten minutes to type that above (well, and upload the image and related jazz,) and I have my first reply from BugGuide – yes, they’re that fast, more often than not. That initial guess is family Ligiidae, a member of the woodlouse (pillbug) class often called rock slaters. Which reminded me of the times I’ve seen colonies of similar critters swarming over the rocks in some areas on the coast, though what I was seeing tended to be much bigger than this one. Harmless of course, but the numbers and rapid movements are enough to stir the creeps in most people.
Of the various images that are connected to that family, Ligia exotica, which may go under the colloquial name of “wharf roach,” looks the closest to me, though BugGuide doesn’t provide a range of sizes for the species. But I’m not even going to tag this tentatively as such, because there are so many variations in the arthropod kingdom that there could be multiple, even dozens, of species that look ‘close.’ But, now I have a goal of doing some much more detailed pics of the little buggers next time I see them.
Podcast: Macro video, part one I suspect
I wanted to do this one entirely as a video, but the video clips that I had to work with ended up being too short (or, I guess you could say, I was once again too long-winded) to match up audio and video. So it’s both, a podcast covering the main details and a video to illustrate what I was talking about. I’ll get better at this soon. Maybe.
So let’s start with the audio.
Walkabout podcast – Macro video, part one
It works better if you don’t skip ahead to the video below. And hey, at least this isn’t another towering wall of text, right? I’m trying to accommodate the social-media-bred attention span.
Macro photography, part eight: Tripod or no tripod?
The very simple way to make an external video monitor for DSLRs
The post where I introduce the LED light, which we’ll see again anytime now.
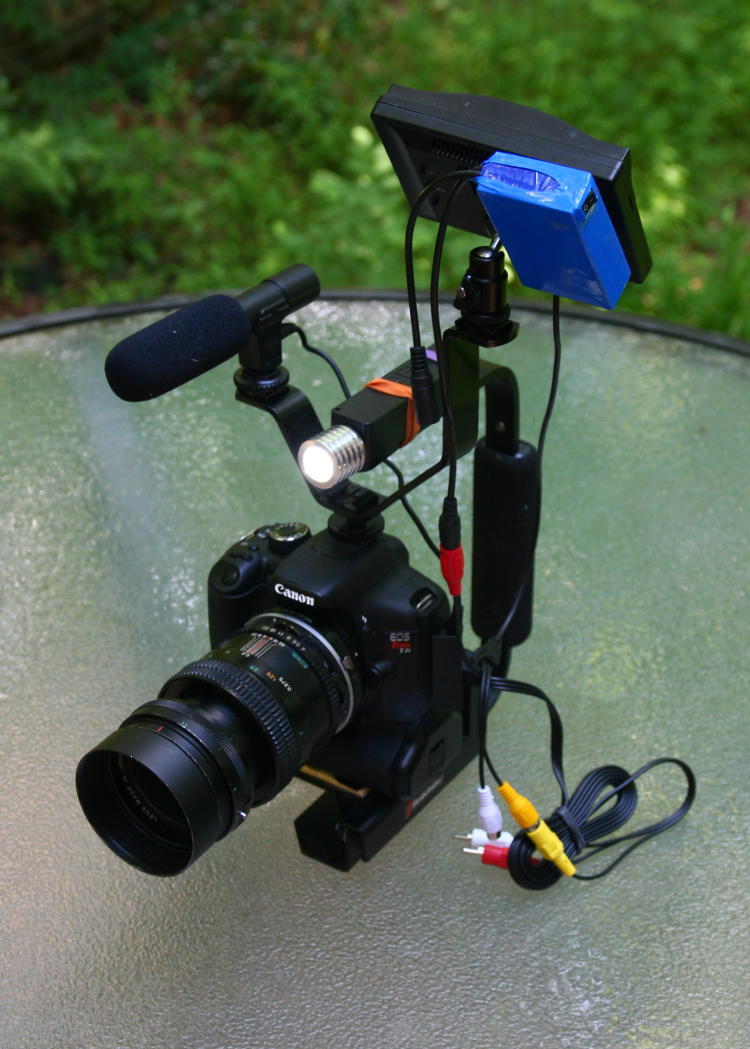
A look at the rig, as it stands now. I fully expect to be changing this, perhaps quite a bit, as I go. I’ll keep you updated.
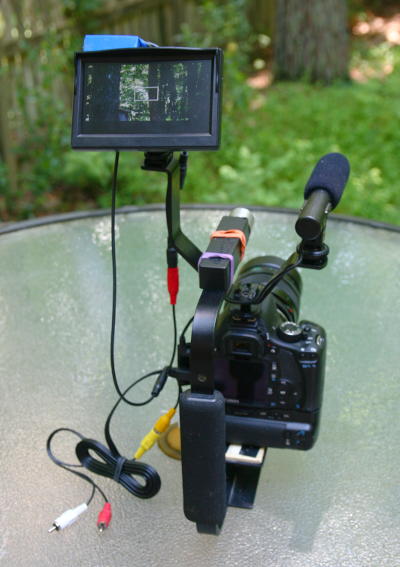 By the way, it took no time at all to realize that an external microphone was pretty much a necessity. because the onboard mic is not very impressive and very sensitive to wind noise. It also helps isolate sounds from the lens. Doing audio recording with a separate recorder probably isn’t a bad idea either, just be sure to start each clip with something that’s both visible and audible to synchronize the two together – I’m not saying that you have to use a movie clapper, but you get the general idea. A starter pistol probably works just fine…
There’s two key components to this particular layout. The main support is a Stroboframe flashbracket, used sideways so the arm rises behind the camera instead of alongside it; this allows the camera to be held at either an upward or downward angle just by shifting grip a little. They make an inexpensive DSLR stabilizer much like this, and I have one, but it’s a little too small to accommodate the camera with a battery grip on the bottom. The second useful bit is that V-shaped arm attached to the camera hotshoe, which provides three separate shoe mounts for accessories like the microphone, an LED light source, and of course that monitor (modified to take a mini-ballhead, which makes it much more versatile.) Not only is this a fairly complete rig, self-contained and easy to handle, but it’s remarkably inexpensive. You can always throw a lot of money at such things, but it’s rarely necessary, and a little searching and ingenuity can save you a bundle.
So, obviously, I still have a lot of work to do in achieving steady results at macro magnifications, and I’ll probably be trying out a lot of different options. I’ll keep you abreast of what seems to be working best, and naturally, if you have any suggestions or solutions, drop a comment, or contact me directly if you prefer. As long as it isn’t something like, “Just give it up, Al.” Even if it seems warranted…
Per the ancient lore, part 15
It’s been a while since we’ve seen any crustaceans – let’s feature some crabs today.
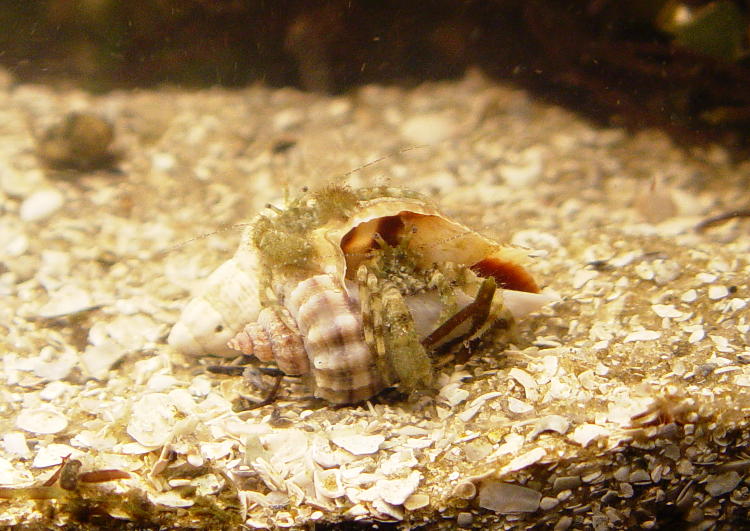
Okay, sorry, I’m not in a rut, this is just one of the earlier images that still held some interest. We’re once again back in the Aquatic folder, on Day Two of the loaner camera and once again shooting in the little saltwater aquarium that I maintained while in Florida. Two of the constant residents within were the transparent grass shrimp that could be found with effort, and the tiny hermit crabs that were virtually everywhere in the Indian River Lagoon. The pair seen here measured perhaps 20mm across the wide points of their scavenged shells, so much smaller than the example seen in The Girlfriend’s hand in that previous post. And I wish I could tell you what was going on here, but I don’t really know. All I can say is that the one in the back tried, for a minute or so, to pull across or roll over the one in the front, which was resisting, but whether this was a mating thing, a territorial dispute (which did not seem to be an issue at all for the multiple crabs I had in the aquarium,) or simply the search for a new empty shell, I can’t offer an opinion. It’s easy to see that the one in the back may not have had any view at all of the occupant of the shell in the front, given the length of the eyestalks, but that’s anthropocentric thinking; they have very long antennae and presumably could tell where one another was even in pitch darkness.
By the way, this is the macro mode of the Sony F717, which was not too shabby on its own. But I quickly tried the lens-stacking trick, putting an Olympus 50mm f1.4 reversed onto the end of the fixed zoom lens that the Sony possessed, and pulled off some wicked magnification – an example can be found here (one of the aforementioned grass shrimp.) I definitely had my fun with the camera.
The dedicated researcher, I
I probably don’t need to tell you that today is Do Additional Research for a Blog Post Day, when anyone who is routinely posting should put aside some time to look deeper into one of their chosen topics. As such, I am meeting with some friends down at an amusement park for further investigation into thrill rides and their peculiar appeal to so many people. Normally, I’d be working or meeting with students or something along those lines, but if you don’t take such holidays seriously, then can you even call yourself a blogger? So I feel obligated to make this sacrifice and do the necessary observations. No, don’t call me a hero – it’s just the onus of a resolute pop psychologist.