I was going to title this post, “It’s something,” to reflect that I’m making the barest effort to have a little content here, but in looking at my list of previous post titles, I find that not only have I used it before, I have started way too many posts with, “It’s.” So I’m not. But I still didn’t have any good ideas for what to name it…
I’ve been ass-deep in projects for the past several days, and they’re continuing, so there hasn’t been a lot of time for photos, much less anything introspective or philosophical or whatnot. I have a handful of video clips that will eventually make it into semi-coherent form, but not until next week at least. And little bits of news, too. But right now, we have largely random schtuff.
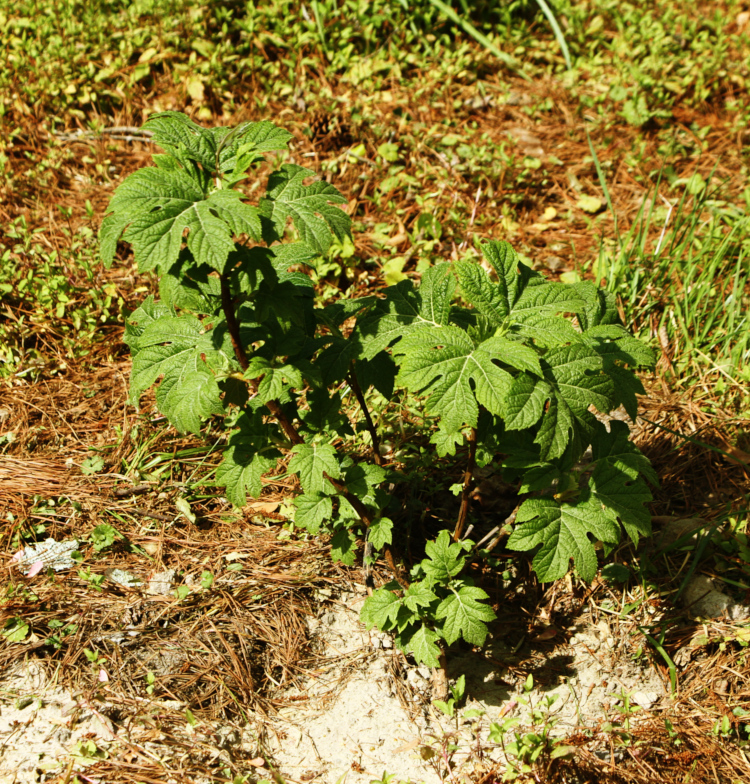
When we moved from the old place, we gathered a few cuttings of the oak-leaf hydrangeas (Hydrangea quercifolia) to propagate them here, but never got them to thrive – we got one to transplanting stage but it failed immediately after, don’t know why. So a few weeks back, we picked up one from a local nursery, and once it was stable and making progress, transplanted that. And we’re happy to say it’s been thriving, so we should have one of our favorite bushes going, with perhaps more to join it.
Yet, I noticed about a week or so after transplanting, it had attracted the attention of a new occupant.
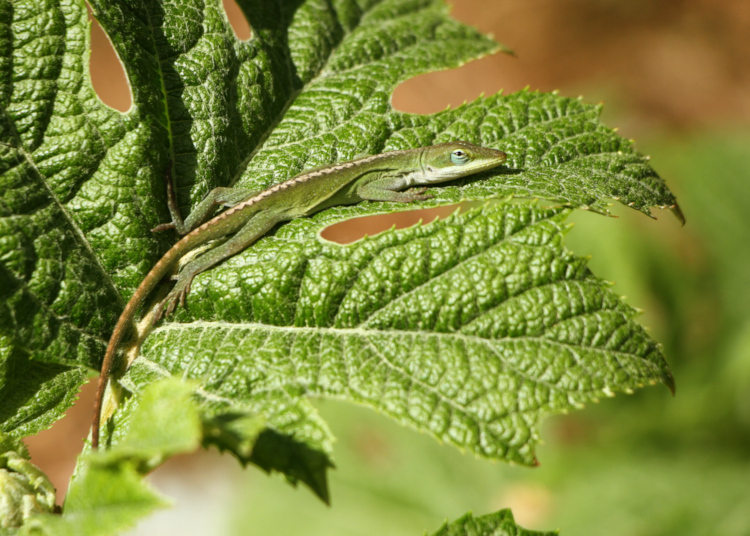
The hydrangeas at the old place had been a favorite haunt of the Carolina anoles (Anolis carolinensis,) and so this one has now been christened. We’re still going through significant temperature drops at times overnight, and the anoles haven’t fully gotten into the swing of things and this one hasn’t reappeared while I’ve been around, but as the spring settles in, we expect to see more of them.
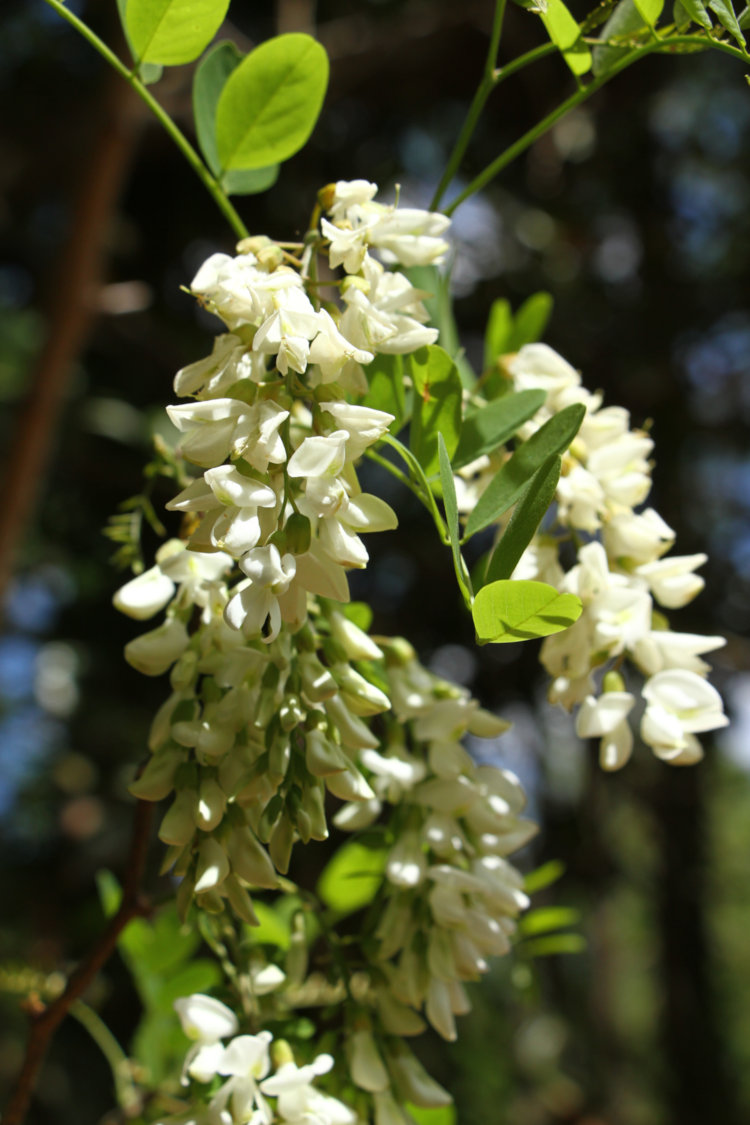
The black locust trees (Robinia pseudoacacia) have produced their blossoms, smelling fantastic as always.
We wouldn’t mind having more of these around the yard, just for the blossoms at this time of year, but perhaps that’s all. While the candy aroma of the flowers is great, the branches themselves have rather nasty thorns, and so it’s better that this sits at the very edge of the yard where I don’t have to mow or clean around them. What we discovered this year is that there are two trees: one produces all of its flowers way above our heads out of reach, and the other is actually a fallen trunk that retained its roots, so these flowers are from new branches that sprouted from that, down low enough to reach. It says something about the thicket that this resides within that we didn’t discover this until now.
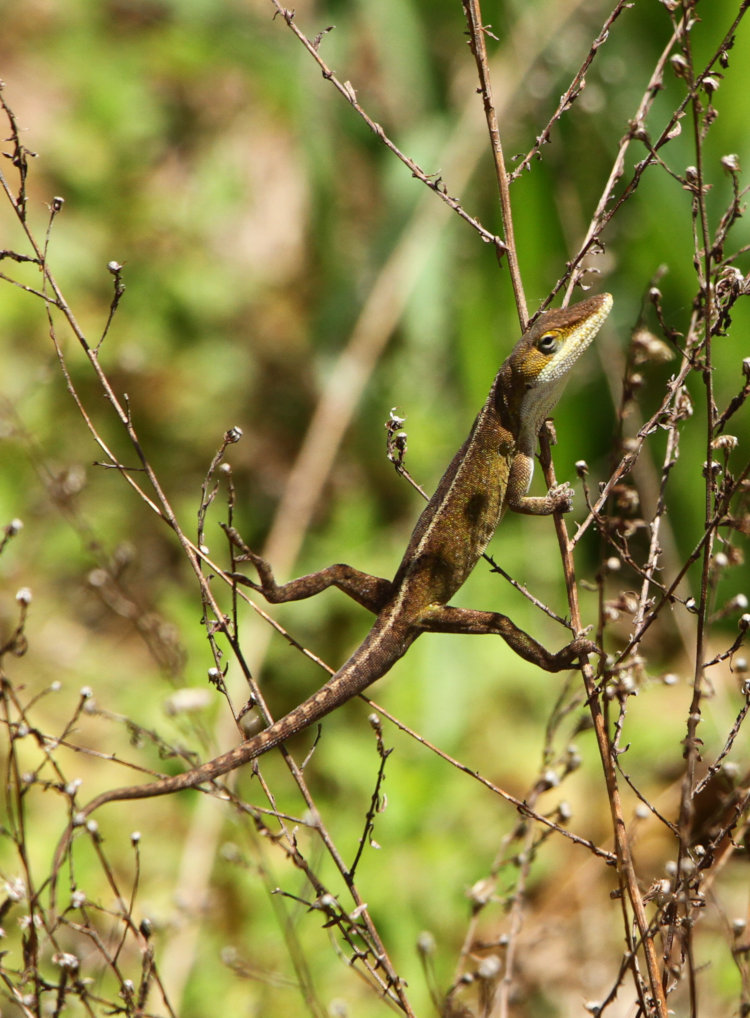
Another anole, this one exactly as found:
Credit to the anole for staying put while I got close enough to get the shot.
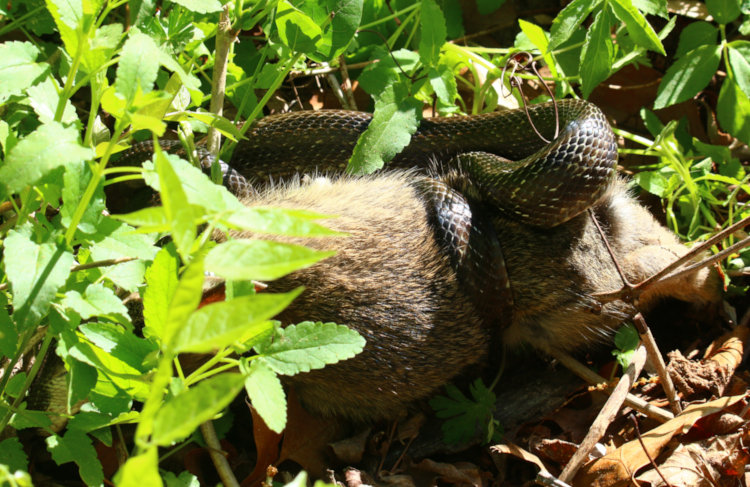
While out in the yard about a week ago, I heard a sustained squealing coming from down near the edge, another thicket, and recognizing it as likely the sound of some smaller mammal that had been caught, I quickly went in and got the camera and long lens. On returning, the cries were fading and coming farther apart, but it was enough to give me an an initial direction to go in. We’d been seeing the red-shouldered hawk hanging out in that approximate area, apparently trying to snag a rabbit that lived nearby, and I suspected it had finally succeeded. I crept up quietly, trying to watch everywhere and see the hawk before it saw me. Meanwhile, a couple of squirrels had started up their irritated barking alarm calls, helping to guide me in. They seemed to be centered in the thicket, which didn’t strike me as anyplace the hawk could strike, so I was starting to suspect a fox or something. As I was peering carefully through the branches and foliage, I heard a faint rustle almost behind me, and found I’d practically walked past the source of the noise, certainly not a hawk.
It seems like every time I feature this (these) species, it’s changed since last time; I can’t vouch for this being correct tomorrow. I was right about the prey, which is a juvenile eastern cottontail (Sylvilagus floridanus,) but not the predator, which it now seems is considered a central rat snake (Pantherophis alleghaniensis.) The last time I checked, the grey pattern that we see around here was considered a regional morph of the eastern rat snake (Pantherophis quadrivittatus) while the black color that I was most familiar with, like this one, was another morph of the same species – now they’re considered separate again. Seriously, I just covered this last year.
The rabbit had ceased squealing by this time, but was still struggling and kicking occasionally, and near as I could see, the snake did not have an adequate constrictive grip upon it. I couldn’t get a better view in the weeds even though it was right at my feet, and had to back off to even get these shots, since the long lens has a close focusing distance of 2.5 meters or so – you’re seeing the rabbit’s hind feet to the right.
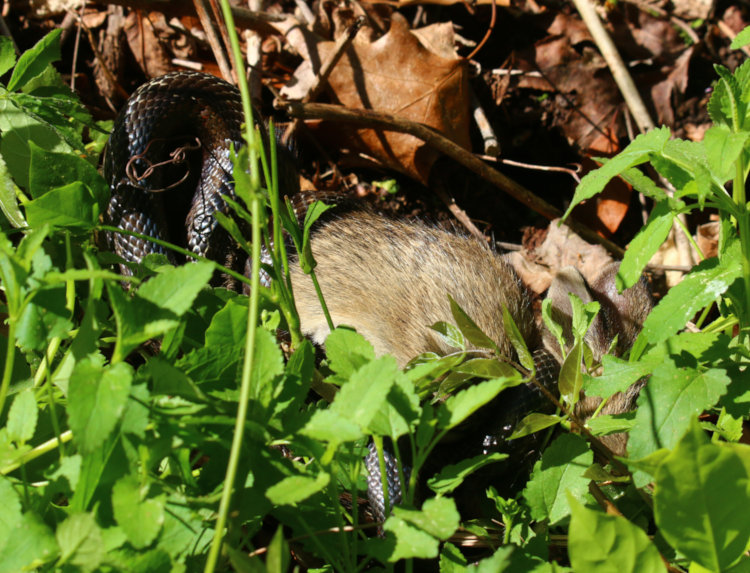
The view from the other side – now the ears are faintly visible, though I never could spot where the snake’s head was. I also had to question whether the snake really was going to get this guy down – we’ve seen before that their judgment is not always accurate. However, I didn’t elect to stick around and watch the drama unfold, since I was still in the middle of projects.
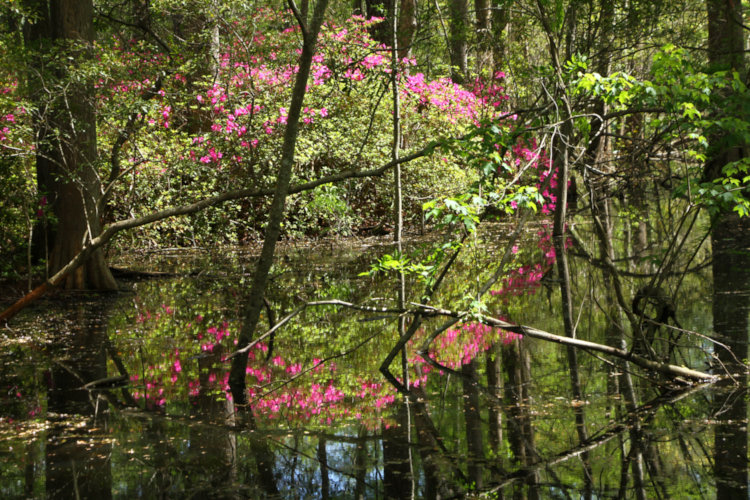
But to offset those a little,
From certain areas of the yard we could see the hint of these azalea flowers through the foliage, knowing they were out on a small island bordering The Bay, but it’s nigh inaccessible. I finally tramped my way around to a semi-decent vantage point, though I could have done without the random branches, but at least I could use the reflection in the still water. A better view would only come from the kayak or by sloshing through the shallows, which we already know can get treacherously boggy. I’ll check it out the next time I have the kayak out, but the blooms will probably have faded by then.
That’s all for now, though more will be along as time permits.
In case you missed it, there was a post specific to moon photography last week, if you were looking to pursue that. This will deal with other kinds of night photography.
Note, too, that a significant amount of my macro work and even quite a few videos are all shot at night, mostly because that’s when certain subjects appear, but also because it’s easier to get close to those same subjects when my presence in lost in the glare of the headlamp. Instead, what we’ll deal with here are specific aspects of night sky, ambient light, and moonlight photography.
Again, a firm tripod and a remote release are almost an absolute necessity, mirror lock-up is recommended for exposure times between 1/10 second and ten seconds, and I’ll add in a headlamp or flashlight to assist in setting up. And another layer of clothes as the temperature drops at night. If the night is cold, a spare set of freshly-charged batteries is also helpful, since batteries lose their ooomph quickly in the cold (it bounces back once they warm up though.)
Now let’s look at some specifics.
Astrophotography, night sky, starfields and star trails. Let me get this out of the way early: A lot of the images that you might find showing the night sky, especially an extremely vivid Milky Way, are digitally enhanced at best, but far too often a composite image. This is especially true when you see a vivid starfield over a detailed landscape. The reason is, getting enough light from stars and the Milky Way, regardless of where you are or what camera you have, requires a long exposure – only the Earth keeps stubbornly turning, meaning the entire sky is moving east to west. You can do three things:a) deal with the movement and have stars that smear across the sky to varying degrees;b) have a tracking motor that moves the camera in time with the sky (which will then smear the landscape instead; or c) paste in a separate exposure of the landscape afterwards. The last option seems to be a common practice now, and it’s up to you to decide if you want to pursue that or not – I don’t, and I won’t tell you how to go about it, since there’s no skill in composite images. Just be aware that the drastic difference in the minimal amount of light from stars, much less nebulae and dust clouds, and just about any landscape you can find is far too great to capture in a single exposure, and even with a tracking motor, getting such stark detail from something like the Milky Way without residual noise and skyglow isn’t going to happen without specific image processing.
All that said, you can capture the Milky Way to a reasonable degree without tricks – in the right location, at the right time, and when the conditions allow it. Specifically, someplace with extremely dark skies, using a high ISO and, for preference, a fast lens (large maximum aperture such as f4, 2.8, or 1.8.) While the Milky Way can stretch across the entire sky, the really elaborate portion falls along the plane of the ecliptic in the summer months, meaning it sits close to the same arcing path that the sun and the moon take across the sky, a certain degree south of ‘straight up’ when viewed from the northern hemisphere (and vice versa.) Stellarium can help you plan things like this, tremendously. The stickler is, the plane of the ecliptic is also where the apparent movement across the sky is the greatest, so the sky will ‘smear’ there faster/more than anyplace else, thus your exposure times have to be the shortest to prevent this. Just as a rough guideline, f4, ISO 3200, 15 seconds. And this only applies to a fairly wide-angle lens, in this case 18mm; going longer means that the movement of the sky will be magnified more and start to show distinctive star trails and smearing.
This will produce nothing if the light pollution or humidity is too high, generating skyglow that might rival the Milky Way, or at least destroy the contrast that makes the details stand out. Get as far away from cities and towns as you possibly can, preferably to the south (if you’re in the northern hemisphere) to put that glow behind you.
The movement and smearing reduces the closer you aim towards the poles. These would be the celestial poles, such as Polaris/The North Star; there is no handy candidate for the southern hemisphere, but the Southern Cross asterism helps indicate the rough spot. The closer you aim towards these regions, the less apparent motion the stars show and the longer your exposures can go without noticeable streaks. This depends quite a bit on your focal length; if you’re really trying to zoom in on a small region, let’s say by using a 500mm lens, that motion will still show very quickly. You will likely need to experiment a lot.
Experiment a lot. There are too many variable to provide adequate guidelines, up to and including how well your camera handles high ISO settings. Do as many exposures as possible, changing settings by small increments, to try and ensure that you capture what you’re after.
Focus. This can be extremely difficult, since autofocus will virtually never snag stars, and even trusting lens markings is too imprecise to be useful. Best bet is to pick the brightest star (actually, planets are far brighter) you can find and focus manually on that, and do test exposures that you then examine under high magnification in the camera’s LCD – make sure you exposure time is short enough not to show star motion. Once you have the tightest focus possible, don’t touch that focus ring and use that setting thereafter. However, as we said last week, redo focus every ten minutes or so because changing temperatures can change the lens barrel and twitch your focus off.
I have also used a distant radio tower beacon light, well over a kilometer away – they’re brighter and easier to find in the viewfinder. I’ve noticed that the Tamron 150-600, even when focused on distant treetops, is somehow not at the ‘infinity’ focus necessary for stars, so be sure to pick a focusing target that’s at least several hundred meters away, the further the better.
Meteors. I’m really not the one to advise on this, given my execrable past history in capturing any, but I’ve also noticed that nearly every decent meteor that’s occurred while I was out shooting was outside the view of the lens. The wider your viewing angle (shorter focal lengths,) the greater the field of view – but also, the smaller any such streak will appear in the frame. Fix your view upon the radiant? Perhaps, but not in my experience, with the exception of just one storm in over twenty years; they might appear to emanate from the radiant, meaning the trail will point back in that direction, but the trails can still be all over the sky, including on the opposite side. My advice is to pick the darkest portion of the sky someplace not too far from the radiant, just to allow longer exposures without skyglow overwhelming the frame.
Meteors tend to show much better after midnight, since the rotation of the Earth now means your view is more into the debris stream that creates meteors. Many sources will list peak times, which are often fairly accurate, and predictions of the numbers, which rarely are in my experience.
Again, experiment. Meteors tend to be very brief and often only marginally brighter than stars, so set an exposure that allows as many stars as possible to show up in a two-second exposure, and then simply lengthen your shutter speeds until the glow starts to overwhelm the frame, and back off a little from that. Too much skyglow or too many/long star trails can obscure what you do capture, so go for shorter periods, more often. It will mean you blow through a lot of frames with nothing to show for it, but it’s digital – discard them.
First long exposure by night, on negative film, with a decent meteor to boot – never surpassed this shot yet, dammitDO NOT end your exposure as soon as you think you’ve captured a meteor – they look better with the context of stars and the landscape, so make sure you have enough of an exposure to capture these too, regardless of how quickly the meteor might have appeared.
A quick tip: If you suspect you might have snagged one, the very next frame should be either extremely short or done with the lens covered. That way, any frame ahead of a black one should be examined carefully when back home for evidence of that meteor.
We all want to capture that spectacular fireball, the bolide that flares brilliantly and perhaps breaks up into separate chunks – I’ve seen them a few times, but never captured one. However, if it does happen to you, shoot several frames of the same section of sky (even if you never captured the fireball,) because residual glow and particles can actually show for minutes afterward, even being blown across the sky by high altitude winds.
Don’t be fooled by satellites, of which there are far too many anymore. Typically, if you see a faint streak in an image, examine the frames on either side of that one, in the same general vicinity, to see if there’s a matching streak, which would indicate you captured a much slower satellite rather than a meteor. Stellarium can also help pinpoint some of the satellites up there, but with more getting added every day, it won’t be a guarantee. However, most satellites only show when they’re reflecting the sunlight around the edge of the Earth, so often within an hour or two of sunset or sunrise. Around midnight, virtually none of them will show.
Satellites as a subject. Certainly possible, though in the majority of cases all you’ll get is a streak like a meteor. The major exceptions are the International Space Station and China’s Tiangong space station, since they’re big enough and close enough to actually resolve to more than a speck – not much more, but possible. Stellarium can plot the major satellites, and this site can plot when the space stations will pass in front of the moon (and the sun, though that doesn’t count for this post) for your location.
Long exposure noise reduction. Some cameras have this, and I’ve tried it exactly once. It froze the camera for the same length of time that the exposure itself had been while it processed the frame, meaning I couldn’t capture anything while that was happening, and thus would only get half as many frames as I would have without it. I say skip it – you can clean things up in post-processing, but you have to actually capture it first.
Star Trails. Depending on your view, you can aim for very long exposures, from ten minutes to a few hours, letting the stars streak across your frame. If you’re aiming at or near the celestial poles, you’ll get circles around these points, while aiming near the plane of the ecliptic will produce much straighter streaks – a wide angle lens centered on the ecliptic plane will produce trails that are straight (ish) in the middle and bow outwards the farther away they get. This is also a great way to see the different colors of the stars better, since they show in the streaks far more than in singular dots.
Lightning. Night is the best time to capture lightning images, since you can leave the shutter open for extended periods while waiting on a strike. Ensure that you are a safe distance from the storm, not directly under trees but with some perhaps twenty meters away (the lightning is more likely to ground to them and not you,) and pay attention to the movement of the storm. If thunder follows a visible strike within 6-10 seconds, pack it up and get inside, or at least in the car.
Try to pick a decent landscape as a setting, and water to reflect a bolt within is excellent. Set exposure to get a decent view of the landscape so you have a nice setting, and as with meteors, don’t close the shutter until you have the exposure for the landscape pinned down, regardless of when a strike occurred – if you caught it, you caught it, and no reaction after the fact will change anything.
Best is to have a fixed exposure time, for instance 20 seconds, and simply let it happen. However, lightning really does follow a faint pattern at times, and strikes may occur almost routinely. Counting to yourself every time you see a strike will help you establish this pattern, and then you can open the shutter 5-10 seconds ahead of when a strike is ‘due,’ increasing your chances of capturing it. As the storm moves, this timing will alter, but you may have 10-20 minutes of semi-predictable strikes.
Have rain gear, for yourself and the camera, and be ready to don it immediately. If you do get wet, make sure you get everything out of the bag as soon as possible, and dry both the equipment and your bag thoroughly before recombining – a wet bag can drive moisture into cameras and lenses easily.
Lightning trackers can be very handy to know when a storm is approaching and from where, but in my experience, their strike location plotting is wildly variable (and will rarely tell you when cloud-to-cloud bolts occur.) And getting those bolts that light up the clouds without even showing themselves can be very dynamic too, sometimes much richer than just a white streak against the sky.
Red Sprites/Blue Jets. These are very rare, hard to capture phenomena that happen occasionally, emanating from the tops of the storm clouds. They are very brief and very dim, so your exposure has to be in the range of capturing dim stars, but the nice thing is, you don’t have to worry about them streaking like stars do. I have yet to see one (confirmed, anyway,) but to all accounts, they occur very high above the thundercell, so your best bet is a wide-open view of the advancing or retreating storm from a great distance – like, mountaintop or out to sea, without obscuring clouds.
Car Light Trails. If you have a decent view of a road, especially one that curves across the frame in an interesting manner, you might try a long exposure as cars pass, producing white, red, or orange streaks across your frame. It’s best if you start and end the exposure while the cars are out of sight, so you don’t have trails that abruptly stop in midair, but you can be creative with that. Two things to avoid: getting too much of a direct line with approaching headlights, which will overwhelm the frame with glare, and getting too many cars in the frame – usually a couple is enough. Highway overpasses afford a great view sometimes, but be aware of traffic on the road you’re standing next to – a reflective vest is highly recommended. Doing this under a bright moon can help light up the landscape too.
Other night photography. Such as, using the ambient light nearby or the light of the moon. No real guidelines for this exist because the variables are too great, so experiment freely. With a long enough exposure by moonlight, the image can appear to be in daylight, perhaps only betrayed by star trails in the sky. Know that your exposure times may run from a full minute to twenty or more, depending on what you’re after, and all you’re doing is killing time while this happens; resist the urge to look around with your headlamp or flashlight, because even residual light getting into the frame may make things look weird, and of course you don’t want direct light in there. Or maybe you do – some experiments produce great results.
Most times, you’ll want to try and keep lights (street lights et al) from shining directly into the lens, since at longer exposures the glare will typically be overwhelming, but you can also go with a very small aperture to turn these into starbursts as you like – then your challenge is to balance that aperture with the other ambient light for a proper exposure. Meanwhile, these longer shutter speeds can produce blurs from moving water and plants blowing in the breeze, or drifting boats and even any wildlife that you might happen to capture. You can also get creative with a flash burst or, as hinted above, illuminating your subject or portions thereof with your headlamp/flashlight. It can take a lot of experimenting to determine how long to do this for, and as always, don’t trust the LCD preview on the camera to give an accurate impression, since the brightness will likely be deceiving – do several variations bracketing the exposure to get the one that will work.
Weather. Fog, rain, and mist can all lend a lot of character and mood to night shots, and it’s never a bad idea to have a couple of potential locations in mind for when the weather reports indicate that fog is likely. With these, light direction can make or break the shot, so work around the light and check different directions and positions to see what works best. A full moon and fog? Better get your ass out there to shoot something, since such conditions are rare – I missed an opportunity nearly forty years ago and have been kicking myself ever since.
Okay, that’s enough to get you started and give you some ideas at least – I’m sure I missed something I could have included, but this is plenty long as it is. Next week I gotta do a short one…
I just ran across an offhand comment somewhere that slammed into me with a bit of perspective, a simple one with a lot of baggage: Next year will be the 50th anniversary of Star Wars.
Fifty years ago. Half a fucking century. Why did that little datum suddenly register so specifically? I mean, it’s always been there, waiting to be found, and I’ve been hearing things about our country’s semiquincentennial (or bisesquicentennial) off and on for months. I’ve been seeing the original actors age and, in too many cases, pass away. So what is it about this?
I’ve written before that Star Wars was a turning point in my youth, and it’s hard to describe exactly how, but until that time, the future presented by the science fiction that I’d been exposed to (primarily Star Trek) was a bit too sterile and lackluster, not really holding my interest. Star Wars was gritty, active, little talky-talky and more zoomy-blasty, just right for my age at the time (which I’m not actually revealing, so go squat.) Not to mention that the video and audio effects were outstanding, and set a new precedent for movies that followed.
Now, a small sideline. 2001: A Space Odyssey had been released eight years earlier and had simply the best special effects done until that time, and for years afterward. It still holds up amazingly well in that department, and does indeed beat Star Wars because it has seamless realism for what to expect from space travel – you could easily believe that much of 2001 was actually filmed in space. I had not seen it at the time, and would not have liked it if I had, since it also remains incredibly poorly-paced and sadly lacking in both a captivating storyline and any characters to identify with. But Star Wars had what we wanted to see in space. Or at least, what [blank]-year-old me wanted to see in space…
I’ve mentioned before that I used to be heavily into building plastic model kits, and still tackle it from time to time – not anywhere near as much as I did, but then again, I’m now more into intricate and accurate detailing than I had been. What this means is, I have a stack of kits awaiting my attention, and among those is a Millennium Falcon, which I’ve now decided I will get done within the next year to observe this horrendous anniversary.
[Do NOT make me explain what a Millennium Falcon is. Don’t even contemplate it.]
Notably, this will be my third such kit. George Lucas was smart enough to not only secure the merchandising rights from the studio, he exercised them aggressively, so as soon as the film grew in popularity, figures and model kits were appearing on the shelves. I don’t think the Falcon showed up until the second movie was on the horizon, not sure, but I did receive it as an xmas gift then, and really didn’t do a bad job of it even for my age at the time, adding further lights with fiber-optics (it came with a couple of lights for the engines and cockpit, something unheard of at the time, and I piped more through the body for running lights,) as well as blaster damage and weathering. The exact fate of that kit is unknown, but some number of years later, I got it again and constructed it with my expanded skills, eventually giving this away to a friend when I moved to North Carolina. Yet I still have a picture of it. Kinda.
This was sitting in the background of a self-portrait done back in the late 1980s, among many model kits on display. It was on negative film that aged poorly, shot with my trusty (no) Wittnauer Challenger rangefinder with the 50mm lens, from halfway across the room and thus taking up only a small portion of the frame. So hush – at least you’re not seeing me in the pic. But even here, you can see that I was enthusiastically into the detailing.
The kit that remains waiting in the box right now was purchased some years ago, and I’d decided I’d do it pretty elaborately, so only a short time later I obtained a couple of strips of LEDs to do the lighting much better than the first time – maybe not as elaborately as this, but some of those at least.
[A note on the drastic changes that have occurred over the years. Back in the late 1970s when the first kit was produced, and through into the early 2000s I believe, the only options for model lighting were tiny little incandescent ‘grain of wheat’ bulbs, typically 3 volts and anemic as hell – they looked like shit for the engine lighting, to say the least. LEDs certainly existed, but only in deep red, yellow, or green. They also, being diodes, couldn’t just be wired in straight to a battery, but needed additional circuitry. Now, of course, we have multicolored LED strips readily available that only need to be connected to a power source, as well as a huge range of rechargeable batteries to choose from, so my 2027 kit will not only have the blue-ish engine lights more evenly glowing from the rear, but will be rechargeable through a hidden USB power port.]
So I have my goal, and a decent workspace to do it within, which wasn’t always available before, and now it only remains to see how long it’s going to take me to get started, as well as follow through. But at least this post is here to embarrass me…
And. it’s just, “Star Wars.” That “Episode IV: A New Hope” bullshit was retconned in by Lucas later on, and using it just pegs you as a nerf-herder…
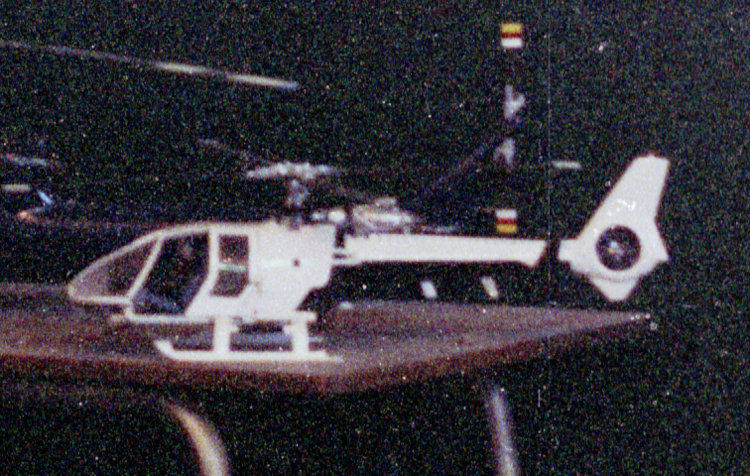
And now, another little bit of trivia from that same cruddy negative. One of the other model kits visible in that image was this one, though the dark background did a lot to obscure some details:
Helicopter kits in the scales that I preferred (in this case 1/24) barely existed, and so I scratch-built this one, my own design – there was no helicopter resembling this in existence. The rotor head, turbine, tailboom, and skids were all cribbed from a ‘Special’ helicopter model from the film Blue Thunder, the interior from a Renault 5 Turbo I believe, and the rest of the body and glass and what-have-you was designed and built entirely by me; the curving glass was carefully cut from a specifically curved portion of a 2-liter soda bottle, and the doors both opened and removed. This was built in the late ’80s. Funny thing is, the Eurocopter EC-120 Colibri wasn’t introduced until 1997, and it looked like this:
By Huhu Uet (Frank Schwichtenberg) – Own work, Creative Commons 3.0 Surprisingly close, isn’t it? Not too surprising in a way, because that distinctive ‘Fenestron’ tail rotor first appeared on the Sud-Aérospatiale 341 Gazelle, upon which the Blue Thunder ‘Special’ was built. Aérospatiale later merged into Eurocopter, and their four-seat single turbine AS-350 Écureuil was updated into the EC-120 Colibri using that same tail-rotor design. But the similarity in body and cockpit shape makes me a little stupidly proud at least – mine is admittedly sleeker.
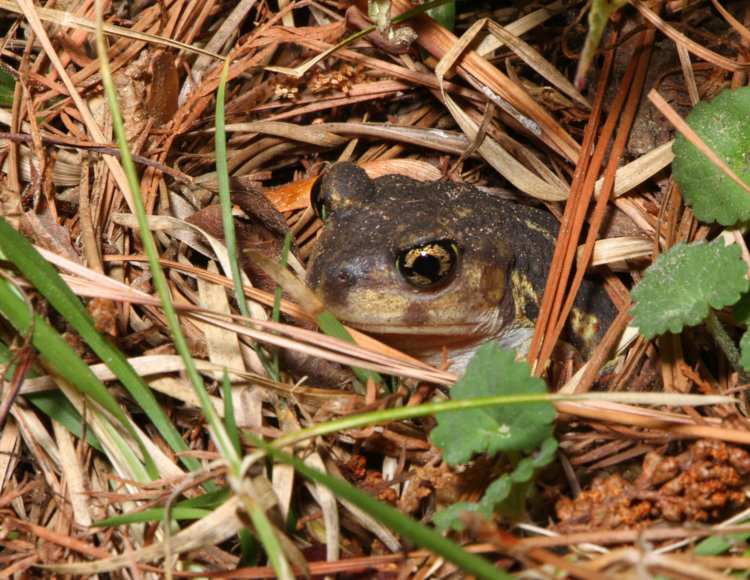
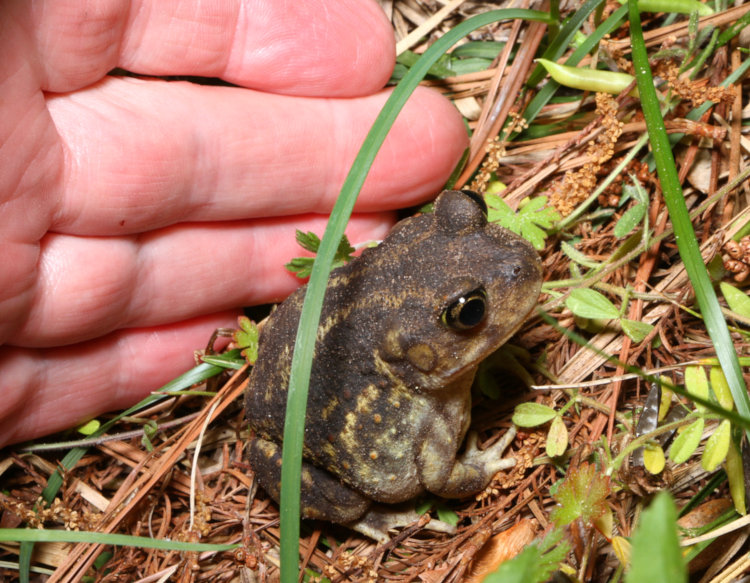
Poking around tonight, I spotted the first eastern spadefoot (Scaphiopus holbrookii) of the season, and so commemorated this event, naturally.
This one is partially backed into its burrow, which is where they often sit, simply waiting for food like crickets to walk by. It’s amusing (honestly, a little frustrating) that this actually works; I’ve sat outside for hours on many occasions and haven’t yet had a plate of barbecued beef ribs happen along, or even a simple quesadilla. Seriously.
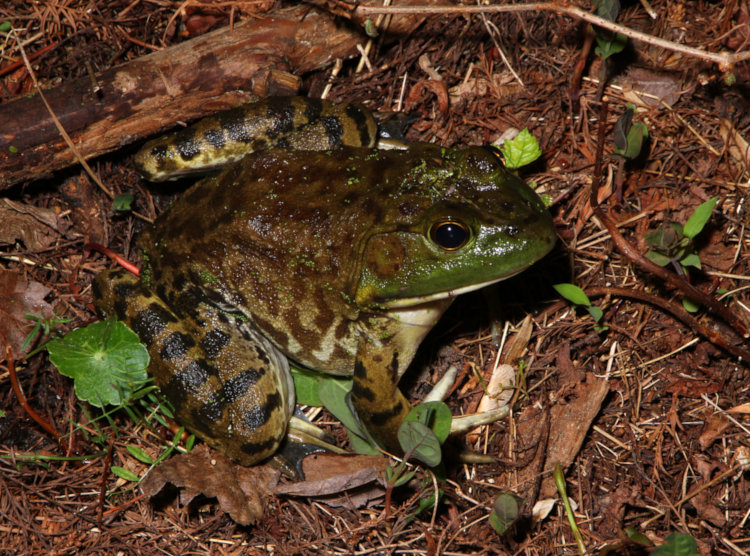
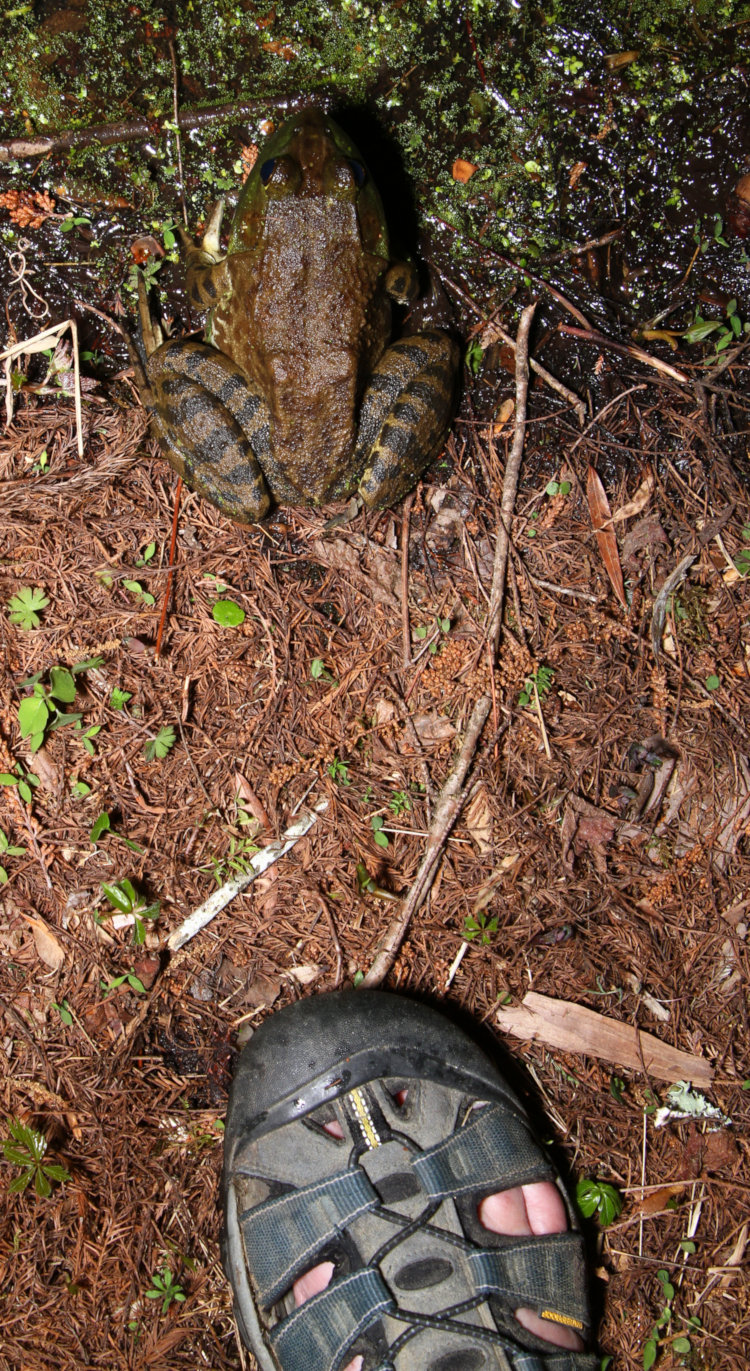
I also got a few other nocturnal amphibian images, like an American bullfrog (Lithobates catesbeianus)…
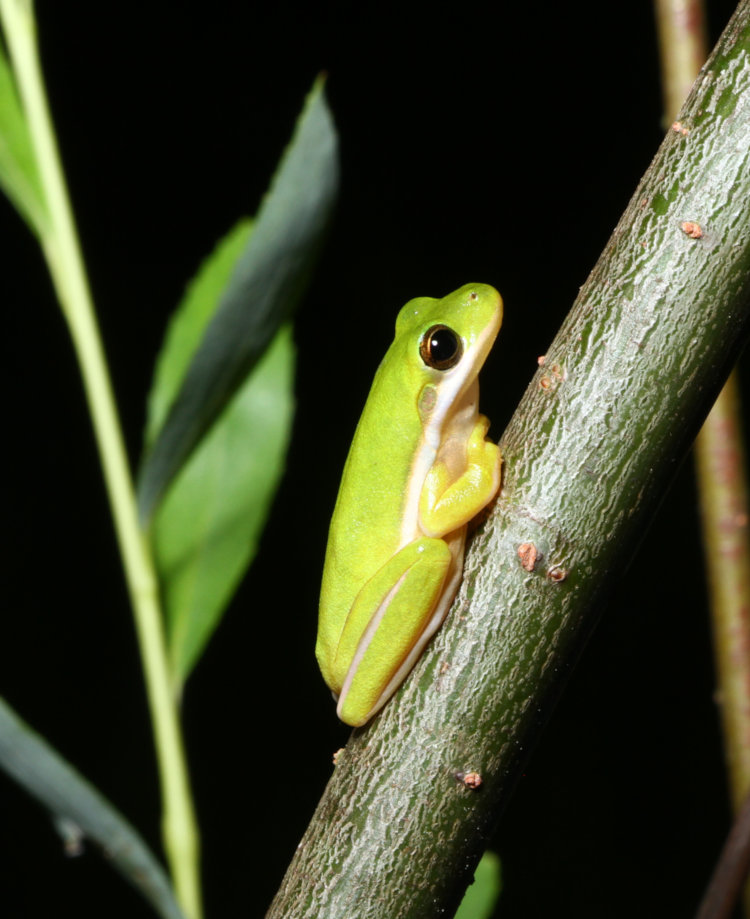
… and even a small green treefrog (Dryophytes cinereus,) one of many that stake out the weeping willow (Salix babylonica) by day and hunts the tree and surrounding area at night:
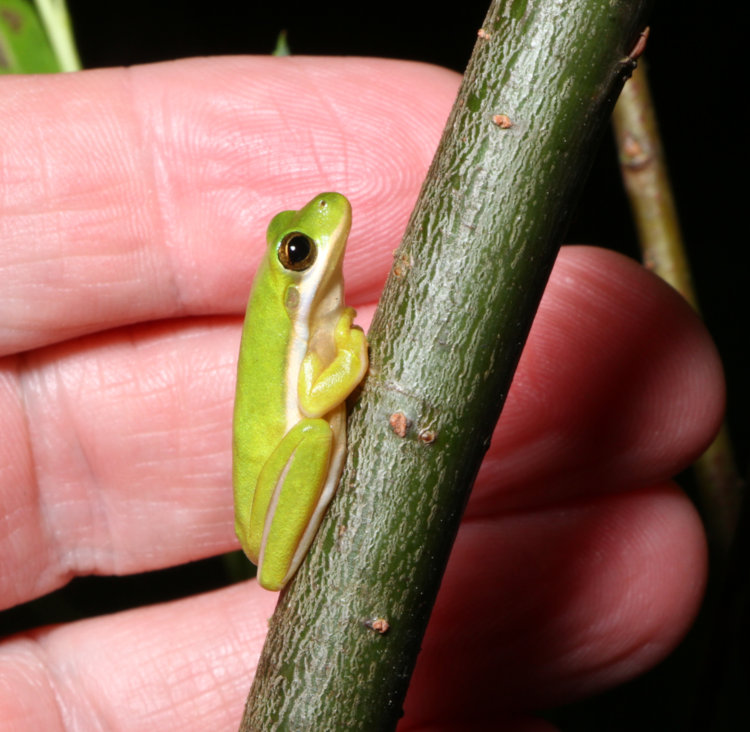
This one was less than half of adult size, as are all of those that sleep on or near the tree, such as on the posts of the protective fencing around it until it gets big enough to fend for itself (beavers adore willows, and deer are known the strip the ends off of branches, so it’s shielded in its vulnerable sapling stage.) The count of green treefrogs sleeping around the tree by day has been as high as nine, by the way. Yet it occurred to be that I had quite a range of sizes for the one night, but could I show scale decently? Turns out, by going out and trying to find the same subjects again, that I could. The green treefrog first:
It’s a shame I couldn’t locate the smallest one that hangs out here, probably about the size of my thumbnail, but this suffices, and treefrogs can be fairly complacent at times – it’s usually worse if you disturb what they’re perched upon.
So okay, how about the spadefoot?
Not too hard to locate again – in fact, I found two – and also quite complacent, so no sweat here.
But, now the bullfrog. They’re notoriously spooky, able to be photographed as long as you keep the headlamp on them, but quick to vault into the water the moment something becomes visible in the beam, or even if the noises sound too suspicious, and my original photo subject had indeed made its escape earlier, with a leap of well over a meter in length and close to half that in height as it fled to safety (leaving a trail of urine in the air momentarily, it must be said.) It had been over an hour, though, and thus there was a chance it had returned to the shore. But even if I found it, could I somehow get something close enough to it for scale without sending it off again?
Turns out, I was extraordinarily lucky tonight. Yes, there it was on shore again, and I managed to approach quietly enough. Then, when directly behind it, I tilted the headlamp up so it shone on the frog, just barely, but left shadow behind it, and gently slid my foot forward. It was sufficient for a couple of frames.
This was a monster, about the largest that I’ve seen, far more than a handful. Just for the sake of it, I extended my hand close enough to confirm that the head was three fingers wide, but in doing so I revealed my presence and once again sent it sailing off into the water. Still, I had my scale shot, so I was pleased, and could illustrate the range of amphibian sizes visible right here, on one night. It can be even more extreme, but that might wait for another night.
Now that the bloggarootie seems to be back to perfectly (well, nominally) functioning order, I thought, Should I go ahead and squeeze one last post and a handful of photos out before the day is up? and naturally followed with, Why not? I mean, the photos have already been shot, of a decent subject too – it’s not like I’m forcing anything (unlike, you know, certain posts,) and why should I pass up the opportunity to increase the monthly count to something that will then make me feel like a slackass when I can’t match it in subsequent months? And so, never one to pass up an opportunity to abuse future me, we proceed.
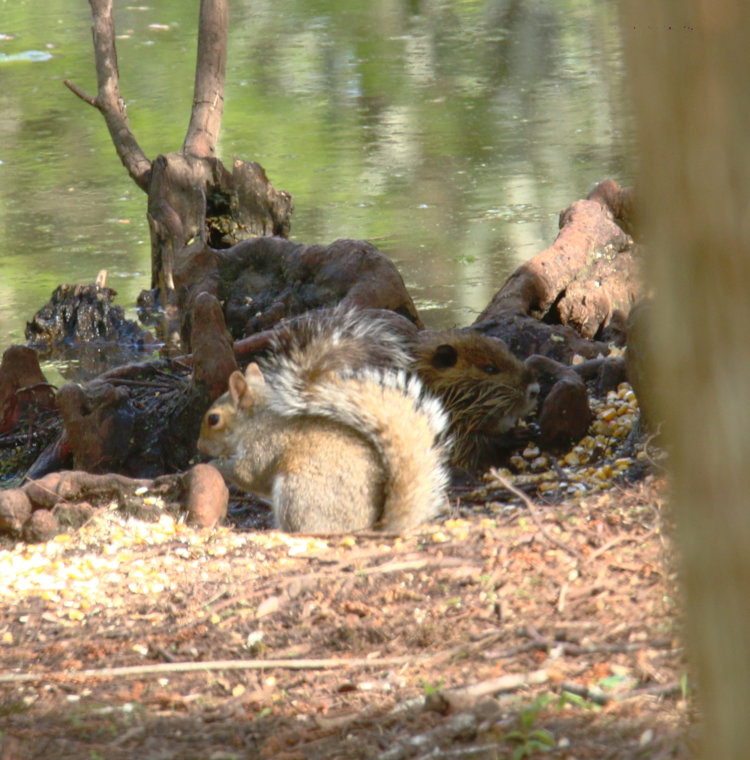
It was just a couple of days ago, in the afternoon, when I received an opportunity to show scale better than before.
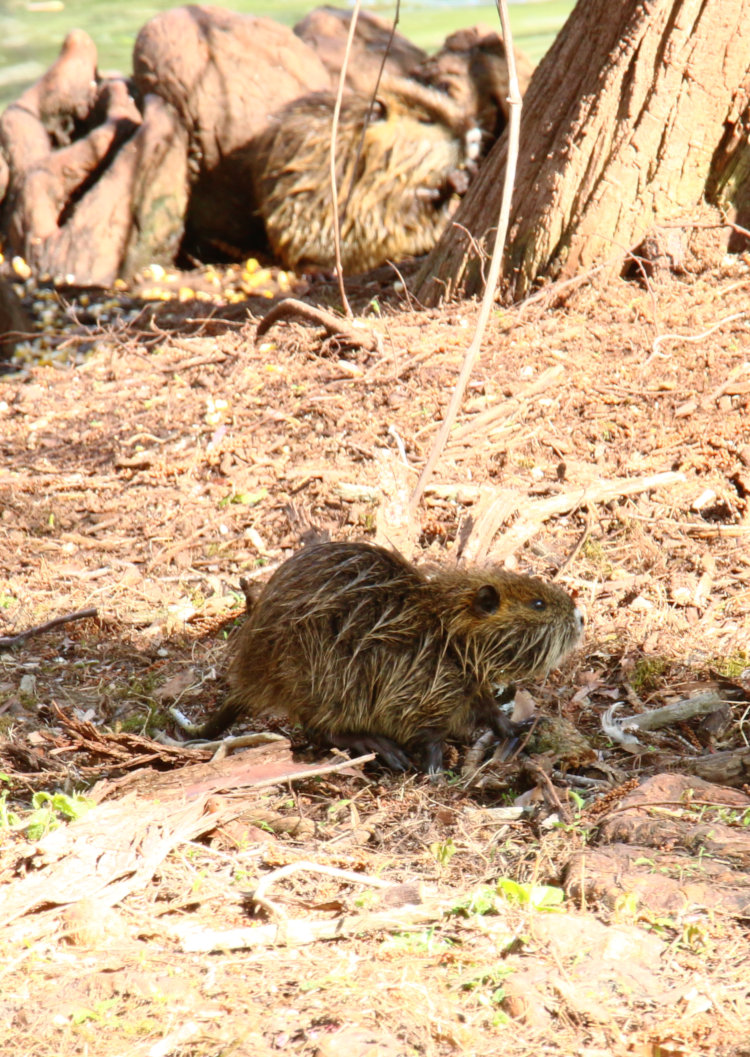
An eastern grey squirrel (Sciurus carolinensis) of course, but behind it sits one of the bebbeh nutrias (Myocastor coypus.) The squirrel is an adult, or at least very close to it, so we see the relative size of the two – the nutria will eventually get several times this size, big enough to go into your trunk for winter traction. But right now, they’re cute as hell.
While these were shot two days ago, just today we found that there are three this size – photos and video will be forthcoming.
There were actually a pair there that day, mostly staying in the deep shadow behind the tree and necessitating some exposure compensation to counteract the camera reading too much of the surrounding brightness. And that knee over to the left, the darkest one, we’ve also seen before.
One was comfortable just sitting where it was and scarfing down the corn, but the other decided it wanted to explore what the yard had to offer.
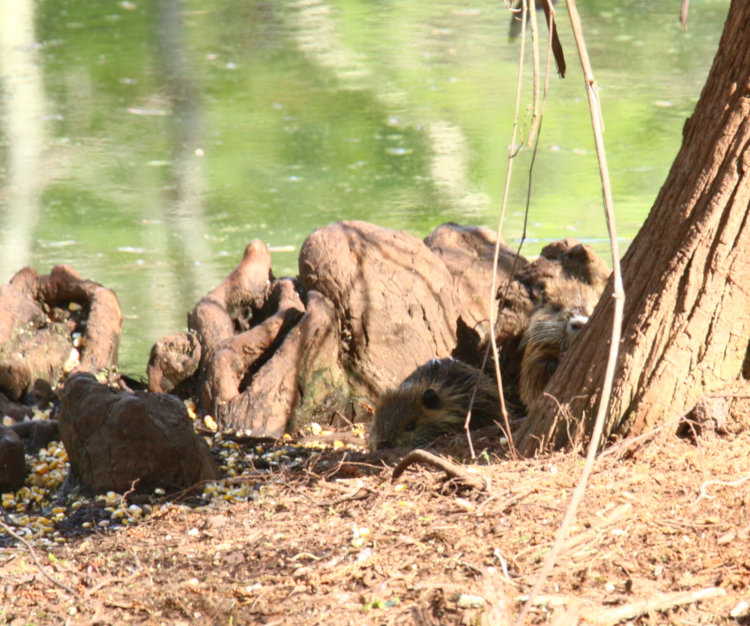
I snagged the frame where it had lined up nicely in front of its sibling, but it must be said, this wasn’t the safest move; the pair of red-shouldered hawks have mated recently and show all signs of occupying the nest that sits not twenty meters from this spot, and while the adult nutrias could probably swat a hawk out of the air, these little spuds are just the right size for a decent meal. No adult was in sight to offer any warning or protection, either – we’re actually a little surprised how often they’re out on their own, and wonder if we should be calling CPS.
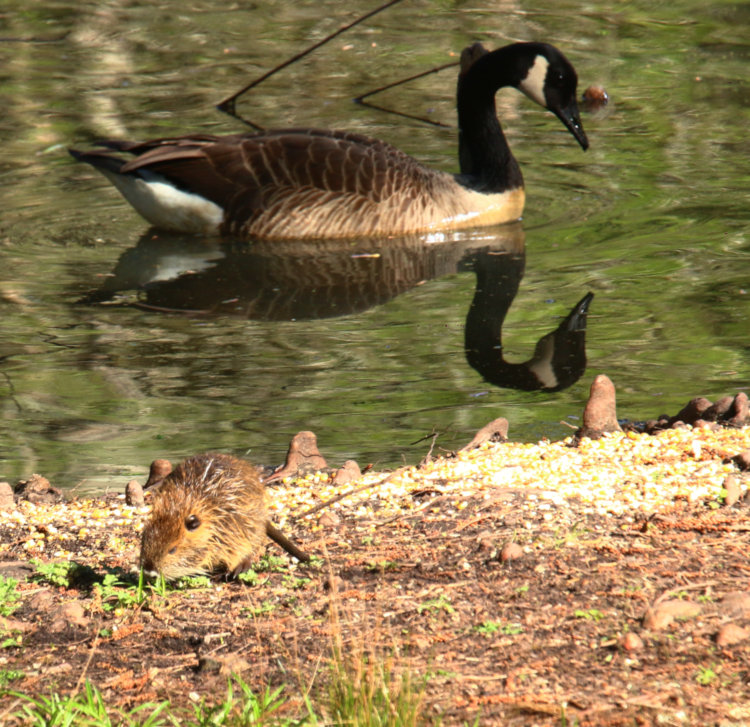
Another nice scale shot, as a Canada goose (Branta canadensis) cruises on past. Everything in the pond – nutrias, turtles, herons, ibises – all seem to consider the geese a mere fixture and ignore their presence, no matter how close they come. And of course, you realize that there’s a bit of distance between the bebbeh and the goose, with telephoto compression having some effect, so the bebbeh appears larger than it would if right alongside the goose. They’re little more than a handful right now, like something you might hang from your rearview mirror after winning it from a claw machine.
So that’s four more photos down, and we still have an hour left in the day – should we try for more?
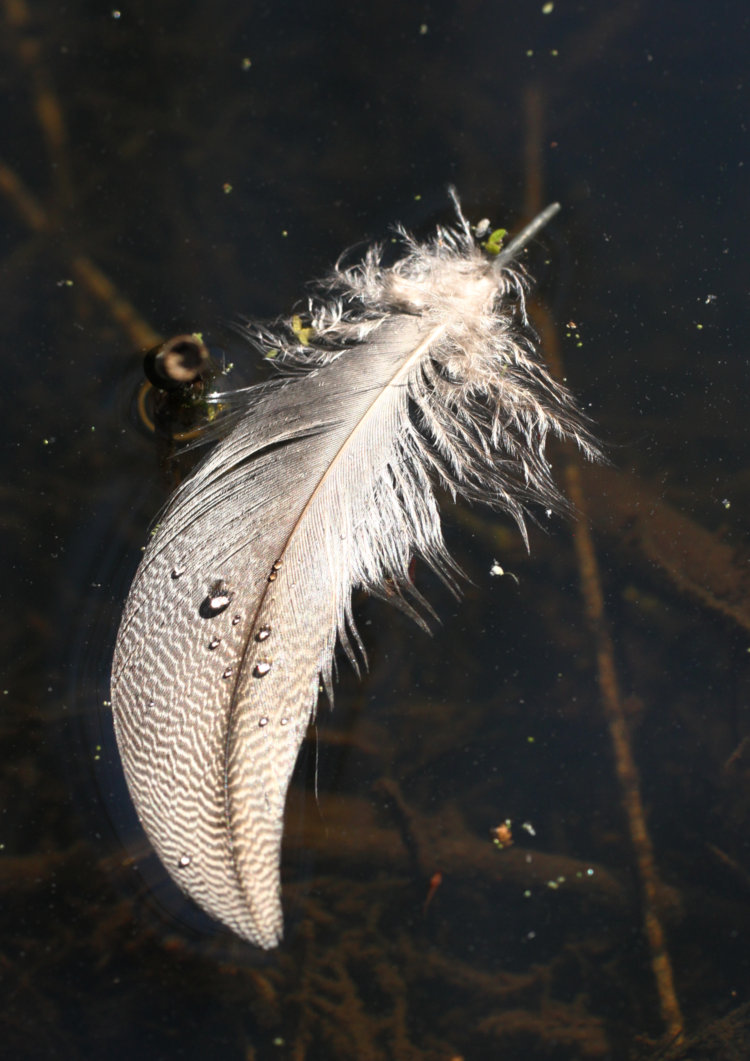
Now it’s time to let it go. And we do so with the month-end abstract of course. March left us with two, to split between all of us. Evenly, so don’t be claiming more than your share. They look like this:
This wouldn’t have been half as good without the stippled coloration, which I believe is a breast feather from a male wood duck – see here. I would have liked to have gotten closer, perhaps used one of those drops as a lens for the feather underneath it, but it was a little ways offshore and I didn’t feel like getting wet – it is still March, you know, and certainly was then too, since this was shot on the 1st. Sure, you can mutter all you want about a lack of dedication to my art – as long as you’re one of those who’ve actually bought a print.
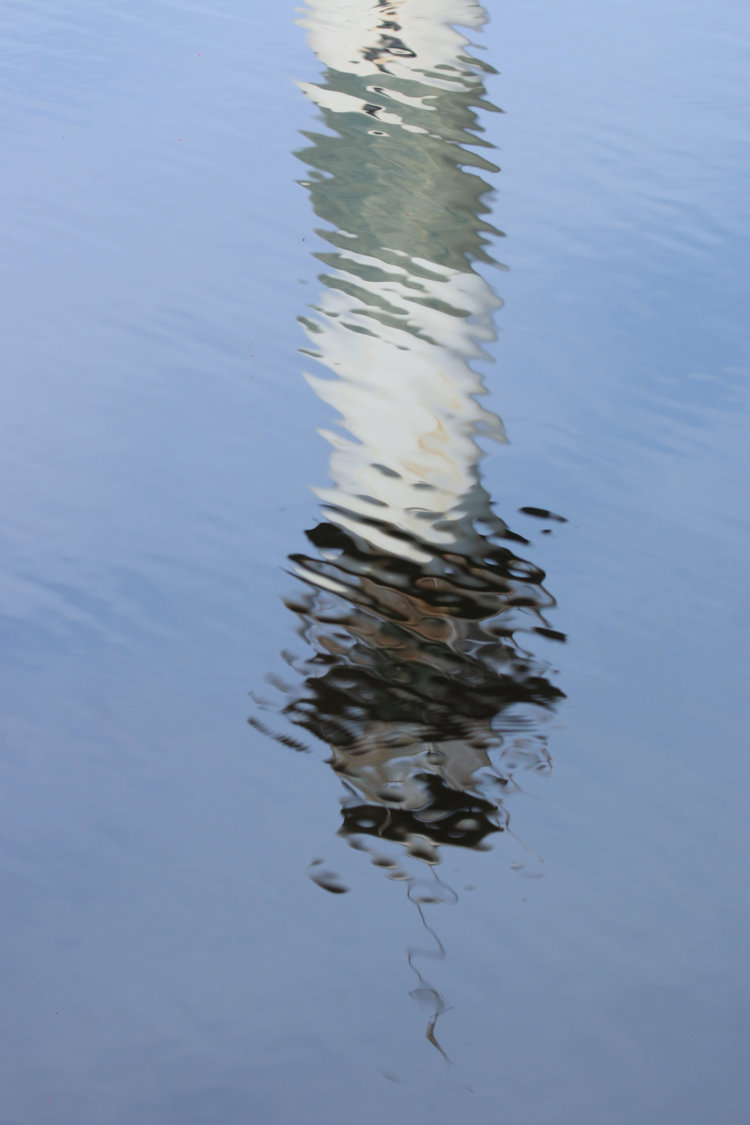
And then there’s this one:
If your memory of previous posts is sharp (or you’ve been there yourself,) you should know what this is, but as many times in the past as I’ve posted something that really stretches the definition of ‘abstract,’ I think this one fits pretty well. I probably should have inverted it to make it even more so, an impressionistic painting, but I left it this way just to support the idea that it’s a reflection.
I don’t actually have a final tally on the number of images uploaded for March, because of stupid shit, but it’s significant. The spring’s off to a good start, anyway…
Tried to log into the blogsite yesterday morning to post some further stuff, and couldn’t get in at all – this was disconcerting since I’d been logged in for the previous post less than 6 hours earlier. My efforts produced nothing, and since I couldn’t log in I couldn’t update anything on the program end, and so spent waaaayyyy too much time with the hosting service’s AI troubleshooter, pretty much just making things worse. I’m trying to be objective here and not jump to conclusions, but objectively, when I finally got a real human on the line, they corrected most of what the AI fucked up within minutes.
I still can’t log in properly, but I can now get in through the backend and post a little, and do some routine maintenance stuff. We’ll see how long it takes to get things back in order.
So if you came here and got, well, anything but a proper website, I apologize – I have no idea what failed, and if I did anything, it was completely without trying or even knowledge. Which is to say, I doubt I did anything.
Right now I’m rebuilding the three posts that got wiped out when I restored from a backup that had taken place before they posted, so bear with me. I even did the Latest Images updates, and they got wiped too. Insert a plethora of the choicest cuss words in here, and make up a few while you’re at it, because I certainly did.
EDIT, 21 HOURS LATER: I believe I found the culprit, and think this deserves attention, since there was a folder in my Plugins directory named, “Jetpack.” I didn’t recall ever downloading any plugin by that name, but waited until I could check it out better (some plugins bear odd names that aren’t self-evident,) and after finding the description of this, I knew that I hadn’t downloaded it myself. While troubleshooting, all plugins had been disabled by renaming their folders, including the master folder itself, but this never fixed the issue. Deleting this particular folder, however, restored all working order to WordPress.
Note also that no entry for it existed within the plugin menu within WordPress, unlike all other plugins. To all appearances, this thing (whatever it was) was active regardless of the structure within WordPress.
Therefore, I consider ‘Jetpack’ to be malware and strongly suggest never installing it, and removing it immediately should you find it present. Note that you will have to find it in the folder structure, because it does not show from the normal WordPress interface.
Also note that it was causing significant delays on the very login screen before producing an error message – not the best of signs. I changed my password following the deletion of the folder.
I have no e-commerce or woo-commerce stuff active on my site, so there’s little that it had access to; I would suggest anyone that does be doubly vigilant. Now it remains to be determined how it actually ended up within my folder structure.
And yes, I am aware that the folder being named “Jetpack” does not confirm that it is related to the plugin of the same name, but enough reviews pegged said plugin as “phoning home” constantly (sending information from one’s computer directly to the creators’ website.) Regardless, it was this way on my system – it can be this way on others. Delete any unrecognized folders from your Plugins directory, and it doesn’t hurt to maintain a list (or duplicate local directory) of what you do have, so you know what belongs and what doesn’t.
[Technically, this was not written on the proper day, since I was trying to login to write this one when I discovered the problems with the site that destroyed the entire day, but we’ll just gaslight ourselves into believing it was and history will never be the wiser.]
It’s an interesting holiday today, with a fascinating history that I strongly suggest you check out, since it’s too convoluted to go into here, but it’s Dark And Moody Day, and so, we have some photos that were specifically chosen to fit in with this holiday and not at all contrived.
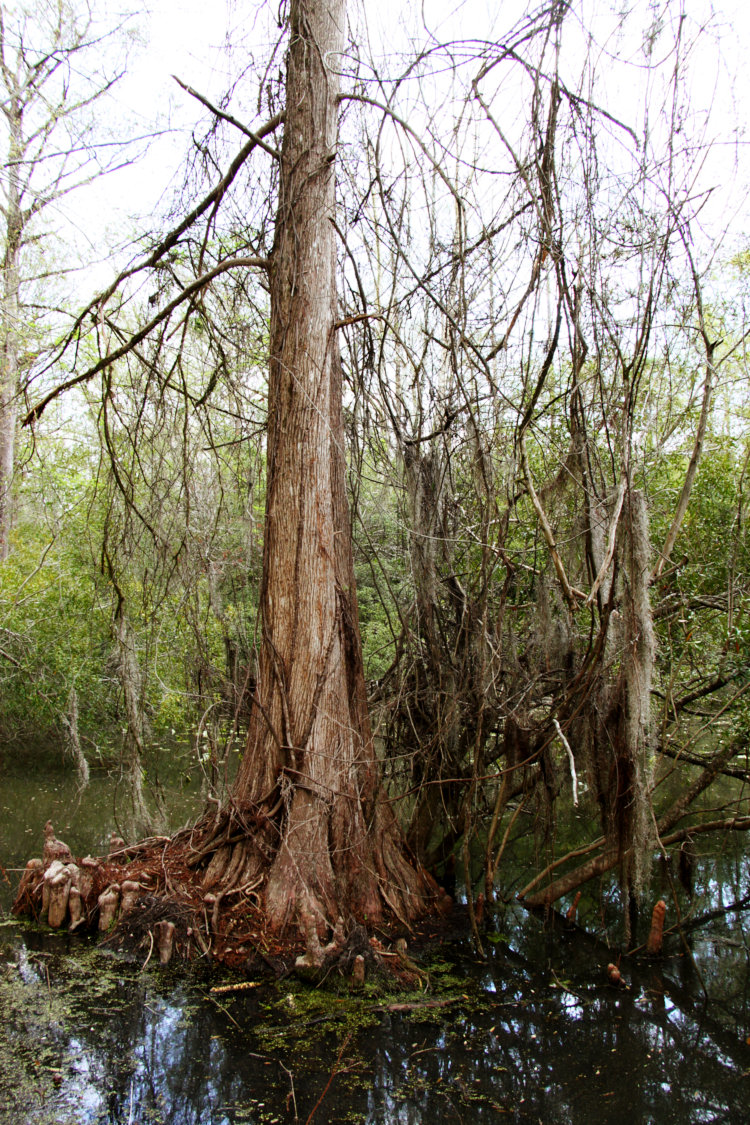
You may recall my mentioning the ‘Haunted Tree’ on the property, though at the time I had no good illustrations of it, but I set out to remedy this because you all deserve it, for all the support you provide. First off, during an lightly overcast day:
I mean, you can see why we call it that, right? This is the arboreal equivalent of that old gothic house on the moors, even in this light, with the vines and Spanish moss and that convoluted trunk and knees. If a tree was going to be haunted, it would be this one.
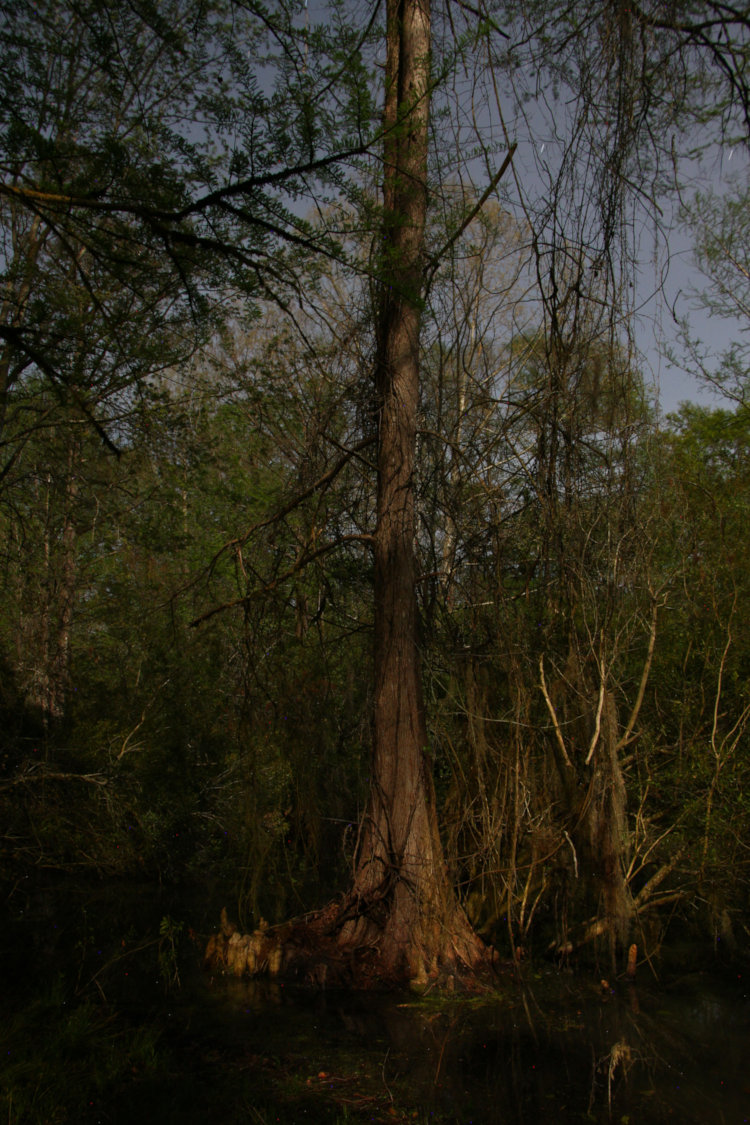
But I couldn’t leave it at that, and tackled it last night by moonlight.
Hard as it may be to believe, this brought out a bit more color, without reducing the idea that if you got too close it might clutch at you. There are a lot of bald cypress (Taxodium distichum) trees on the property, but this one has the most character. If you want to call it that.
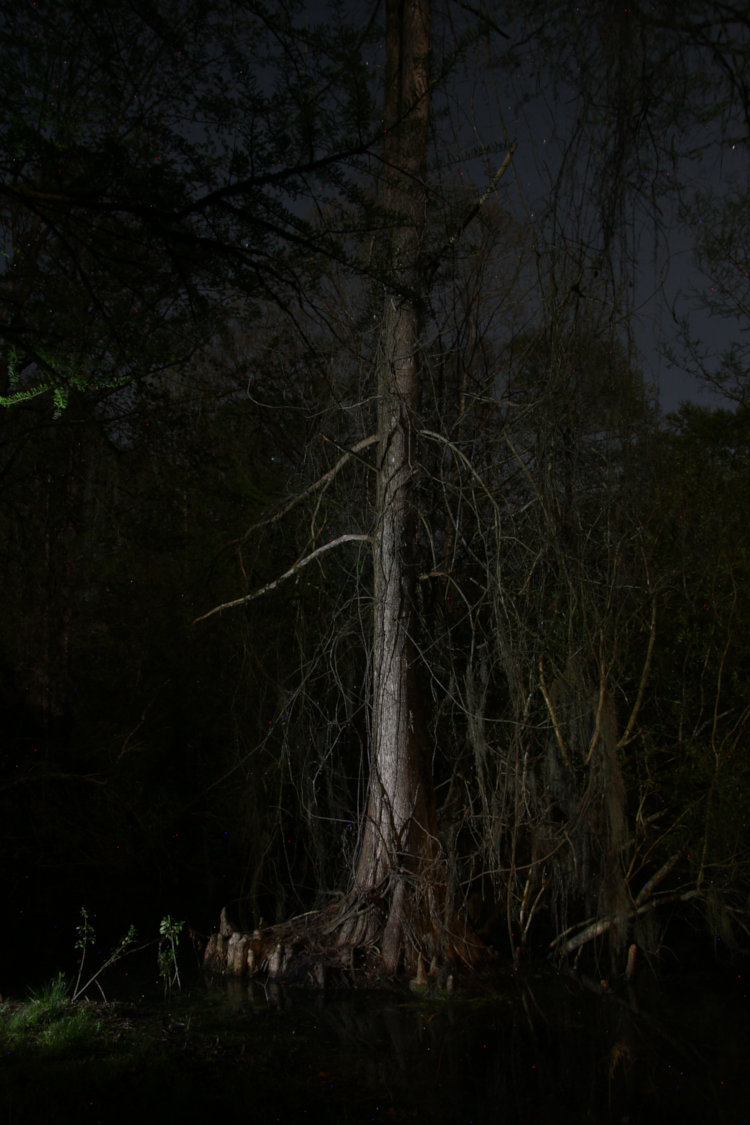
And then, while the tripod was set up, I did a version illuminated primarily by the headlamp.
I was trying to get it a little more evenly illuminated and not produce this spotlit effect, and so will perhaps try again later, but now the ‘arms’ or ‘tendrils’ or whatever are more apparent. Funny how the differences in lighting produce different impressions, though none of them particularly inviting.
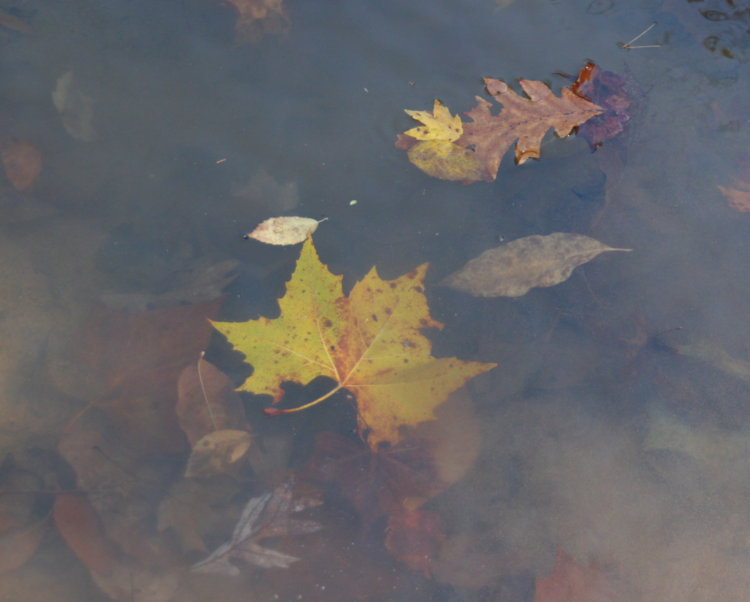
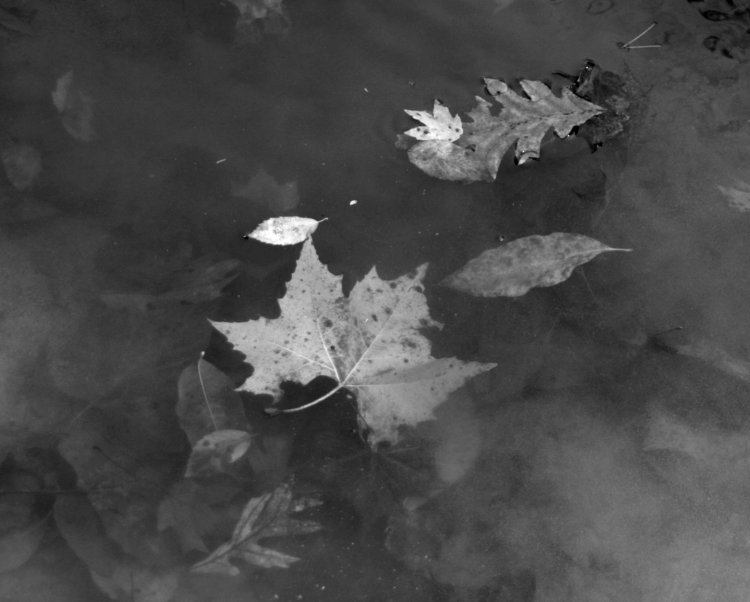
While working on the monochrome post from a week ago, I pulled several older photos to mess with, and this one didn’t make the video but still deserved a little attention, and since I knew the holiday was approaching, it could serve its purpose for that.
Very muted, all clustered around the midtones without distinct highlights or shadows, seeming to drift out of the smoke – it’s funny how I get the impression that the leaves at lower left are semi-transparent and bleeding through one another, even though this really isn’t the case. But then I converted it to monochrome and boosted the dynamic range to just barely get it from full white to full black:
Still impressionistic, though a little bolder, but also a little confusing now. Suggestive, in many ways, and I suspect it would hit different people with different ideas.
And then I wondered how it would look if I kept it in color but still boosted the dynamic range to the edges. It would look like this:
Richer, certainly, but more pleasant? Still doesn’t strike me as a print, but perhaps an illustration for a specific purpose (a dark and moody one.) Something to point out here, but while I don’t recall the circumstances or conditions of this image, I don’t believe the smokey aspect most visible on the right is silt or sediment, but actually the reflection of the clouded sky from the surface of the water, which is part of what gives it the layers that it has. A cool rediscovery.
And two more for the holiday.
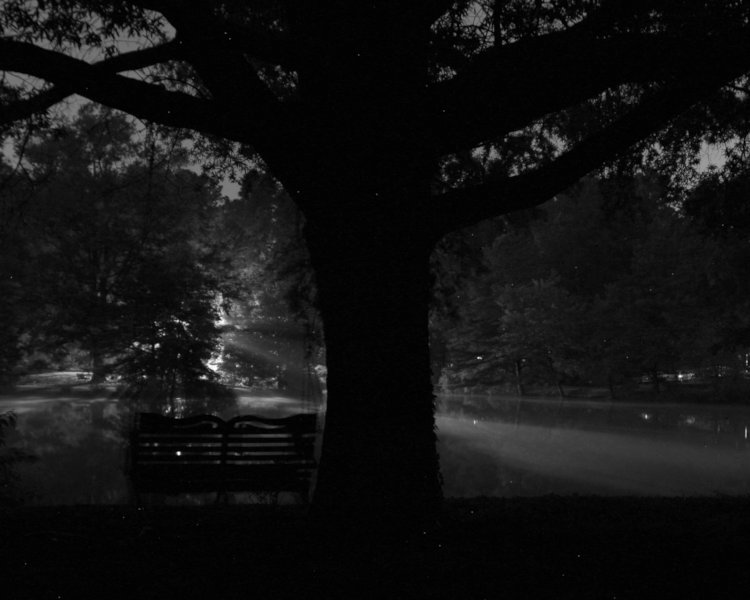
The original was a weird color, since the old style mercury pressure lamps that used to be used everywhere as streetlights was the main light source, and their color spectrum is very odd: to our eyes, the appeared a bit blue-ish, but when captured on either film or digital sensors, they went distinctly green, and I don’t pretend to know why this is. The very thin fog is what produced the rays, and I was smart enough to position myself so the direct glare from the light was blocked. Plenty suggestive, but again, ‘of what’ is probably plenty subjective as well.
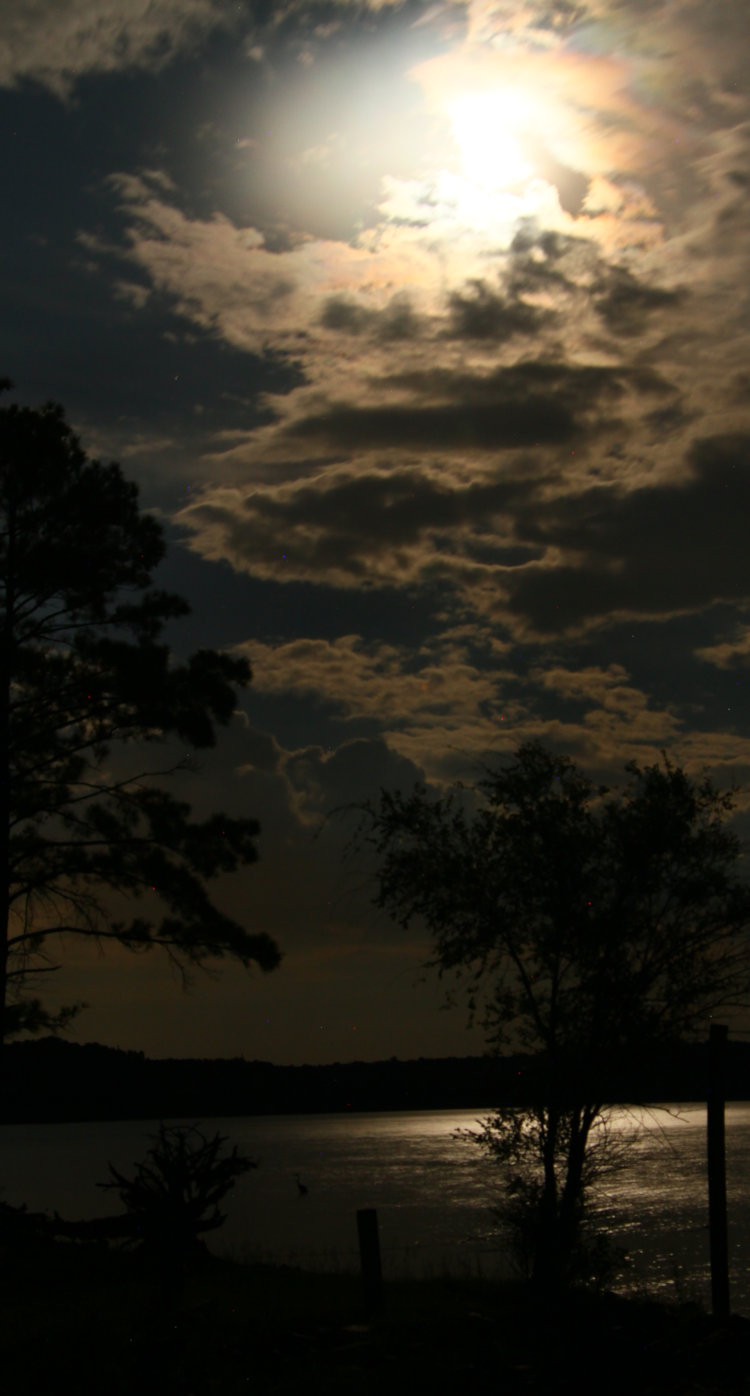
And finally,
Perhaps not quite as spooky as some of the others at least, this still has its elements, though a mixed bag. You didn’t miss the heron down there, did you? But what strikes me right now is, the waters produced a nice rippled effect and not at all the soft haze that I would have expected from the 10-second exposure, where they all should have blended together. Had that occurred, it might have been mistaken for low-lying fog or something. Overall, just enough light to make details distinct throughout, while remaining dark and a bit foreboding. A lucky capture, or more specifically (since I was trying for something along these lines,) a lucky guess at the exposure needed.
There – a nice celebration of the holiday and not at all a desperate attempt to squeeze one out for March since I’d been neglecting the idea all month. Cheers! (Or, well, a more appropriate salutation…)
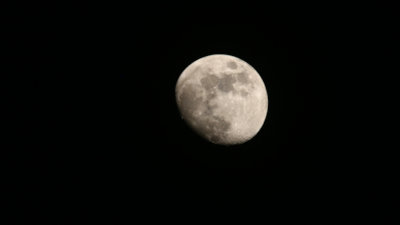
Shot a few hours before this post, 1/320 second, f10, ISO 500 – full resolution inset of image below Originally, I was going to do this about night photography in general, with a subset of photographing the moon itself, then realized that the moon alone had enough for a full post. So other kinds of night photography will be along in a later post, perhaps next week. No promises though.
As a bare minimum for chasing moon photos, I have to recommend a firm tripod and a remote shutter release, because motion blur is easily a big factor at high magnifications. If your camera has a ‘Mirror Lock-Up’ option, use it – just remember to turn it off afterwards so you don’t miss any shots later on from that unwanted delay. The longest focal length you can manage of course.
Full frame at 600mm with digital 1.3 modifierThe moon is really quite small in the sky, and getting any kind of decent detail from it requires pretty strong magnification – a long telephoto lens. But it’s actually easier to snag than many people realize, once you know the trick, and that is, the moon is illuminated by bright sunlight. Shut off all auto-exposure stuff on the camera, since almost invariably it will be reading all the surrounding dark sky and trying to brighten that up, over-exposing the one thing that you actually were aiming for. Instead, we resort to a simple guideline: With clear skies and a full moon overhead, set aperture for f11, and your shutter speed should be 1/[ISO]. For example, if your ISO is set at 250, your shutter speed should be 1/250 second. Easy.
[This is simply a variation of the old ‘Sunny 16’ rule, the guide to estimating exposure for any photo in bright sunlight – the one above is occasionally referred to as ‘Moony 11’ instead. Sunny 16 would actually apply just fine, but the moon itself really is a medium-grey tone, yet most people don’t want it to look that way in photos since it doesn’t appear that way to us at night with our dark-adjusted eyes, so using f11 brightens it a bit.]
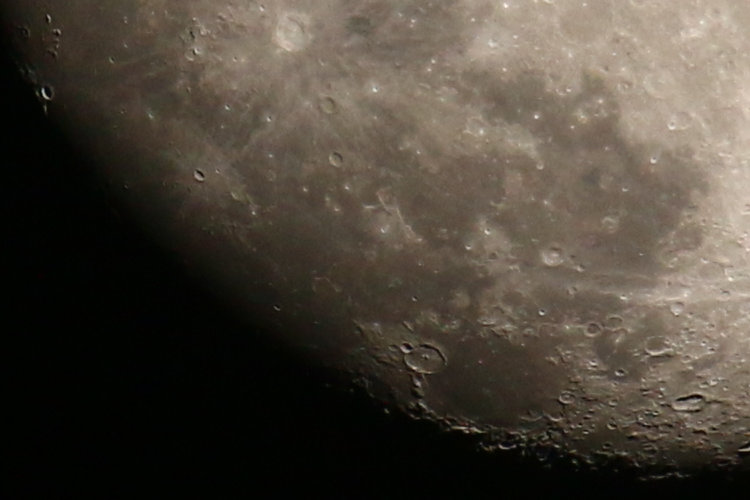
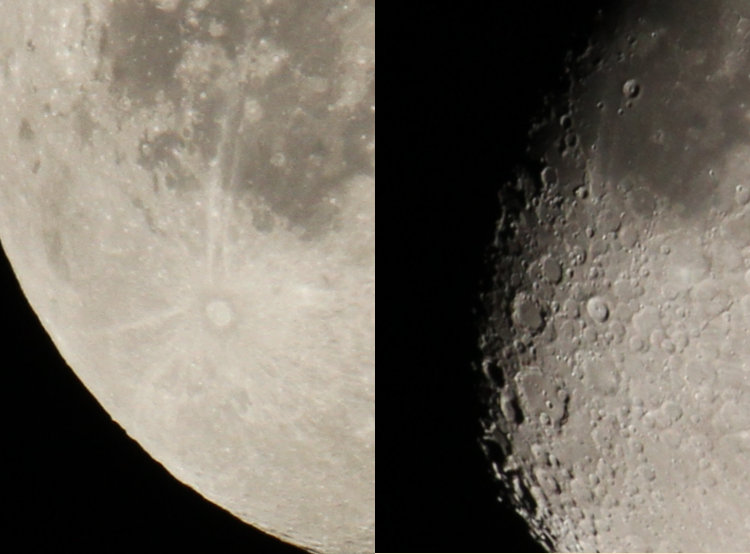
This is, however, only for a full moon, and I’ve said it before, the full moon is boring – no shadows, no definition of the craters and ridges and hoohah. Once you get away from the full phase, however, the light is becoming more oblique, reflecting less directly towards us. This means that, for a half moon (first- or third-quarter, if you want to use the astronomical terms,) the amount of light reaching us is only 1/4 what it was for a full moon, or two stops less, so to compensate, we’d change the aperture to f5.6. You can try out this guide, but I’ll admit that I haven’t hashed it out myself (since I’m writing this far too close to the deadline,) and I’ve seen a lot of guides online that are way inaccurate. My initial examination has found no problems with it though.
Full and gibbous moons centered on same region around Tycho crater, not a perfect match because the moon wobbles as well as arcing across the sky Yet, there are no firm guidelines, since the atmosphere isn’t consistent. Getting closer to the horizon increases not just the thickness of the air (shooting at an oblique angle through the shell of the atmosphere,) but the humidity as well, the reason we get such nice colors at sunset so often, and can even look directly at the sun. High altitude smoke and dust can easily be present as well, especially with major fires in the direction of the prevailing winds. These can change the necessary exposure significantly, so the best bet is to shoot several exposures at small variations to capture what you’re after.
Also, remember that the earth rotates so the moon is constantly moving across the sky, roughly its own width in 180 seconds. Don’t let your shutter speed get too slow, or the moon will be blurred from motion – this varies greatly depending on your focal length, but if it’s less than a second, you’re toying with motion blur even with a firm tripod (and virtually guaranteed without one.) Adjust aperture and/or ISO to compensate accordingly.
Using the LCD preview to judge proper exposure. Don’t. Not only do many such LCDs lack the dynamic range to be useful in this context, the brightness can be adjusted too easily, and at night, our eyes are already adjusted for the darkness, so the preview will likely look hugely different from what you’ll see on your computer monitor later.
White balance. Full sunlight, which is the same as “Off.”
Autofocus. Also “Off,” and here’s why. The moon being so small in the sky means autofocus can have small variations in what it considers “sharp,” and since we’re probably after the best detail, these variations can soften things too much when the image is enlarged. So, go manual, shoot a test, and look at the resulting preview image in the LCD on the camera, zoomed in tightly – most especially, look at the terminator, the line between light and shadow (which is where all the details will show anyway.) If it’s not perfectly sharp, tweak the focus and try again. Once you get that tack-sharp image, don’t touch the focus ring again.
[Caveat: if you’ve been out longer than ten minutes, or the temperature is changing significantly, touch that focus ring again, meaning do the focus routine all over. The changing temperature will twitch the lens elements and barrel and actually affect focus, so you’ll have to correct for this.]
Foreground Elements and Creating a Scene. There are only very narrow circumstances where you can achieve such things – most times, the difference between an exposure that will give moon detail and one that will show earthly elements is so drastic you’ll never do it ‘in camera,’ and would have to resort to compositing the image. The main exception is, soon after sunset (or before sunrise) when the sky has a little light and is thus throwing some of it around onto your foreground. This window is narrow, a few minutes long depending on just what you’re after, so be ready. The other circumstance that can work occasionally is a layer of high, thin, and even clouds that filter out some of the glare from the moon (and occasionally throw optical effects,) lessening that exposure difference.
The day of the full moon in summer means that the moon will rise and set while the sky has a decent amount of daylight – less so the closer it gets towards winter because of the shorter days. However, orbital mechanics dictates that the moon rises close to an hour later each night, so if you’re after a rising or setting full moon without that sky glow, you’ll need to be a day ahead (setting) or a day behind (rising) the actual date of the ‘full’ moon; it will usually be full enough to count for photos.
Earthshine, that glow visible on the dark portion of a crescent moon that comes from sunlight still hitting a large portion of the Earth and reflecting up to the moon. Once again, the difference between an exposure to get Earthshine, and to get detail from the crescent, is still drastically different even with the reduced light from the crescent phase. Basically, pick one or the other for detail, but you won’t get both without compositing (and you’d probably still have to edit out residual glare.) By the way, if you’re attempting exposures that will blow out the brighter areas, try to center the moon in the viewfinder as much as possible, because this reduces lens flare by a small amount.
1 second, f8, ISO 3200 Ultra-thin crescents. Because of the very nature of crescents, mostly lit on the side away from us, very thin crescent moons can only be seen in twilight conditions, just before sunrise or just after sunset. I have a goal to get one less than 1% illuminated, which is a tall order: such crescents only occur twice a month at best, usually fewer because of orbital mechanics, and the sky has to be perfectly clear. I’ve caught several at less than 3%, but not yet less than 1.
1/2 second, f11, ISO 1600, 1.1% illuminated Lunar Eclipses. Fun to watch, interesting to capture especially during totality. There is no useful guideline towards a proper exposure because it varies so much approaching and receding from totality, and even totality depends on where it falls in Earth’s shadow and atmospheric conditions. The best advice is to bracket exposures wildly – and pin down focus tightly before totality hits, because you won’t be doing it afterward (sometimes it’s hard enough to even locate that ‘blood moon’ in the viewfinder.)
0.6 second, f6.3, ISO 6400 to capture the star being occulted Locating the moon and knowing the phases. There are numerous smutphone apps to keep you apprised of the phases, and many of them give altitude and azimuth at any given time. Of course, Stellarium always gets my recommendation because of its accuracy and versatility, especially when chasing those ultra-thin crescents. Something passing in front of the moon (or sun)? This site seems to be working pretty accurately now, despite my first experience with it.
There’s plenty to play with, but plenty of things to keep in mind as well. Experiment freely on those nights that have the right conditions, take notes as necessary, and above all have fun!
1/13 second, f11, ISO 800, soon after sunset (later to become a total lunar eclipse)
Is this going to go on all spring? Well, so be it – I can cope.
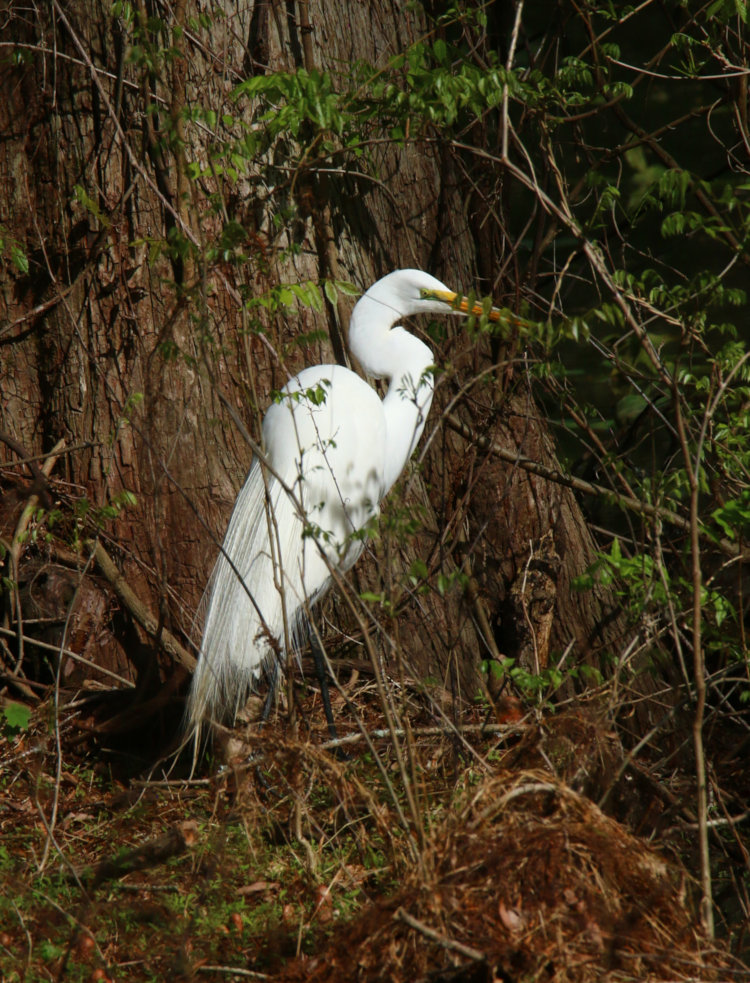
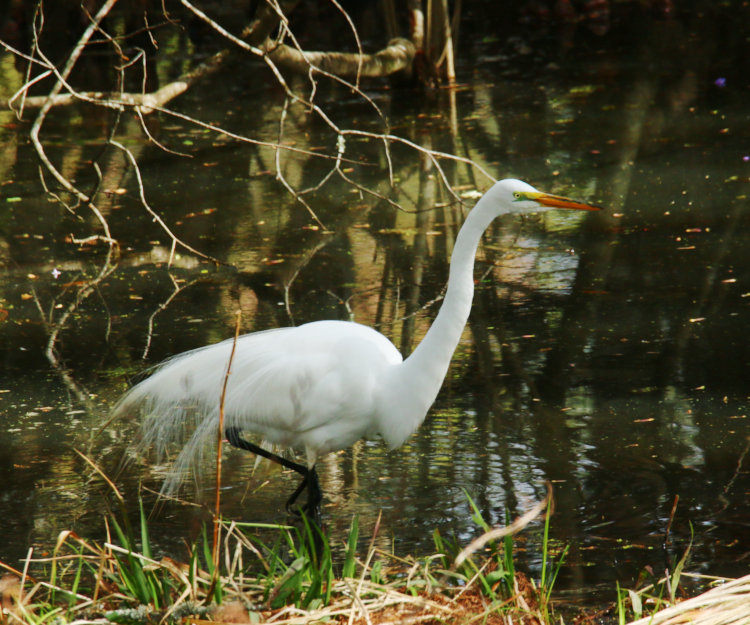
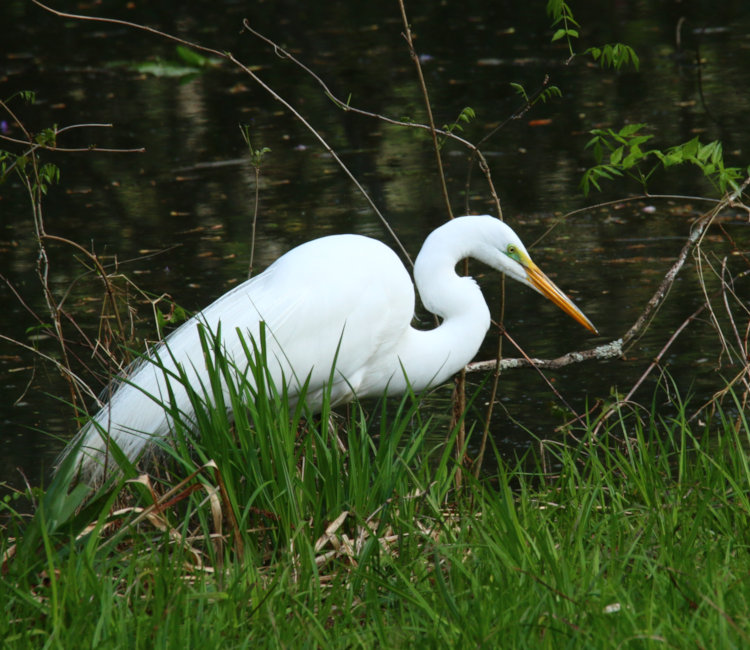
Glanced out the kitchen window while making lunch and saw a bold splash of white where there had been none before. The view of this particular spot on the edge of The Bay wasn’t good from that angle, nor from the back deck, so I slipped out front and went around the end of the garage, which was more than adequate.
This marks the first time we’ve seen a great egret (Ardea alba) on the property – hopefully not the last. This appearance isn’t too surprising, since the great blue herons come by semi-routinely to snack, and egrets like the same conditions. The herons at least rarely stay long, probably because the water cycle in the ponds doesn’t encourage bigger fish, so this is more of a snack stop to them, a quickie mart.
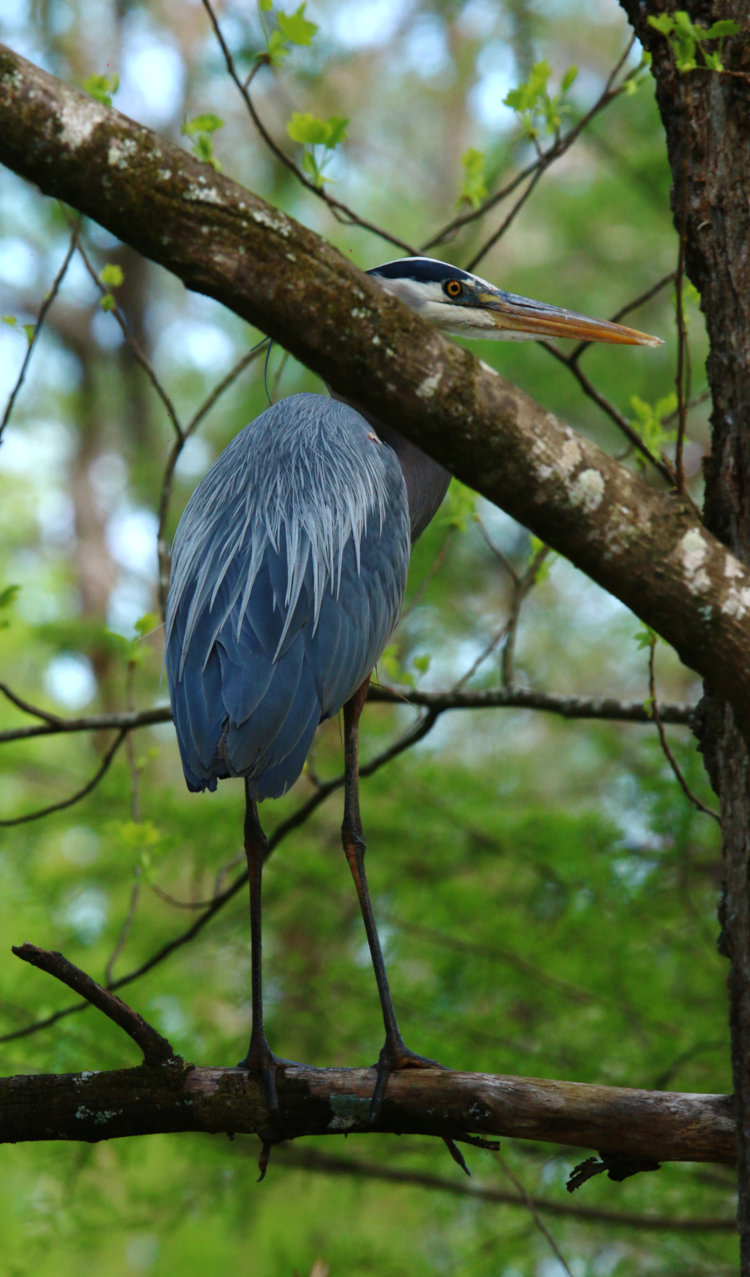
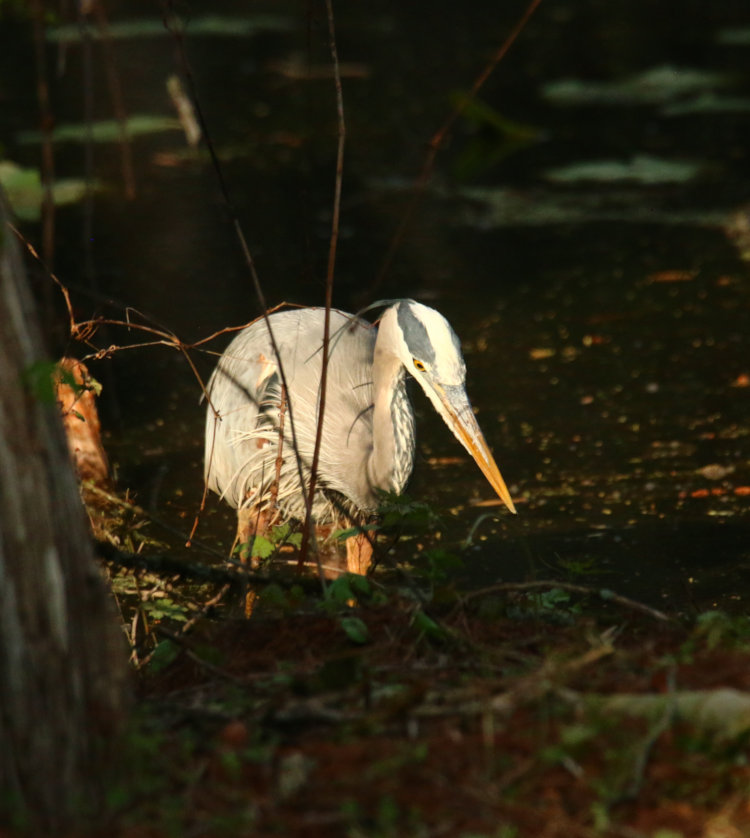
The egret was simply standing there enjoying the sun, so after several decent portraits, I let it be and returned indoors, but this didn’t last long. Catching movement right outside the back windows, I found a great blue heron (Ardea herodias) coming to roost in a tree right off the deck – it could only have been closer had it landed on the railing.
The back door was in direct line with these branches, blatantly obvious. I did a few frames through the glass of the storm door, but that has a tinting film on it; good for not spooking the ducks so we can watch them, and also for softening photos (not good, actually.) So after taking a few ‘safety’ frames through this, I eased the door open while the heron was looking away, and got the end of the lens out into the open for more frames, like this one. The heron realized it was being peeped upon, and shortly flew down to the upper edge of The Bay – notably, with a casual demeanor and not at all with the frantic honking manner that all other herons on the property have adopted when they realize I’m there. This one might actually be a little mellow. Or it might simply have been concentrating on the egret that it was trying to keep an eye on, and didn’t want to stir things up too much.
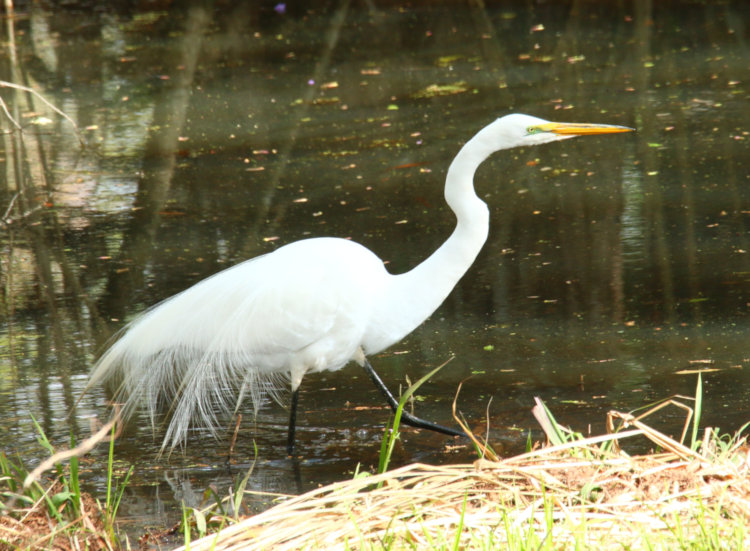
Meanwhile, the egret had now taken up hunting on the water’s edge. Back around the garage went I.
Now, the egret was passing in and out of the direct sunlight, as well as changing its background while it stalked, so I was attempting to manage the exposure compensation to avoid blowing out the white plumage while still getting the shots, and I missed a little too often. Brilliant white birds, man.
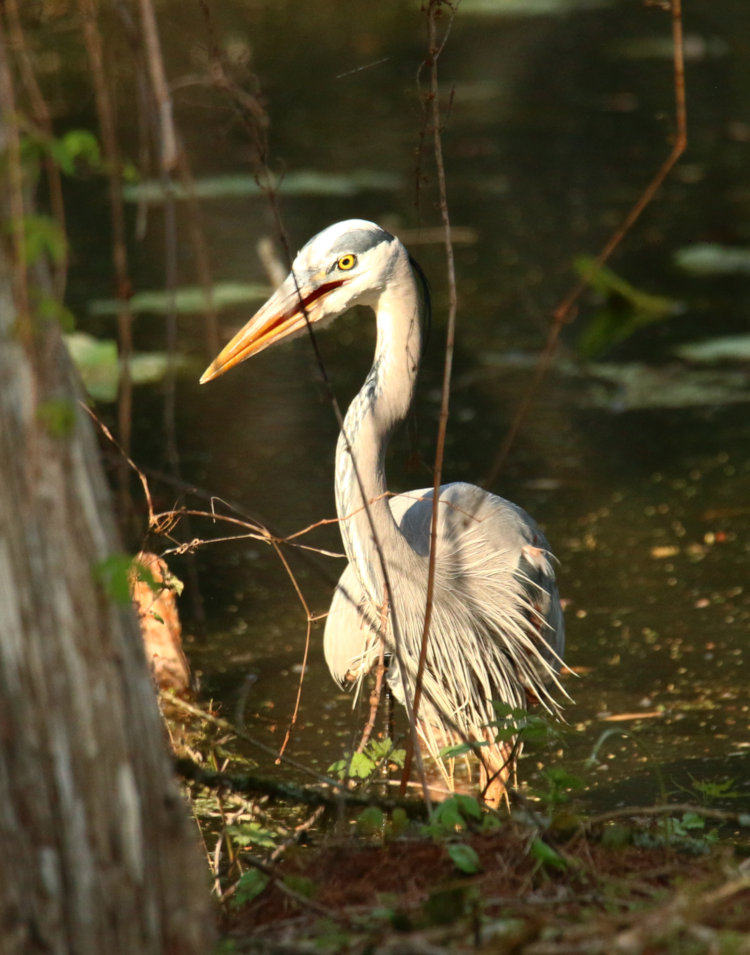
However, this frame might give an indication of why the heron was being circumspect. Or maybe not.
Those lovely willowy feathers off the back are breeding plumage, which I just found out are named, “aigrettes.” I initially thought only the males might have them – this is a typical pattern for many bird species – but no, both sexes have them in egrets. Like the great blues, it’s next to impossible to tell the sexes apart, but perhaps the heron knew a way, and decided not to dispute territory with a breeding male. Or perhaps it simply didn’t care, being a different breed, but they sure notice when another heron shows up on the property, and we always know it too, since there is much honking and chasing when that happens.
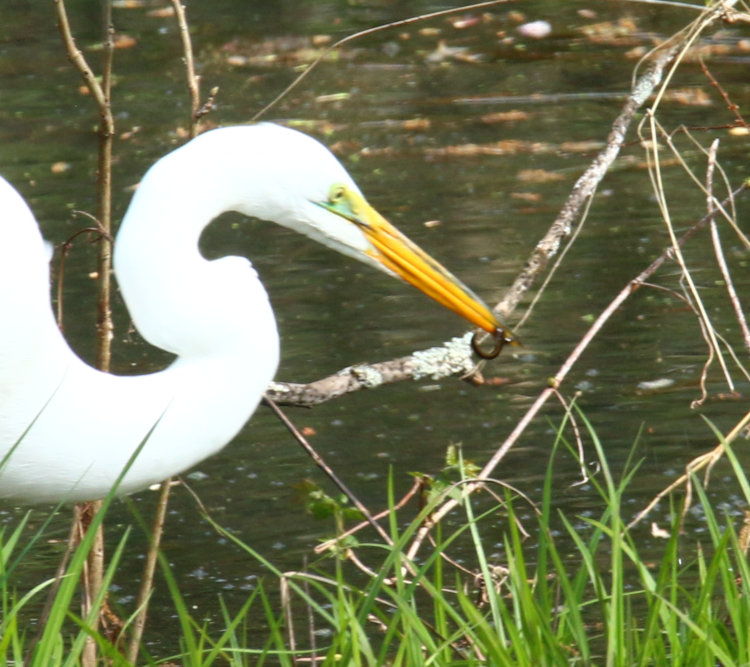
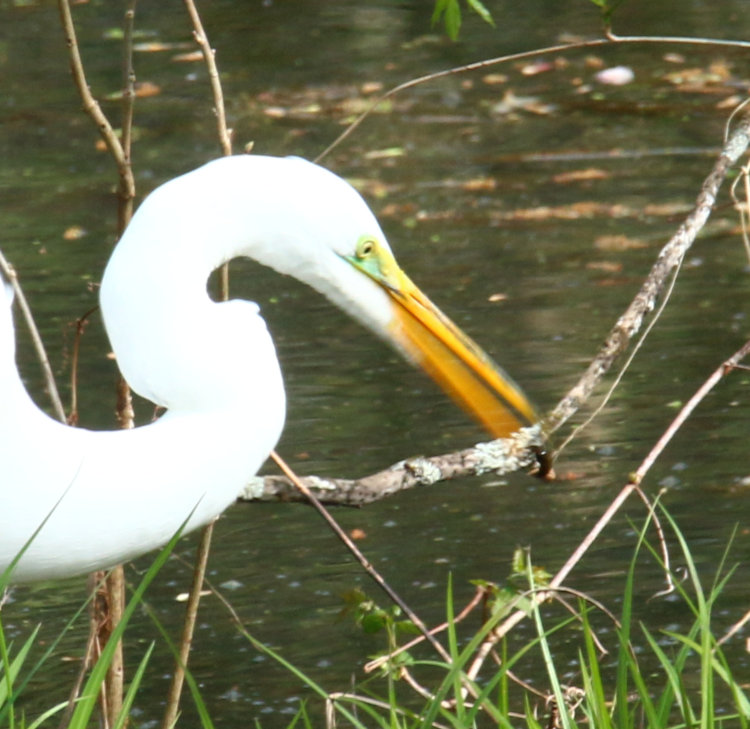
The egret did indeed locate something to eat, though I’m using this word loosely.
This is where the light conditions varied too much from my settings, and the plumage started bleaching out. But you’re not supposed to be looking at that – you’re supposed to be looking in the beak at that little wriggly thing that the egret had caught. Don’t be proud of that capture, my friend.
I guess habits die hard, since the egret insisting on juggling this morsel to get it down head first, even though this is barely a swallow. It’s like celery, hardly providing the calories to even get it down! To say nothing of the risk of actually losing it while doing such manipulations. Silly bird.
I got my exposure back on track soon afterward, for a couple of nice portrait frames though.
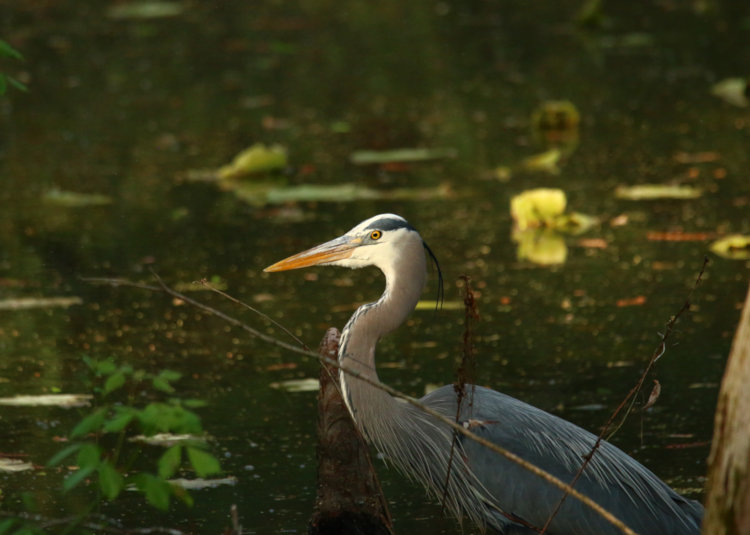
Now that I have those out of the way, I’ll use them to springboard to a few other frames that I obtained two days ago, and simply haven’t uploaded yet. A great blue heron, perhaps the same one, was at the other end of the backyard pond hunting, and I used its distraction to slip out the door to Walkabout Studios and snag some frames with a decently clear view.
Notice the difference in light color, as this was late afternoon and just before the sun stopped reaching the pond at all (which is still well before sunset, because trees and geography and all that.) The heron was taking stabs at things, but I never saw it come up with anything.
Yeah, I know: we could do without an awful lot of little fiddly branches and stuff getting in the way, and I’m working on that, though man, there are a lot. You can still see that herons have the ability to move their lower beak more independently, by that gap near the edge of the mouth while the tips are closed. Fascinating, huh?
And evidence of the light angle, as the heron moved a little further onto the other side of the tree and started getting into the shadows – within minutes, this light would be entirely gone. But while I was firing off frames, I caught an interesting trait during the sorting, and made an animated gif (pronounced, “jith”) from them.
The heron was only stepping forward here, but look carefully at not just the head, but the cypress knee behind and the weed in front. The head is remaining perfectly still while the heron steps forward, and then between steps it will dart the head forward slightly into a new position before doing this again, bobbing faintly like pigeons do, only much slower. Likely, this helps them spot the subtle movements of potential meals that might be stirred into action by their steps, but I never realized just how steady they could be. Lucky capture.
The heron, by this time, knew that I was leaning around the edge of the latticework flanking the steps back there, and didn’t flee madly either; maybe we finally have one that’s not ridiculously spooky. It would be nice, since to date all have flown off in a panic the moment I’ve become known, regardless of the distance. We’ll see what happens.


 Lightning trackers can be very handy to know when a storm is approaching and from where, but in my experience, their strike location plotting is wildly variable (and will rarely tell you when cloud-to-cloud bolts occur.) And getting those bolts that light up the clouds without even showing themselves can be very dynamic too, sometimes much richer than just a white streak against the sky.


_03.jpg)